Quantcast
Channel: TechBrij
Viewing all 116 articles
Browse latest View live

jQuery Popup on button click instead of link navigation

$
0
0


I see there are a lot of jQuery popups. Mostly work on link navigation means when you click on link then it will show popup. Suppose you want to show popup on button click then here is the simple trick to do this. I take fancybox jquery popup for example. This will call ajax.php. For this, I take a link,set display none and trigger it on button click.

    <script type="text/javascript">
         $(document).ready(function() {
             $("#btn").click(function() {
             $("#various2").attr('href', 'ajax.php?ID=' + $("#txt").val());
                 $("#various2").fancybox({
                     'width': '50px',
                     'height': '700',
                     'autoScale'   : false
                 }
                 );
                 $("#various2").trigger('click');  

             });
         });
     </script>  

    <body>
    <input type="text" id="txt" />
    <input type="button" id="btn" />   

    <a id="various2" style="display:none">Ajax</a>  

    </body>

and in ajax.php:

    <h2>This comes from ajax request and Your number is
    <?php echo $_GET['ID'] ?></h2>

Related posts:

  1. Add controls (textbox, radio, checkbox..) dynamically in jQuery way
  2. jQuery: Common Operations on Radio Button & Checkbox
  3. How to Add Digg Search Box Widget in your Website/Blog
  4. Clone html form elements with selected options using jQuery
  5. jqGrid: Drag and Drop columns (Reordering) with Javascript Array

Show ModalPopUp to Edit Asp.net Gridview Row Values Without using AjaxControlToolkit

$
0
0


This article explains how to add a pop-up control to a gridview in order to display drill-down (Master detail) information without using ajaxcontroltoolkit ModalPopup extender. let us take an example to display Northwind database’s customer table.

gridview popup

GridView Structure:

<asp:GridView ID="GridViewData" runat="server" AutoGenerateColumns="False" DataKeyNames="CustomerID"
            OnRowCommand="GridViewData_RowCommand">
            <Columns>
                <asp:BoundField DataField="CustomerID" HeaderText="Customer ID" />
                <asp:BoundField DataField="CompanyName" HeaderText="Company Name" />
                <asp:BoundField DataField="ContactName" HeaderText="Contact Name" />
                <asp:BoundField DataField="Address" HeaderText="Address" />
                <asp:BoundField DataField="City" HeaderText="City" />
                <asp:TemplateField HeaderText="" SortExpression="">
                    <ItemTemplate>
                        <asp:LinkButton ID="LinkButtonEdit" runat="server" CommandName="ShowPopup"
CommandArgument='<%#Eval("CustomerID") %>'>Edit</asp:LinkButton>
                    </ItemTemplate>
                </asp:TemplateField>
            </Columns>
        </asp:GridView>

Bind Data to GridView:

DataTable dt = new DataTable();
        SqlConnection con = new SqlConnection(ConfigurationManager.ConnectionStrings
["NorthwindConnectionString"].ToString());
        protected void Page_Load(object sender, EventArgs e)
        {
            if (!IsPostBack)
            {
                Bind();
            }
        }

        protected void Bind()
        {
            con.Open();
            SqlCommand cmd = new SqlCommand("SELECT [CustomerID], [CompanyName], [ContactName], [Address], [City] FROM [Customers] ", con);
            cmd.CommandType = CommandType.Text;
            SqlDataAdapter da = new SqlDataAdapter(cmd);
            da.Fill(dt);
            GridViewData.DataSource = dt;
            GridViewData.DataBind();
        }

Popup Structure:

 <style type="text/css">

        #mask
        {
            position: fixed;
            left: 0px;
            top: 0px;
            z-index: 4;
            opacity: 0.4;
            -ms-filter: "progid:DXImageTransform.Microsoft.Alpha(Opacity=40)"; /* first!*/
            filter: alpha(opacity=40); /* second!*/
            background-color: gray;
            display: none;
            width: 100%;
            height: 100%;
        }
    </style>
	<script src="Scripts/jquery-1.3.2.min.js" type="text/javascript"></script>
    <script type="text/javascript" language="javascript">
        function ShowPopup() {
            $('#mask').show();
            $('#<%=pnlpopup.ClientID %>').show();
        }
        function HidePopup() {
            $('#mask').hide();
            $('#<%=pnlpopup.ClientID %>').hide();
        }
        $(".btnClose").live('click',function () {
            HidePopup();
        });
    </script>
    <div id="mask">
    </div>
	  <asp:Panel ID="pnlpopup" runat="server"  BackColor="White" Height="175px"
            Width="300px" Style="z-index:111;background-color: White; position: absolute; left: 35%; top: 12%; 

border: outset 2px gray;padding:5px;display:none">
            <table width="100%" style="width: 100%; height: 100%;" cellpadding="0" cellspacing="5">
                <tr style="background-color: #0924BC">
                    <td colspan="2" style="color:White; font-weight: bold; font-size: 1.2em; padding:3px"
                        align="center">
                        Customer Details <a id="closebtn" style="color: white; float: right;text-decoration:none" class="btnClose"  href="#">X</a>
                    </td>
                </tr>
                <tr>
                    <td colspan="2" style="width: 45%; text-align: center;">
                        <asp:Label ID="LabelValidate" runat="server" />
                    </td>
                </tr>
                <tr>
                    <td align="right" style="width: 45%">
                        CustomerID:
                    </td>
                    <td>
                        <asp:Label ID="lblID" runat="server"></asp:Label>
                    </td>
                </tr>
                <tr>
                    <td align="right">
                        Contact Name:
                    </td>
                    <td>
                        <asp:Label ID="lblContactName" runat="server"></asp:Label>
                    </td>
                </tr>
                <tr>
                    <td align="right">
                        Address:
                    </td>
                    <td>
                        <asp:TextBox ID="txtAddress" runat="server" />
                    </td>
                </tr>
                <tr>
                    <td align="right">
                        City:
                    </td>
                    <td>
                        <asp:TextBox ID="txtCity" runat="server" />
                    </td>
                </tr>
                <tr>
                    <td>
                    </td>
                    <td>
                        <asp:Button ID="btnUpdate" CommandName="Update" runat="server" Text="Update" OnClick="btnUpdate_Click" />
                        <input type="button" class="btnClose" value="Cancel" />
                    </td>
                </tr>
            </table>
        </asp:Panel>

Here mask div is used as a layer to block page elements and pnlpopup will be displayed as popup.

Show & Edit data:

protected void GridViewData_RowCommand(object sender, GridViewCommandEventArgs e)
        {
            if (e.CommandName == "ShowPopup")
            {
                LinkButton btndetails = (LinkButton)e.CommandSource;
                GridViewRow gvrow = (GridViewRow)btndetails.NamingContainer;
                lblID.Text = GridViewData.DataKeys[gvrow.RowIndex].Value.ToString();
                // DataRow dr = dt.Select("CustomerID=" + GridViewData.DataKeys[gvrow.RowIndex].Value.ToString())[0];
                lblContactName.Text = HttpUtility.HtmlDecode(gvrow.Cells[2].Text);
                txtAddress.Text = HttpUtility.HtmlDecode(gvrow.Cells[3].Text);
                txtCity.Text = HttpUtility.HtmlDecode(gvrow.Cells[4].Text);
                Popup(true);
            }
        }

        protected void btnUpdate_Click(object sender, EventArgs e)
        {
            if (txtAddress.Text == "")
            {
                LabelValidate.Text = "Please enter the address.";
                LabelValidate.ForeColor = Color.Red;
            }
            else
            {
                con.Open();
                SqlCommand cmd = new SqlCommand("update Customers set Address=@Address,City=@City where CustomerID=@CustomerID", con);
                cmd.Parameters.AddWithValue("@Address", txtAddress.Text);
                cmd.Parameters.AddWithValue("@City", txtCity.Text);
                cmd.Parameters.AddWithValue("@CustomerID", lblID.Text);
                cmd.ExecuteNonQuery();
                con.Close();
                lblresult.Text = lblContactName.Text + " Details Updated Successfully";
                lblresult.ForeColor = Color.Green;
                Bind();
                Popup(false);
            }
        }
        //To show message after performing operations
        void Popup(bool isDisplay)
        {
            StringBuilder builder = new StringBuilder();
            if (isDisplay)
            {
                builder.Append("<script language=JavaScript> ShowPopup(); </script>\n");
                Page.ClientScript.RegisterStartupScript(this.GetType(), "ShowPopup", builder.ToString());
            }
            else
            {
                builder.Append("<script language=JavaScript> HidePopup(); </script>\n");
                Page.ClientScript.RegisterStartupScript(this.GetType(), "HidePopup", builder.ToString());
            }
        }

Hope, It helps.

Related posts:

  1. Bind array to specific column of asp.net gridview
  2. Adding Gridview nested in Repeater in ASP.NET 2.0
  3. Stylish ASP.NET Wizard Control with Horizontal Sidebar on Top
  4. Add Dynamic Buttons and Handle click event on server side in ASP.NET
  5. Online Ticket Booking System using ASP.NET

Seat Reservation with jQuery

$
0
0


In my Online Bus Reservation System project, I got queries from many people about how to implement seat selection screen effectively. So, I decided to write on it. This post explains how to implement seat booking with jQuery. It can be used in online Bus, flight, hotel, exam support, cinema and ticket booking system.

seat reservation jquery

HTML:

<h2> Choose seats by clicking the corresponding seat in the layout below:</h2>
    <div id="holder">
		<ul  id="place">
        </ul>
	</div>
	<div style="float:left;">
	<ul id="seatDescription">
		<li style="background:url('images/available_seat_img.gif') no-repeat scroll 0 0 transparent;">Available Seat</li>
		<li style="background:url('images/booked_seat_img.gif') no-repeat scroll 0 0 transparent;">Booked Seat</li>
		<li style="background:url('images/selected_seat_img.gif') no-repeat scroll 0 0 transparent;">Selected Seat</li>
	</ul>
	</div>
        <div style="clear:both;width:100%">
		<input type="button" id="btnShowNew" value="Show Selected Seats" />
		<input type="button" id="btnShow" value="Show All" />
        </div>

We will add seats in “#place” element using javascript.

Settings:

To make it generalize, settings object is used.

 var settings = {
                rows: 5,
                cols: 15,
                rowCssPrefix: 'row-',
                colCssPrefix: 'col-',
                seatWidth: 35,
                seatHeight: 35,
                seatCss: 'seat',
                selectedSeatCss: 'selectedSeat',
				selectingSeatCss: 'selectingSeat'
            };

rows: total number of rows of seats.
cols: total number of seats in each row.
rowCssPrefix: will be used to customize row layout using (rowCssPrefix + row number) css class.
colCssPrefix: will be used to customize column using (colCssPrefix + column number) css class.
seatWidth: width of seat.
seatHeight: height of seat.
seatCss: css class of seat.
selectedSeatCss: css class of already booked seats.
selectingSeatCss: css class of selected seats.

Seat Layout:

We will create basic layout of seats.

var init = function (reservedSeat) {
                var str = [], seatNo, className;
                for (i = 0; i < settings.rows; i++) {
                    for (j = 0; j < settings.cols; j++) {
                        seatNo = (i + j * settings.rows + 1);
                        className = settings.seatCss + ' ' + settings.rowCssPrefix + i.toString() + ' ' + settings.colCssPrefix + j.toString();
                        if ($.isArray(reservedSeat) && $.inArray(seatNo, reservedSeat) != -1) {
                            className += ' ' + settings.selectedSeatCss;
                        }
                        str.push('<li class="' + className + '"' +
                                  'style="top:' + (i * settings.seatHeight).toString() + 'px;left:' + (j * settings.seatWidth).toString() + 'px">' +
                                  '<a title="' + seatNo + '">' + seatNo + '</a>' +
                                  '</li>');
                    }
                }
                $('#place').html(str.join(''));
            };
			//case I: Show from starting
            //init();

            //Case II: If already booked
            var bookedSeats = [5, 10, 25];
            init(bookedSeats);

init method is used to draw seats layout. Already booked seats array will be passed as argument of this method.

Seat Selection:

$('.' + settings.seatCss).click(function () {
if ($(this).hasClass(settings.selectedSeatCss)){
	alert('This seat is already reserved');
}
else{
	$(this).toggleClass(settings.selectingSeatCss);
	}
});

$('#btnShow').click(function () {
	var str = [];
	$.each($('#place li.' + settings.selectedSeatCss + ' a, #place li.'+ settings.selectingSeatCss + ' a'), function (index, value) {
		str.push($(this).attr('title'));
	});
	alert(str.join(','));
})

$('#btnShowNew').click(function () {
	var str = [], item;
	$.each($('#place li.' + settings.selectingSeatCss + ' a'), function (index, value) {
		item = $(this).attr('title');
		str.push(item);
	});
	alert(str.join(','));
})

When user clicks on available seat, it is selected and second click on same seat will unselect seat. Button “Show All” will show all booked seat numbers and “Show Selected Seats” will show selected seats only.

CSS:

#holder{
height:200px;
width:550px;
background-color:#F5F5F5;
border:1px solid #A4A4A4;
margin-left:10px;
}
#place {
position:relative;
margin:7px;
}
#place a{
font-size:0.6em;
}
#place li
{
 list-style: none outside none;
 position: absolute;
}
#place li:hover
{
background-color:yellow;
}
#place .seat{
background:url("images/available_seat_img.gif") no-repeat scroll 0 0 transparent;
height:33px;
width:33px;
display:block;
}
#place .selectedSeat
{
background-image:url("images/booked_seat_img.gif");
}
#place .selectingSeat
{
background-image:url("images/selected_seat_img.gif");
}
#place .row-3, #place .row-4{
margin-top:10px;
}
#seatDescription li{
verticle-align:middle;
list-style: none outside none;
padding-left:35px;
height:35px;
float:left;
}

In my next post, you will get how to use this in asp.net project with sql server database .
If you have any query, put in below comment box.

Related posts:

  1. Online Ticket Booking System using ASP.NET
  2. Fixed Sidebar during Scrolling between Header & Footer using jQuery
  3. A Simple Rounded Corner Slide Tabbed Box (Content Slider) using jQuery
  4. jQuery: Common Operations on DropdownList (Combobox)
  5. Clone html form elements with selected options using jQuery

Online Ticket Booking System using ASP.NET

$
0
0


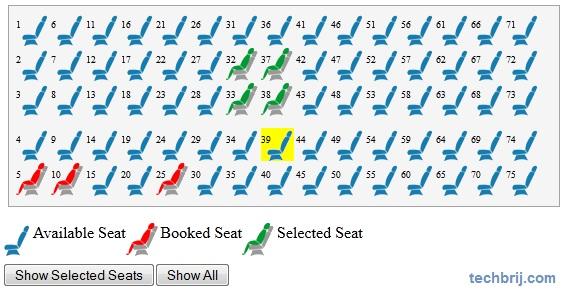
In my previous post, I explained how to implement seat reservation with jQuery. In this post, you will see how to use it in ASP.NET project to save and retrieve data from database. It can be used in online Bus, flight, hotel, exam support, cinema and ticket booking system.

modal popup

DB Structure:

DB structure

There are two tables:
BookingDetail Table: Seat owner information
SeatDetail Table: To save booked seats information. One user can select multiple seats, so separate table is used. There is no primary key in this table so you need to create insert stored proc. It will be mapped in EF.

CREATE PROCEDURE dbo.SP_SeatDetails_Insert
	(
	@BookingID int,
	@SeatID int
	)
AS
	insert into SeatDetails (BookingID,SeatID) values (@BookingID,@SeatID)

Setup Entity Data Model:

First Create database and stored proc as mentioned above.

Right click on Project > Add New Item > Select ADO.NET Entity Data Model >(name: Model.edmx) > Add
Select “Generate from database” > Next > Select Database >(save entity connection string…: StarBusEntities1)> Next
Select Both tables and Stored proc > (Model Namespace: StarBusModel) > Finish

You will get the above db structure – screen shot and get tables in edmx file.

Now Right click on SeatDetail > Stored Procedure Mapping

Expand “Select Insert Function” in ‘Mapping Details’ dialog and select “SP_SeatDetails_Insert” and map with same property name.

Now save it.

Display Booked Seat:

Add new page and use code from my previous article.
Before going code, It is assumed seat charge and tourid comes from different tables and available on server side.

Now, our first object is to retrieve data from database and show booked seat in the page.

 StarBusModel.StarBusEntities1 objEntities = new StarBusModel.StarBusEntities1();
 int tourID = 1;
 int chargePerSeat = 100;
    void BindSeats(){
        txtAmount.Text = chargePerSeat.ToString();
        string sel =  String.Join(",",(from b in objEntities.BookingDetails
                   join s in objEntities.SeatDetails on b.BookingID equals s.BookingID
                   where b.TourID == tourID
                   select s.SeatID).ToArray());
        ClientScript.RegisterStartupScript(this.GetType(), "Init", "init([" + sel + "]);",true);

    }

We have defined calling of init method from server side. Remove calling of init from client side and add following in init method to set charge per seat.

chargePerSeat = $('#<%=txtAmount.ClientID %>').val();

Save Selected Seat:

After selecting seats, when user clicks on button, A modal popup will be displayed with calculated price. User gives name, phone and click on save button, seat information will be saved in database.

To open pop-up:

 $('#btnShowNew').click(function () {
            var str = [];
            $.each($('#place li.' + settings.selectingSeatCss + ' a'), function (index, value) {
                str.push($(this).attr('title'));
            });
            if (str.length > 0) {
                $('#<%=txtAmount.ClientID %>').val(str.length * chargePerSeat);
                $('#<%=txtSeatNo.ClientID %>').val(str.join(','));
                ShowPopup();
            }
            else {
                alert('Select atleast one seat');
            }
        })

        function ShowPopup() {
            $('#mask').show();
            $('#<%=PanelPop.ClientID %>').show();
        }
        function HidePopup() {
            $('#mask').hide();
            $('#<%=PanelPop.ClientID %>').hide();
        }

HTML:

 <div id="mask">
</div>

<asp:Panel ID="PanelPop" runat="server" Style="display: none; cursor: pointer; width: 250px;
        z-index: 111; background-color: White; position: absolute; left: 35%; top: 12%;
        border: outset 2px gray; text-align: center; padding: 10px" class="popUp">
        <p>
            <asp:Label ID="Label1" runat="server" Text="Name" AssociatedControlID="txtName"></asp:Label>
            <asp:TextBox ID="txtName" runat="server"></asp:TextBox>
            <asp:RequiredFieldValidator ID="RequiredFieldValidator1" ControlToValidate="txtName" runat="server" Display="Dynamic"  ErrorMessage="Name is required.">*</asp:RequiredFieldValidator>
        </p>
        <p>
            <asp:Label ID="Label2" runat="server" Text="Phone" AssociatedControlID="txtPhone"></asp:Label>
            <asp:TextBox ID="txtPhone" runat="server"></asp:TextBox>
            <asp:RequiredFieldValidator ID="RequiredFieldValidator2" ControlToValidate="txtPhone" runat="server" Display="Dynamic"  ErrorMessage="Phone is required.">*</asp:RequiredFieldValidator>
        </p>
        <p>
            <asp:Label ID="Label3" runat="server" Text="Amount" AssociatedControlID="txtAmount"></asp:Label>
            <asp:TextBox ID="txtAmount" runat="server" ReadOnly="true" ></asp:TextBox>
            <asp:RequiredFieldValidator ID="RequiredFieldValidator3" runat="server" ControlToValidate="txtAmount" Display="Dynamic"  ErrorMessage="Amount is required.">*</asp:RequiredFieldValidator>
        </p>
        <p>
            <asp:Label ID="Label4" runat="server" Text="Seat" AssociatedControlID="txtSeatNo"></asp:Label>
            <asp:TextBox ID="txtSeatNo" runat="server" ReadOnly="true"></asp:TextBox>
        </p>
        <p>
            <asp:Button ID="btnSave" runat="server" Text="Save" OnClick="btnSave_Click" />
            <input type="button" id="btnCancel" value="Cancel" onclick ="HidePopup();" />
        </p>
    </asp:Panel>

CSS:

#mask
        {
            position: fixed;
            left: 0px;
            top: 0px;
            z-index: 4;
            opacity: 0.4;
            -ms-filter: "progid:DXImageTransform.Microsoft.Alpha(Opacity=40)"; /* first!*/
            filter: alpha(opacity=40); /* second!*/
            background-color: gray;
            display: none;
            width: 100%;
            height: 100%;
        }
.popUp label
        {
            width: 4em;
            float: left;
            text-align: right;
            margin-right: 0em;
            display: block;
        }

To save information:


 protected void btnSave_Click(object sender, EventArgs e)
    {
        StarBusModel.BookingDetail objBooking = new StarBusModel.BookingDetail();
        objBooking.TourID = tourID;
        objBooking.Name = txtName.Text;
        objBooking.Phone = txtPhone.Text;
        objBooking.Amount = Convert.ToDecimal(Request.Form[txtAmount.ClientID]);
        string[] seats = Request.Form[txtSeatNo.ClientID].Split(new char[] { ',' });
        for (int i = 0; i < seats.Length; i++)
            objBooking.SeatDetails.Add(new StarBusModel.SeatDetail() { SeatID = Convert.ToInt32(seats[i]) });
        objEntities.BookingDetails.AddObject(objBooking);
        objEntities.SaveChanges();
        BindSeats();
    }

Hope, It helps. If you have any query, put in below comment box.

Related posts:

  1. Client Side Validation using ASP.NET Validator Controls from Javascript
  2. Show ModalPopUp to Edit Asp.net Gridview Row Values Without using AjaxControlToolkit
  3. Bind array to specific column of asp.net gridview
  4. Retrieve value of Dynamic controls in asp.net
  5. Seat Reservation with jQuery

jQuery Date Range Picker To Select Year, Month Or Quarter Only

$
0
0


This article explains how to implement custom date range picker to select year, month or quarter only (Generally used in reporting) and get start date and end date of user selected value. We will use daterangepicker jQuery-Plugin by filamentgroup. I see jQueryUI DatePicker but it’s little bit complicate.

datepicker jQuery Date Range Picker To Select Year, Month Or Quarter Only

By default, Year mode is selected means user can select year. When user clicks on show button, It’ll display start and end date of current year. Similarly, It’ll display current Quarter’s start and end date, current Month’s start and end date in Quarter, Month mode respectively.

HTML:

 <div align="left" class="holder ui-accordion-content ui-helper-reset ui-widget-content ui-corner-bottom ui-accordion-content-active">
                <div class="mode" style="">
				Select Mode:
                    <ul class="classDateMode ui-state-default">
                        <li><a href="javascript:void(0);">Month</a></li>
                        <li><a href="javascript:void(0);">Quarter</a></li>
                        <li id="yearLink" class="selectedDateMode"><a href="javascript:void(0);">Year</a></li>
                    </ul>
                <div class="ui-datepicker-header ui-widget-header  ui-corner-all outputHolder">
                    <a title="Prev" id="datePrev" class="ui-daterangepicker-prev ui-corner-all" style="left:2px" href="javascript:void(0);">
                        <span class="ui-icon ui-icon-circle-triangle-w">Prev</span></a>
					<a title="Next" id="dateNext" style="right:2px"
                            class="ui-daterangepicker-next ui-corner-all" href="javascript:void(0);"><span class="ui-icon ui-icon-circle-triangle-e">
                                Next</span></a><div class="ui-datepicker-title">
                    <input type="text" id="dateFilter" readonly="readonly" style="font-size: 12px;background:transparent;font-weight:bold;border:0px;text-align: center;height: 14px;padding-top:2px " value="2011" class="date ui-rangepicker-input ui-widget-content" /></div>
                </div>
     <input class="ui-button ui-widget ui-state-default ui-corner-all ui-button-text-only show" id="Show" type="button" value="Show" />
</div>

Script:

 $(document).ready(function() {
	     //For DateSelection
    var dateSelection = {
        SelectionMode: 'Year',
        LeftNavControl: $('#datePrev'),
        RightNavControl: $('#dateNext'),
        LabelControl: $('#dateFilter'),
        StartDate: new Date(Date.now().getFullYear(), 0, 1),
        EndDate: new Date(Date.now().getFullYear(), 11, 31),
        SelectedYear: Date.now().getFullYear(),
        SelectedMonth: Date.now().getMonth(),
        SelectedQuarter: Math.floor(Date.now().getMonth() / 3),
        MonthNames: new Array("January", "February", "March", "April", "May", "June", "July", "August", "September", "October", "November", "December"),
        MonthAbbreviations: new Array("Jan", "Feb", "Mar", "Apr", "May", "Jun", "Jul", "Aug", "Sep", "Oct", "Nov", "Dec"),
        Quarters: new Array("Q1", "Q2", "Q3", "Q4"),
        LeftClick: function () {
            if (dateSelection.SelectionMode == 'Year') {
                dateSelection.SelectedYear -= 1;
            }
            if (dateSelection.SelectionMode == 'Month') {
                if (dateSelection.SelectedMonth == 0) {
                    dateSelection.SelectedMonth = 11;
                    dateSelection.SelectedYear -= 1;
                }
                else {
                    dateSelection.SelectedMonth -= 1;
                }
            }
            if (dateSelection.SelectionMode == 'Quarter') {
                if (dateSelection.SelectedQuarter == 0) {
                    dateSelection.SelectedQuarter = 3;
                    dateSelection.SelectedYear -= 1;
                }
                else {
                    dateSelection.SelectedQuarter -= 1;
                }
            }

            dateSelection.show();

        },
        RightClick: function () {
            if (dateSelection.SelectionMode == 'Year') {
                dateSelection.SelectedYear += 1;
            }
            if (dateSelection.SelectionMode == 'Month') {
                if (dateSelection.SelectedMonth == 11) {
                    dateSelection.SelectedMonth = 0;
                    dateSelection.SelectedYear += 1;
                }
                else {
                    dateSelection.SelectedMonth += 1;
                }
            }
            if (dateSelection.SelectionMode == 'Quarter') {
                if (dateSelection.SelectedQuarter == 3) {
                    dateSelection.SelectedQuarter = 0;
                    dateSelection.SelectedYear += 1;
                }
                else {
                    dateSelection.SelectedQuarter += 1;
                }
            }

            dateSelection.show();
        },
        init: function () {
            dateSelection.LeftNavControl.bind('click', dateSelection.LeftClick);
            dateSelection.RightNavControl.bind('click', dateSelection.RightClick);
        },

        show: function () {
            if (dateSelection.SelectionMode == 'Year') {
                dateSelection.LabelControl.val('Jan - Dec ' + dateSelection.SelectedYear);
            }
            if (dateSelection.SelectionMode == 'Month') {
                dateSelection.LabelControl.val(dateSelection.MonthNames[dateSelection.SelectedMonth] + ' ' + dateSelection.SelectedYear);
            }
            if (dateSelection.SelectionMode == 'Quarter') {
                dateSelection.LabelControl.val(dateSelection.Quarters[dateSelection.SelectedQuarter] + ' ' + dateSelection.SelectedYear);
            }
            //alert(dateSelection.getStartDate());
            //alert(dateSelection.getEndDate());
        },
        getStartDate: function () {
            if (dateSelection.SelectionMode == 'Year') {
                dateSelection.StartDate.setFullYear(dateSelection.SelectedYear);
                dateSelection.StartDate.setMonth(0,1);
                dateSelection.StartDate.setDate(1);
            }
            if (dateSelection.SelectionMode == 'Month') {
                dateSelection.StartDate.setFullYear(dateSelection.SelectedYear);
                dateSelection.StartDate.setMonth(dateSelection.SelectedMonth,1);
                dateSelection.StartDate.setDate(1);
            }
            if (dateSelection.SelectionMode == 'Quarter') {
                dateSelection.StartDate.setFullYear(dateSelection.SelectedYear);
                dateSelection.StartDate.setDate(1);
                dateSelection.StartDate.setMonth(dateSelection.SelectedQuarter * 3);
            }
            return dateSelection.StartDate;
        },
        getEndDate: function () {
            if (dateSelection.SelectionMode == 'Year') {
                dateSelection.EndDate.setFullYear(dateSelection.SelectedYear);
                dateSelection.EndDate.setMonth(11);
                dateSelection.EndDate.setDate(dateSelection.EndDate.getDaysInMonth());
            }
            if (dateSelection.SelectionMode == 'Month') {
                dateSelection.EndDate.setFullYear(dateSelection.SelectedYear);
                dateSelection.EndDate.setMonth(dateSelection.SelectedMonth,1);
                dateSelection.EndDate.setDate(dateSelection.EndDate.getDaysInMonth());
            }
            if (dateSelection.SelectionMode == 'Quarter') {
                dateSelection.EndDate.setFullYear(dateSelection.SelectedYear);
                dateSelection.EndDate.setMonth(dateSelection.SelectedQuarter * 3 + 2,1);
                dateSelection.EndDate.setDate(dateSelection.EndDate.getDaysInMonth());
            }
            return dateSelection.EndDate;
        }
    };

    dateSelection.init();
    dateSelection.show(); 

	$('.classDateMode li a').click(function () {
        dateSelection.SelectionMode = $(this).text();
        dateSelection.show();
        $('.classDateMode li').removeClass('selectedDateMode');
        $(this).parent().addClass('selectedDateMode');
    });
	$('#Show').click(function () {
	alert('Start Date: ' + dateSelection.getStartDate() + '\nEnd Date:' + dateSelection.getEndDate());
	});
});
 

You have to define your LeftNavControl, RightNavControl and LabelControl if you use different HTML structure and get start and end date using getStartDate() and getEndDate() methods respectively.

Hope, you enjoy it. Share your opinion or query in comment box.

Related posts:

  1. Convert TimeSpan to year, month, date (Age Calculation) in .NET
  2. jQuery: Common Operations on Radio Button & Checkbox
  3. Javascript Backreferences: String Replace with $1, $2…
  4. Fixed Sidebar during Scrolling between Header & Footer using jQuery
  5. Seat Reservation with jQuery

Fix Google Adsense Blank Ads Issue

$
0
0


A few months ago, I faced this problem and figured it out. I would like to share my experience so it might help you. See following steps to figure this issue.

1. Make sure you are strictly following Google adsense program policies and didn’t get any mail about blocking from adsense.

2. Make sure you don’t have adblock installed or no block for adsense in server firewall/ security suit.

3. First test in another browser(chrome/firefox/IE) and see whether it’s working. It would be better if you could test on another PC.

4. Check adsense sandbox for your site and see whether it shows ads.

5. If you have not received first payment and earnings have reached $10, Google sends PIN number for verification process. Make sure, you have verified PIN number. If no, wait for PIN or request it again from your adsense account.

6. If you are using wordpress/Joomla..etc CMS. It might be due to configuration. So create a test HTML page and put adsense code, upload it independent from CMS and see whether it works.

7. Your privacy policy must be adsense compliant.

8. Use Adsense Troubleshooter

Blank ads only on few pages:

If ads aren’t showing on specific pages, there is a problem with that individual page. The most common reasons for ads not showing are a lack of text (don’t count images and videos) or the use of stop words (all the common swear words plus others they have decided aren’t family safe).

It’s also possible that there are no advertisers for the keywords in your page’s content. Either you get them PSAs (Public Service Ads) or a blank ad block. To remedy this, you could use alternative ads in place of the blank spots. See here for specifying alternate ads.

Hope, It helps. Share your opinion to fix this issue.

Related posts:

  1. Google Adsense Tips: My Adsense Placement Experiments
  2. TechBrij Got Google SiteLinks on Search Results
  3. Site Traffic Increases After Google Panda Update
  4. How To See Subdomain Tracking Report In Google Analytics
  5. Configure ‘Google Analytics for WordPress’ plugin for Subdomain tracking

jQuery .attr() vs .prop()

$
0
0


jQuery 1.6 introduces .prop() function and separates DOM Attributes and Properties, it raised a lot of questions about the difference between .attr and .prop functions. Before going jQuery, let us understand DOM Attributes and Properties. See following line

<input id="demo" type="text" value="TechBrij" />

Now, I changed text ‘TechBrij‘ to ‘jQuery‘ in textbox and see FireBug DOM Tab(select Show DOM Properties option in DOM tab dropdown)


firebug-dom-properties-attributes

You see Property “value” is ‘jQuery‘, but Attribute “value” is still ‘TechBrij‘. Now you have got idea what it means. Only element’s property is changed, because it is in the DOM and dynamic. But element’s attribute is in HTML text and can not be changed. In wide sense, the property always represents the current state while the attribute (except in old versions of IE) represents the initial state or is meant for html attributes as they are strictly defined. the attribute tells you nothing about the current state.

In jQuery 1.6+, .prop() is used for property and .attr() for attribute. After changing text, when you run

$("#demo").attr("value");   // returns TechBrij
$("#demo").prop("value");   // returns jQuery

Points to Remember:

1. selectedIndex, tagName, nodeName, nodeType, ownerDocument, defaultChecked, and defaultSelected..etc should be retrieved and set with the .prop() method. These do not have corresponding attributes and are only properties.

2. for a checkbox (jquery 1.6+)

<input id="check1" checked="checked" type="checkbox" />

.attr('checked') //returns  checked
.prop('checked') //returns  true
.is(':checked') //returns true

prop method returns Boolean value for checked, selected, disabled, readOnly..etc while attr returns defined string. So, you can directly use .prop(‘checked’) in if condition.

3. .attr() calls .prop() internally so .attr() method will be slightly slower than accessing them directly through .prop().

Conclusion:

For jQuery 1.6+, prop will be mostly used because it is simple and wider than attr. In most old projects, attr is used to get current state information of element. But now prop has taken this job and attr would be replaced with prop.

Hope, It helps. Share your opinion in comment box.

Related posts:

  1. jQuery: Common Operations on Radio Button & Checkbox
  2. Add controls (textbox, radio, checkbox..) dynamically in jQuery way
  3. Tools for jQuery Development
  4. jQuery: Common Operations on DropdownList (Combobox)
  5. IxEDIT: No coding for Javascript/jQuery

Stylish ASP.NET Wizard Control with Horizontal Sidebar on Top

$
0
0


Our objective is to customize asp.net wizard control sidebar as stylish horizontal step navigation on top without any image. First, we will disable existing side bar and use header template to create own sidebar. See following screen-shot which we are going to implement:

wizard steps asp.net sidebar

Wizard Structure:

To disable existing sidebar, set DisplaySideBar=”false”. See following wizard structure, there are 5 steps for sample and Repeater is used in header template.

 <asp:Wizard ID="Wizard1" runat="server" DisplaySideBar="false">
            <WizardSteps>
                <asp:WizardStep ID="WizardStep1" runat="server" Title="Step 1">
                 <div class="content">This is Step 1</div>
                </asp:WizardStep>
                <asp:WizardStep ID="WizardStep2" runat="server" Title="Step 2">
                    <div class="content">This is Step 2</div>
                </asp:WizardStep>
                <asp:WizardStep ID="WizardStep3" runat="server" Title="Step 3">
                   <div class="content">This is Step 3</div>
                </asp:WizardStep>
                <asp:WizardStep ID="WizardStep4" runat="server" Title="Step 4">
                    <div class="content">This is Step 4</div>
                </asp:WizardStep>
            <asp:WizardStep ID="WizardStep5" runat="server" Title="Step 5">
                    <div class="content">This is Step 5</div>
                </asp:WizardStep>
           </WizardSteps>
            <HeaderTemplate>
                <ul id="wizHeader">
                    <asp:Repeater ID="SideBarList" runat="server">
                        <ItemTemplate>
                            <li><a class="<%# GetClassForWizardStep(Container.DataItem) %>" title="<%#Eval("Name")%>">
                                <%# Eval("Name")%></a> </li>
                        </ItemTemplate>
                    </asp:Repeater>
                </ul>
            </HeaderTemplate>
        </asp:Wizard>

See following server side code to bind repeater and assign class name:

	protected void Page_Load(object sender, EventArgs e)
    {
        Wizard1.PreRender += new EventHandler(Wizard1_PreRender);
    }
    protected void Wizard1_PreRender(object sender, EventArgs e)
    {
        Repeater SideBarList = Wizard1.FindControl("HeaderContainer").FindControl("SideBarList") as Repeater;
        SideBarList.DataSource = Wizard1.WizardSteps;
        SideBarList.DataBind();

    }

    protected string GetClassForWizardStep(object wizardStep)
    {
        WizardStep step = wizardStep as WizardStep;

        if (step == null)
        {
            return "";
        }
        int stepIndex = Wizard1.WizardSteps.IndexOf(step);

        if (stepIndex < Wizard1.ActiveStepIndex)
        {
            return "prevStep";
        }
        else if (stepIndex > Wizard1.ActiveStepIndex)
        {
            return "nextStep";
        }
        else
        {
            return "currentStep";
        }
    }

CSS:

There are 3 classes used for previous steps(prevStep), current step(currentStep) and next steps(nextStep).

		#wizHeader li .prevStep
        {
            background-color: #669966;
        }
        #wizHeader li .prevStep:after
        {
            border-left-color:#669966 !important;
        }
        #wizHeader li .currentStep
        {
            background-color: #C36615;
        }
        #wizHeader li .currentStep:after
        {
            border-left-color: #C36615 !important;
        }
        #wizHeader li .nextStep
        {
            background-color:#C2C2C2;
        }
        #wizHeader li .nextStep:after
        {
            border-left-color:#C2C2C2 !important;
        }
        #wizHeader
        {
            list-style: none;
            overflow: hidden;
            font: 18px Helvetica, Arial, Sans-Serif;
            margin: 0px;
            padding: 0px;
        }
        #wizHeader li
        {
            float: left;
        }
        #wizHeader li a
        {
            color: white;
            text-decoration: none;
            padding: 10px 0 10px 55px;
            background: brown; /* fallback color */
            background: hsla(34,85%,35%,1);
            position: relative;
            display: block;
            float: left;
        }
        #wizHeader li a:after
        {
            content: " ";
            display: block;
            width: 0;
            height: 0;
            border-top: 50px solid transparent; /* Go big on the size, and let overflow hide */
            border-bottom: 50px solid transparent;
            border-left: 30px solid hsla(34,85%,35%,1);
            position: absolute;
            top: 50%;
            margin-top: -50px;
            left: 100%;
            z-index: 2;
        }
        #wizHeader li a:before
        {
            content: " ";
            display: block;
            width: 0;
            height: 0;
            border-top: 50px solid transparent;
            border-bottom: 50px solid transparent;
            border-left: 30px solid white;
            position: absolute;
            top: 50%;
            margin-top: -50px;
            margin-left: 1px;
            left: 100%;
            z-index: 1;
        }
        #wizHeader li:first-child a
        {
            padding-left: 10px;
        }
        #wizHeader li:last-child
        {
            padding-right: 50px;
        }
        #wizHeader li a:hover
        {
            background: #FE9400;
        }
        #wizHeader li a:hover:after
        {
            border-left-color: #FE9400 !important;
        }
        .content
        {
            height:150px;
            padding-top:75px;
            text-align:center;
            background-color:#F9F9F9;
            font-size:48px;
        }

Note:
For browsers that don’t support :after/:before/ nth-child, the code will not work.

Fun with CSS:

1. Increase margin-left in “#wizHeader li a:before” to increase width of arrow.

2. Add Padding:20px in “#wizHeader li” css you will get following layout

wizard steps css

3. Set margin-left: 35px; in “#wizHeader li a” to get above layout.

Thanks this post, fiddle and CSS Triangle Breadcrumbs. Share your opinion or queries in comment box.

Enjoy Programming!!!

Related posts:

  1. Fixed Sidebar during Scrolling between Header & Footer using jQuery
  2. Show ModalPopUp to Edit Asp.net Gridview Row Values Without using AjaxControlToolkit
  3. Adding Gridview nested in Repeater in ASP.NET 2.0
  4. Online Ticket Booking System using ASP.NET
  5. Bind array to specific column of asp.net gridview

How to Add Your Facebook Page To Your Profile

$
0
0


It’s not about copy and paste Facebook page link into profile options. I see some Facebook profiles having their page list in left side bar. So, I decided to add my TechBrij page to my profile in left side bar. If you are a Facebook page owner and want to show or hide your Facebook page link with your profile, See following steps:

facebbok-page-add

1. First open your Facebook page and click on right side “Edit Page” button.
2. Select “Featured” option from left side bar.
3. Select “Add Featured Page Owners” button.
4. Select your name as a featured owner and click on Save button.(If you don’t want to show, deselect your name)
5. Now your profile photo will be displayed in Page Owners option.
6. Open your home page or profile page, you will get the page listed in left sidebar as in below image.

Facebook page add

Facebook has over 500 million users that access their accounts almost on a daily basis. It’s helpful to get more traffic on your page and website. Share your opinion in below comment box.

Related posts:

  1. 5 things I learned from Facebook design
  2. Add widget to page instead of sidebar in wordpress
  3. Display Flickr based User Profile Photo using PhpFlickr
  4. How to Add Digg Search Box Widget in your Website/Blog
  5. 3 New Tips to Increase Your Alexa Rank

Quick View of ASP.NET UpdatePanel Control

$
0
0


UpdatePanel control is used to perform partial-page update means you can refresh selected parts of the page instead of refreshing the whole page with a postback. In this post, you will get UpdatePanel behavior in different cases without reading more paragraphs or code…:). Let’s consider each button will update text of all labels. Now see following diagram, Check sign(✔) indicates the label’s modification is displayed and Cross sign(x) indicates no display of changes.

updatepanel ajax control

Share your opinion in comment box.

Related posts:

  1. Quick View of ASP.NET MVC 3 Razor View Engine
  2. Show ModalPopUp to Edit Asp.net Gridview Row Values Without using AjaxControlToolkit
  3. Online Ticket Booking System using ASP.NET
  4. Client Side Validation using ASP.NET Validator Controls from Javascript
  5. Add Dynamic Buttons and Handle click event on server side in ASP.NET

Display Flickr based User Profile Photo using PhpFlickr

$
0
0


In your web app, If you don’t want to store images on your hosting to save space and bandwidth, Flickr is the best option for you. Flickr is the most popular online photo management and sharing app. phpFlickr is an open source wrapper class of Flickr’s API to upload and retrieve pictures and related information. This post explains how to display user photo in profile page when user logs in.

Upload Photo:

First, you need to configure phpFlickr library and save user uploaded photo in Flickr. You can follow step by step guide to create a public photo uploader using flickr. The tricky part is to get Token.

See following main part of code to upload photo in Flickr:

   $f = new phpFlickr($apiKey, $apiSecret, true);
    $f->setToken($token);
    $photoID = $f->sync_upload($newpath, $title);

There are two ways of uploading, synchronous and asynchronous. We’ll use sync_upload because it gives photoID which is to be saved in database with profile information. It is the unique ID to identify photo and will be used during displaying.

Display Photo:

The photoID is retrieved with profile information from database when user logs in. We can get link of photo(photoURL) easily from photoID, see following code:

$f = new phpFlickr($apiKey, $apiSecret, false);
$photo = $f->photos_getInfo($photoID,$secret = NULL );
$photoUrl = $f->buildPhotoURL($photo['photo'], "medium");

Now, you can display photo from photoURL.

<img width="150px" src="<?php echo $photoUrl ?>" />

Resources:

If you want to see phpFlickr in more detail, See following good resources:

how to create a public photo uploader using flickr

How to Create a Photo Gallery using the Flickr API

phpFlickr README

Hope, It’s useful. Share your opinion or query in comment box.

Related posts:

  1. How to Add Your Facebook Page To Your Profile
  2. Social media APIs and libraries for .NET developers
  3. Custom role provider based sitemap navigation in asp.net
  4. How to set or test connection string
  5. Windows Form Localization in .NET

FEDe: A Search engine for Front-End (HTML, CSS, Javascript & jQuery) Web developers

$
0
0


Generally, A Web developer or designer want to search in his/her favorite sites first, but too complex to search in individual site one by one. Being a Front-End developer, I decided to create a search engine based on top sites, forums and blogs for HTML, CSS, Javascript and jQuery. After NetBrij(A Search engine for .NET developers), BrijPad(An online text editor for fast development), The next is FEDe (free from ‘Brij’ keyword icon smile FEDe: A Search engine for Front End (HTML, CSS, Javascript & jQuery) Web developers ). It’s a search engine for Front-End (HTML, CSS, Javascript & jQuery) Web developers based on Google CSE.

Features:

Similar to NetBrij, It has different tabs.

fede techbrij search engine FEDe: A Search engine for Front End (HTML, CSS, Javascript & jQuery) Web developers

Smashing: Smashing Magazine is the best online magazine for professional Web designers and developers and smashing network contribute a wide range of high-quality content to the Web design community. There are approx 50 sites in network for both web design and development. I tested one by one and added sites related to front-end development in this tab.

Stackoverflow: It’s the best questions and answers site for web developers and one of my favourite site. It has solution of all known problems and experts are ready for the new problems. This tab has all stackoverflow related thread of your search query.

Beginner: It has sites like w3schools, java2s, sitepoint..etc for the beginner.

Others: FEDe has HTML, CSS and ‘js jQuery‘ tabs for HTML, CSS and javascript respectively.

Adding FEDe to your Browser:

If you are using FF2+ or IE7+, you can add FEDe in your Browser’s search engine list. First open FEDe in your browser.

For Firefox, expand search provider list and click Add “FEDe”.

add fede browser firefox FEDe: A Search engine for Front End (HTML, CSS, Javascript & jQuery) Web developers

For IE, expand search provider list, click on Add Search Providers > FEDe then confirmation dialog will appear. Click on Add button.

add fede browser IE FEDe: A Search engine for Front End (HTML, CSS, Javascript & jQuery) Web developers

Now, you can search from browser directly.

Hope, It’ll be productive and save bunch of time. Feel free to give your opinion or suggestion to improve the search engine in comment box.

Related posts:

  1. NetBrij – A search engine for .NET developers
  2. IxEDIT: No coding for Javascript/jQuery
  3. Simple Tabs with CSS & jQuery
  4. 25 Free Online Tools for Web Design and Development
  5. Top 22 Firefox Add-ons for Web Designers & Developers

Add Facebook Like Button in Your Google Custom Search Results

$
0
0


If you are using Google custom search engine for your website and want to add Facebook like button in every search result. See following steps to implement this. Assuming you are familiar with basic HTML ,CSS and Javascript.

google search facebook like Add Facebook Like Button in Your Google Custom Search Results

1. Add jQuery in your page (if not added) in HTML head tag.

<script type="text/javascript" src="//ajax.googleapis.com/ajax/libs/jquery/1.7.1/jquery.min.js"></script>

2. Add XFBML (if not added) in HTML head tag.

 <script src="http://connect.facebook.net/en_US/all.js#xfbml=1"></script>

3. login to Google CSE and get code of your custom search engine.

In your code you will see customSearchControl object.

   var customSearchControl = new google.search.CustomSearchControl(...);

Add following code after this:

customSearchControl.setSearchCompleteCallback(this, showMyCustomHTML);

4. Add following script in your page

<script type="text/javascript">
var showMyCustomHTML =function (sc, searcher){
$.each($(".gs-webResult"),function(i,val){
var url = $(this).find("a.gs-title").prop('href');
$(this).find('.fblike').remove();
AddFacebookLike(url,$(this));
});
if (typeof FB !== 'undefined') {
    FB.XFBML.parse();
}
}
 function AddFacebookLike(url,ctrl){
 ctrl.append('<div class="fblike"><fb:like href="' + url + '" layout="button_count" show_faces="false" width="65" action="like" font="segoe ui" colorscheme="light" /></div>');
}
</script>

Similarly, you can add twitter, Google+, linkedin buttons also.
Hope, you enjoy this. Thanks @labnol.

Related posts:

  1. How to Add Digg Search Box Widget in your Website/Blog
  2. Search Results
  3. Add controls (textbox, radio, checkbox..) dynamically in jQuery way
  4. jQuery Popup on button click instead of link navigation
  5. TechBrij Got Google SiteLinks on Search Results

Sequence contains no elements : LINQ error

$
0
0


If you are using LINQ or Lambda expression and getting error: InvalidOperationException “Sequence contains no elements”. It means you are trying to retrieve an element from an empty sequence(may be returned by LINQ query). There are some basic rules to handle this in LINQ or lambda expression.

1. If you are using Single in LINQ, change your habit to use SingleOrDefault.
2. If you are using First or Last in LINQ, use FirstOrDefault or LastOrDefault.
3. If you are using ElementAt, use ElementAtOrDefault.
4. If you are getting this error on Aggregate Functions like Average, Sum…etc.

To understand this, let us take an example. See following code.

var items = new int[] {1, 2, 3, 4, 5};
Double avg = items.Average();

You will get avg = 3.0

Now, On adding where condition as in following, you will get error InvalidOperationException “Sequence contains no elements”.

Double avg = items.Where(x=>x > 10).Average();

because there is no item greater than 10. So what is the solution? Do you need to add one if condition every time to check whether items are available or not?
You need not to change code too much, Just use DefaultIfEmpty function before Aggregate Function.

 Double avg = items.Where(x=>x > 10).DefaultIfEmpty().Average();

Now, avg = 0.0

Hope, It helps.

Related posts:

  1. An error occurred accessing a data source : Browser enabled infopath Error in MOSS 2007
  2. Bind array to specific column of asp.net gridview
  3. Concurrency violation: the UpdateCommand affected 0 of the expected 1 records
  4. Error establishing a database connection – WordPress
  5. Client Side Validation using ASP.NET Validator Controls from Javascript

Displaying Total in ASP.NET Gridview Footer Row Without using Template Field

$
0
0


There are tons of articles to display total in asp.net gridview footer row. The common approach to implement this is:
1. Create template field of the column which is to be totalled.
2. Define FooterTemplate and add Label control.
3. Take a variable and add value of each row in GridView1_RowDataBound event.
4. Find label control in footer and assign the variable.
It’s too complex. Let’s see how to take advantage of LINQ or Lambda expression and skip these steps.
gridview%20footer%20row%20total Displaying Total in ASP.NET Gridview Footer Row Without using Template Field
See following code

  <asp:GridView ID="GridView1" runat="server" AutoGenerateColumns="False" ShowFooter="true">
        <Columns>
            <asp:BoundField DataField="Class" HeaderText="Class" FooterText="Total" />
            <asp:BoundField DataField="Students" HeaderText="Students" />
        </Columns>
    </asp:GridView>

The above grid displays total number of students of the class. Now, we have to show total number of students of all classes in footer row.

	protected void Page_Load(object sender, EventArgs e)
    {
        BindGrid();
    }

    void BindGrid(){
        DataTable dt = GetTotalStudents();
        GridView1.Columns[1].FooterText =  dt.AsEnumerable().Select(x => x.Field<int>("Students")).Sum().ToString();
        GridView1.DataSource = dt;
        GridView1.DataBind();
    }

It’s so simple !!! One line of code has done the task. No need to take template field and add row value in RowDataBound event.

In other way(using LINQ):

 GridView1.Columns[1].FooterText = (from row in dt.AsEnumerable()
                                    select row.Field<int>("Students")).Sum().ToString();

Hope, It helps.

Related posts:

  1. Bind array to specific column of asp.net gridview
  2. Show ModalPopUp to Edit Asp.net Gridview Row Values Without using AjaxControlToolkit
  3. Adding Gridview nested in Repeater in ASP.NET 2.0
  4. Retrieve value of Dynamic controls in asp.net
  5. Create Dynamic DropDownLists in asp.net

Google Adsense: Leaderboard (728 x 90) vs Link Units as Navigation Menu

$
0
0


In my recent post, I shared my Google Adsense placement experiments. I have updated my theme several times to make it more user friendly and focusing on content and to experiment Adsense placement. Ads shouldn’t irritate the user, so I decided to keep one of Ad Units (Either Leaderboard or Link Unit) in header. I used Link unit as navigation menu with theme colour combination and supposed to have Good CTR and LeaderBoard unit just below the menu as in following image.

google%20adsense%20link%20unit%20vs%20leaderboard Google Adsense: Leaderboard (728 x 90) vs Link Units as Navigation Menu


I analyzed performance reports and concluded following results:
1. If Both are used then LeaderBoard has slightly better CTR than link unit but overall earning is mixed.
2. If only Link Unit is used, it doesn’t have good CTR as supposed to happen and Low CPC means overall earning is down.
3. If only LeaderBoard is used, It has good CTR and sometimes giving more earning than 336×280 ads-unit. I see overall earning from this unit is progressively increasing.

So, I removed Link Unit as navigation menu because so much ads irritate the user and now I focus on quality and content. One more cons of using Link Unit as navigation menu is less PageViews/Visits factor. It’s my personal experience. Your experience might be different. Never assume, Test and see what works for you. I’m interested in other’s experiences with the ‘Link unit’ and ‘Leaderboard’ ads. Share your opinion in comment box.

Related posts:

  1. Google Adsense Tips: My Adsense Placement Experiments
  2. Fix Google Adsense Blank Ads Issue
  3. jQuery Popup on button click instead of link navigation
  4. Site Traffic Increases After Google Panda Update
  5. How To See Subdomain Tracking Report In Google Analytics

Testing Web services or REST API Easily with Poster Add-on

$
0
0


If you are developing a web service client, you access web services, pass parameters and test the response to know the behavior of service. It can be easily accomplished using Poster Firefox add-on. You can create your own HTTP request with custom parameters, perform the action (GET,POST, PUT, DELETE..etc) and inspect the result. It saves bunch of time to create web-service based application.
Let’s see sample to use Poster.
1. Download and install Poster Firefox addon.
2. Click on ‘P’ icon in addon bar OR Ctrl+Alt +P OR tools -> Poster to open poster dialog.

poster 1 Testing Web services or REST API Easily with Poster Add on

3. In above screen-shot, I am accessing Facebook TechBrij page using Graph API, Passing URL and parameters and getting following response:

poster 2 Testing Web services or REST API Easily with Poster Add on

Features:

1. Allows you to set any HTTP header in name value pair format
2. Allows to set request parameters
3. full range of HTTP methods available via a simple button click
4. Auto-format parameter body (i.e. form submission)
5. displays complete results including headers
6. Allows you to save preferences for session or permanently
7. supports basic auth and Google login

If you want to see HTTP Request and response of existing running app, read my following posts:

Tools to view HTTP requests and responses
View HTTP requests and responses with Firebug

Poster is very handy to use and another powerful add-on for web developer. Share your opinion about Poster in below comment box.

Related posts:

  1. Handle Web Exception raised from HttpWebRequest in C#
  2. Top 22 Firefox Add-ons for Web Designers & Developers
  3. Tools to view HTTP requests and responses
  4. View HTTP requests and responses with Firebug
  5. 25 Free Online Tools for Web Design and Development

4 Things Every Android User must Know

$
0
0


Android is open source and fully customizable mobile platform. It offers a full stack: an operating system, middle-ware, and key mobile applications. It is estimated more than half of the smartphone market belongs to Android. I recently purchased Samsung Galaxy Ace and got a chance to use Samsung Galaxy Note also. I decided to share my experience for new Android users.

1. During charging, if you are not able to unlock device or work with touch screen, immediate unplug the adapter from the device. It’s due to unstable power supply or problem in charger. Make sure you are using original charger of your device.

2. You can login to Android Market and see your installed app in My Library page. You can purchase and install app from your PC. It will be installed automatically if auto sync is enabled in your device. I like this feature because searching is more convenient on PC than mobile.

3. Many Android web sites provide QR codes to applications in the Android Market. QR code is a 2-D bar code that can be scanned by a smart phone’s camera and transfer information.

TechBrij%20QR%20Code%20Bar 4 Things Every Android User must Know

Advantage of QR Code:

a. Suppose you are searching in android market with 4-5 friends on your PC. Now you find a great app and every one wants to install. One way is to sign-in one by one and push to their device. It is time consuming. Another way is to use ‘Barcode Scanner‘ or ‘Google Goggles‘ to download apps directly to their devices. No need to sign-in individually on PC, It saves bunch of time.

b. Suppose I have to share an application to user in the post. What can i do? One way to put download link of app but same issue for multiple users as discussed above. So modern way is to use QR code.

c. Offline Marketing:

QR Code can be printed out or placed on the back of business cards so that your app or information can be scanned to someone’s phone in seconds.

You can create QR code easily using this Firefox add-on.

4. Maximizing Battery life:

Here are the basic tips to increase the battery life

android power widget 4 Things Every Android User must Know

a. Turn off features like Wi-Fi, Bluetooth, GPS etc which are not being used
b. Reducing its brightness to the lowest acceptable level
c. Disable or uninstall Applications which you aren’t Using.
d. Use Static Wallpaper instead of animated wallpaper.
e. Set proper scheduling for sync apps like for Facebook set “Refresh interval” as high as possible.

Please share your opinion or other tips related to Android.

Related posts:

  1. Windows 8 & Future of .NET
  2. Display Flickr based User Profile Photo using PhpFlickr
  3. What’s New in ASP.NET MVC 4

Received Google Adsense Cheque

$
0
0


Happy New Year to all TechBrij Readers !!! Hope, you are going well to fulfill your new year resolutions. I am happy to announce that I have received my Google Adsense Cheque. I am a big fan of Google Adsense and have written some tips and placement experiments. It motivates me to write a lot more and share experience.

google adsense cheque techbrij%202 Received Google Adsense Cheque

Now, one of my this year resolution is to make it monthly. Being a part time weekly blogger, It’s not so easy but achievable.

TechBrij’s Most popular posts of 2011: Let’s look back 2011 posts which make this blog so popular.

1. Error establishing a database connection – WordPress

2. 10+ Notepad++ Tips For Fast Development

3. Online BUS RESERVATION SYSTEM in ASP.NET (C#)

4. Add controls (textbox, radio, checkbox..) dynamically in jQuery way

5. Retrieve value of Dynamic controls in asp.net

Apart from this blog, It has some other things:

1. FEDe: A Search engine for Front-End (HTML, CSS, Javascript & jQuery) Web developers
2. NetBrij: A Search engine for .NET developers
3. BrijPad: An online text editor for fast development
4. Tweets By Post: WordPress Plugin
5. Dammani Family Tree
6. Final Year Projects

I removed Tools section and combined all tools in BrijPad.

Thanks Google!!!

Related posts:

  1. Google Adsense Tips: My Adsense Placement Experiments
  2. Site Traffic Increases After Google Panda Update
  3. About Me
  4. FEDe: A Search engine for Front-End (HTML, CSS, Javascript & jQuery) Web developers
  5. TechBrij Got Google SiteLinks on Search Results

Dynamically Enable or Disable ASP.NET Validator and Page.IsValid

$
0
0


In my post, I discussed different client side APIs and Methods of asp.net validator Controls. Now suppose if you have customized validation on client side, what’ll happen on server side? We need to do same on server side. Let’s understand this step by step by taking same example. Suppose you have to disable password’s requiredfieldvalidator when ‘Allow me‘ checkbox is true. You have disabled validator on checkbox click using ValidatorEnable javascript method. Now on server side button click, if you validate and check for isValid, it is always false and you will see error message in validationsummary even if checkbox is checked. Client side bypasses validation but on server side it’s stucked and our object is defeated.

aspdotnet validation Dynamically Enable or Disable ASP.NET Validator and Page.IsValid

So, you have to do SAME on server side before calling validate method. you need to disable password’s requiredfield validator on checkbox true, then validate and check Page.IsValid on button click.
Alternatively, you can override Validate method and enable/disable validator in the method. see following code:

public override void Validate(string grp)
    {
        bool enableValidators = !CheckBoxAllowMe.Checked;
        PasswordRequired.Enabled = enableValidators;
        base.Validate();
    }

protected void LoginButton_Click(object sender, EventArgs e)
    {
        Page.Validate("LoginUserValidationGroup");
        if (Page.IsValid)
        {
            LabelMessage.Text = "It's valid on server side";
        }
        else
        {
            LabelMessage.Text = "It's NOT valid on server side";
        }
    }

When you set checkbox and click on button, requiredfieldvalidator is disabled on server side and Page.IsValid = true.

Server side Properties:

1. CausesValidation Property: For validation check(Mostly used to bypass validation on cancel button).
2. Enabled property of Validator Controls: To configure both side validation.
3. EnableClientScript property of Validator control: To configure client side validation only.

Disable All validators:

Suppose you have to disable all validators of a validation group.

Server Side:

//To enable/disable all validators of a validation group
        foreach (BaseValidator val in Page.Validators)
        {
            if (val.ValidationGroup == "LoginUserValidationGroup")
            {
                val.Enabled = false;
            }
        }

Client Side:

 for (i = 0; i < Page_Validators.length; i++) {
	   if (Page_Validators[i].validationGroup == "LoginUserValidationGroup") {
			ValidatorEnable(Page_Validators[i], false);
		}
	}

Disable All Validators related to specific control:

Suppose you have to disable all validators for Password textbox.

Server Side:


//To enable/disable all validators of a validation group
        foreach (BaseValidator val in Page.Validators)
        {
            if (val.ControlToValidate == "Password")
            {
                val.Enabled = false;
            }
        }

Client Side:


 for (i = 0; i < Page_Validators.length; i++) {
                if (Page_Validators[i].controltovalidate == "<%=Password.ClientID %>") {
                    ValidatorEnable(Page_Validators[i], false);
                }
            }

jQuery to Enable/Disable Validation:

In the article, I posted javascript method to enable/disable validator. You can do this using jQuery also. Here is the jQuery equivalent:

 $("[id$='LoginjQButton']").click(function () {
            if ($("[id$='CheckBoxAllowMe']").is(':checked')) {
                ValidatorEnable($("[id$='PasswordRequired']")[0], false);
            }
            //ValidationSummaryOnSubmit("LoginUserValidationGroup");
            if (Page_ClientValidate("LoginUserValidationGroup")) {
                alert('it is valid');
                return true;
            }
            else {
                alert('No valid');
                return false;
            }
        });

Hope, It helps. Share your opinion and tips on ASP.NET Validation.

Related posts:

  1. Client Side Validation using ASP.NET Validator Controls from Javascript
  2. Online Ticket Booking System using ASP.NET
  3. Add Dynamic Buttons and Handle click event on server side in ASP.NET
  4. Add controls (textbox, radio, checkbox..) dynamically in jQuery way
  5. Stylish ASP.NET Wizard Control with Horizontal Sidebar on Top
Viewing all 116 articles
Browse latest View live