Quantcast
Channel: TechBrij
Viewing all 116 articles
Browse latest View live

Run Your Custom Script Quickly with SSMS Tools Pack

$
0
0


Suppose you have to do a task repeatedly with different objects of database, for example, you have to generate code or stored procs of table in the specific format, you created your custom SQL script which takes table name and generate the code. But each time, you have to execute query and pass table name.
What’ll happen If you right click on the table and select your script to execute. It’ll save bunch of time as well as stop you getting irritated icon smile Run Your Custom Script Quickly with SSMS Tools Pack Let’s see how to do using SSMS Tools Pack.
SSMS Tools Pack:

It is the best free Sql Server Management Studio(SSMS)’s add-in having lots of features like Execution Plan Analyzer, SQL Snippets, Execution History, Search Table, View or Database Data, Search Results in Grid Mode, Generate Insert statements from result sets, tables or database, Regions and Debug sections, CRUD stored procedure generation, New query template..etc.
Website Link
Download Link

Steps:

Suppose you want to see total number of records in different tables.

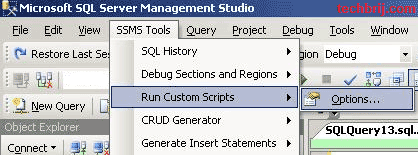
1. Click on SSMS Tools > “Run Custom Script” > Options

SSMS Tools Pack TechBrij 1 Run Your Custom Script Quickly with SSMS Tools Pack

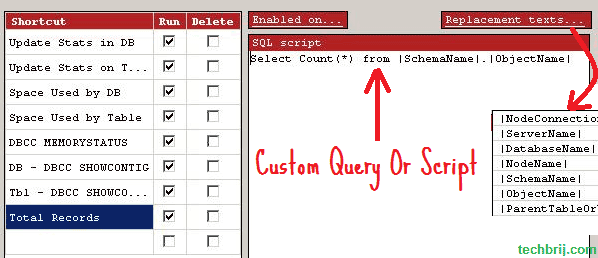
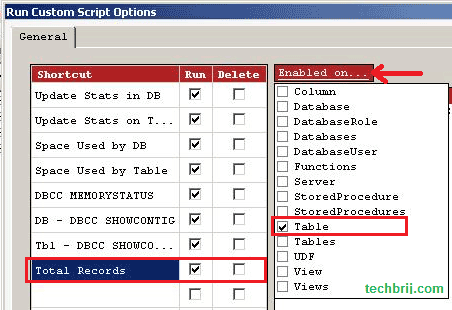
2. Left side of dialog, Enter Shortcut ‘Total Records‘ and check Run checkbox

SSMS Tools Pack TechBrij 2 Run Your Custom Script Quickly with SSMS Tools Pack

3. Right Side, Click on ‘Enabled On..‘ option and select ‘table’. It means this will appear on each table.

4. Enter following script

Select Count(*) from |SchemaName|.|ObjectName|

Here |SchemaName| and |ObjectName| are replacement texts. You can see available replacements options on ‘Replacement Texts‘ click.

SSMS Tools Pack TechBrij 4 Run Your Custom Script Quickly with SSMS Tools Pack

Click on Save and OK button.
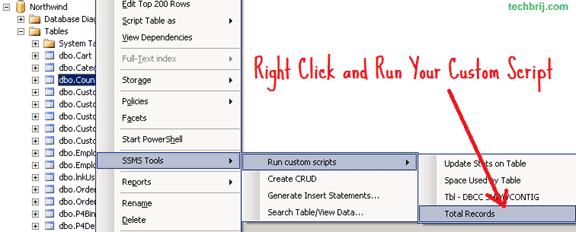
5. Now, Right click on any table > “Select SSMS Tools” > Run Custom Scripts > Total Records

SSMS Tools Pack TechBrij 5 Run Your Custom Script Quickly with SSMS Tools Pack

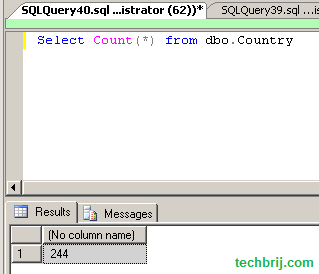
You will get Total Records in result and no need to pass table name in query again and again.

SSMS Tools Pack TechBrij 6 Run Your Custom Script Quickly with SSMS Tools Pack

Similarly, you can run your other custom scripts quickly. It is very helpful as a code generation tool. Let me know how you are using it.

Related posts:

  1. Install sql server database with visual studio setup
  2. Custom role provider based sitemap navigation in asp.net
  3. Fast Development with Free Online TechBrij’s Tools
  4. Create Windows Service quickly using .NET
  5. Concurrency violation: the UpdateCommand affected 0 of the expected 1 records

Month Range Picker using jQuery UI Datepicker

$
0
0


In this article, we’ll implement month range selection feature in which user can select start and end months to get monthly data and we don’t want to add one more external library for this if jQuery UI is already being used in the project. We’ll use jQuery UI date-picker to show month and year only to select month range.
By default, jQuery UI datepicker doesn’t provide to pick month and year only but we can achieve it by simply hiding calendar and displaying date in “MM yy” format.

month range picker jquery ui Month Range Picker using jQuery UI Datepicker

HTML:

To hide calendar control, set display:none for calendar.

<style type="text/css">

.ui-datepicker-calendar {
    display: none;
    }

</style>
<div style="text-align:center;">
 <label for="from">From</label>
 <input type="text" id="from" name="from" readonly="readonly" />
 <label for="to">to</label>
 <input type="text" id="to" name="to" readonly="readonly"  />
 <input type="button" id="btnShow" value="Show" />
</div>

Script:

 $( "#from, #to" ).datepicker({
            changeMonth: true,
            changeYear: true,
            showButtonPanel: true,
            dateFormat: 'MM yy',
            onClose: function(dateText, inst) {
                var month = $("#ui-datepicker-div .ui-datepicker-month :selected").val();
                var year = $("#ui-datepicker-div .ui-datepicker-year :selected").val();
                $(this).datepicker('setDate', new Date(year, month, 1));
            },
            beforeShow : function(input, inst) {
                if ((datestr = $(this).val()).length > 0) {
                    year = datestr.substring(datestr.length-4, datestr.length);
                    month = jQuery.inArray(datestr.substring(0, datestr.length-5), $(this).datepicker('option', 'monthNames'));
                    $(this).datepicker('option', 'defaultDate', new Date(year, month, 1));
                    $(this).datepicker('setDate', new Date(year, month, 1));
				}
				var other = this.id == "from" ? "#to" : "#from";
				var option = this.id == "from" ? "maxDate" : "minDate";
				if ((selectedDate = $(other).val()).length > 0) {
					year = selectedDate.substring(selectedDate.length-4, selectedDate.length);
                    month = jQuery.inArray(selectedDate.substring(0, selectedDate.length-5), $(this).datepicker('option', 'monthNames'));
					$(this).datepicker( "option", option, new Date(year, month, 1));
				}
            }
        });
		$("#btnShow").click(function(){
		if ($("#from").val().length == 0 || $("#to").val().length == 0){
			alert('All fields are required');
		}
		else{
			alert('Selected Month Range :'+ $("#from").val() + ' to ' + $("#to").val());
			}
		})

In above code, to display month and year of selected value:

dateFormat: ‘MM yy’,

‘From Month’ must be less than or equal to ‘To Month’. For this, the minDate or maxDate is defined as per user selected value in ‘beforeShow’ event.

If you need month and year in integer format to pass in your query or stored procedure, you can take hidden field and set month and year value in ‘onClose‘ method and use it on server side. If you have to implement to select a particular month and get start and end date of the month, visit my this article.

Hope, It helps.

Related posts:

  1. jQuery Date Range Picker To Select Year, Month Or Quarter Only
  2. Convert TimeSpan to year, month, date (Age Calculation) in .NET
  3. Clone html form elements with selected options using jQuery
  4. jQuery: Common Operations on Radio Button & Checkbox
  5. jQuery: Common Operations on DropdownList (Combobox)

Display File Download Count in WordPress

$
0
0


In some posts, I’ve attached source code and files allowing user to download. Now I’m interested to check how many times file downloaded and how to display it with download link as in other sites. I found different WordPress plugins like WP-DownloadManager, Downloads Manager, WordPress Download Monitor, WordPress Download Counter..etc. All are doing file management perfectly, But I like WordPress Download Monitor the most. It allows you to upload files, store it on your server and share it with your readers. You can install and activate it easily as normal plugin.

How to Use:

It’s very easy to use. In your post page, Just click on down arrow icon, select file or upload file with details and click on save/insert button as in below image and It will insert the code look something like [download id="1"] which is parsed on viewing post.

download monitor wordpress Display File Download Count in Wordpress

Customize Format:

You can create your own custom template to show download file in your format.
Go to DownLoads > Configuration > Cusotm Output Formats
Enter Name and format using available tags {url},{title}…etc.

download monitor wordpress2 Display File Download Count in Wordpress

For above template, enter following code in format:


<div class="downloadBox" style="border: 1px solid gray; padding: 15px 5px 5px; text-align: center;">
<span style="font-size: 24px;">{title}</span>
<div style="background-color: #3B5998; border-radius: 10px 10px 10px 10px; color: #ffffff !important; display: block; font-size: 16px; font-weight: bold; margin:7px auto; padding: 5px 18px; text-align: center; width: 200px; "><a href="{url}" style="color:white">Download</a></div>
<span style="color: gray;">{hits} total downloads, {size} </span>
</div>

After saving format, you can select format from dropdown-list during inserting into post OR you can pass ID of format something like this

[download id="2" format="2"]

Customize URL:

By default, the download URL is in following format:

http://yourdomain.com/wp-content/plugins/download-monitor/download.php?id=1

You can customize it in DownLoads > Configuration > Custom Download URL and select one of ID, FileName or Title options. If you select filename, new URL will be

http://yourdomain.com/downloads/filename.zip

It’s good for SEO as well as user convenient.

Create a Download Page:

You can create a download page easily. Goto Pages > Add New > Enter [download_page] in post and publish it.

download monitor wordpress3 Display File Download Count in Wordpress

You will get page in default format having search box, popular posts and categorywise post. you can customize it by using available shortcode options. You can get details in plugin documentation.

download monitor wordpress4 Display File Download Count in Wordpress

This plugin is easily customizable and having full of features like category, images, supports external link and many more. You can get more in plugin documentation. Share your opinion and let me know how you are managing files and displaying their download count.

Related posts:

  1. ‘Tweets By Post’ WordPress Plugin (Part-1 Installation)
  2. How to Display Featured Post with Thumbnails Without Plugin
  3. Create a Project Collection Theme using WordPress 3.0 Custom Post Type
  4. WordPress Tips to upload images effectively
  5. Redirect to Stream as File Attachment to Download in ASP.NET

HTML Table Row Grouping with jQuery

$
0
0


It’s easy to group data in SQL statement, but if you have to display it using HTML table, It’s not drag and drop as in reporting environment. One way to group on server side and draw tr td accordingly. But If it is already created with tons of functionality attached, It’s risky to change. Don’t worry, you can do it easily with jQuery.

html table row grouping jquery HTML Table Row Grouping with jQuery

HTML:

Let’s take following HTML table as an example:

<table id="myTable" border="1" cellpadding="3" cellspacing="0">
<tr><th>Category</th><th>Product</th><th>Size</th><th>Price</th><th>Shipping</th></tr>
<tr><td>Category-1</td><td>Product-1</td><td>Big</td><td>102</td><td>Free</td></tr>
<tr><td>Category-1</td><td>Product-1</td><td>Big</td><td>132</td><td>Free</td></tr>
<tr><td>Category-1</td><td>Product-2</td><td>Big</td><td>130</td><td>Free</td></tr>
<tr><td>Category-1</td><td>Product-2</td><td>Small</td><td>100</td><td>Free</td></tr>
<tr><td>Category-2</td><td>Product-3</td><td>Big</td><td>130</td><td>Free</td></tr>
<tr><td>Category-2</td><td>Product-3</td><td>Big</td><td>100</td><td>Free</td></tr>
<tr><td>Category-2</td><td>Product-3</td><td>Small</td><td>100</td><td>10</td></tr>
<tr><td>Category-2</td><td>Product-4</td><td>Big</td><td>150</td><td>10</td></tr>
<tr><td>Category-3</td><td>Product-5</td><td>Big</td><td>150</td><td>10</td></tr>
<tr><td>Category-3</td><td>Product-5</td><td>Small</td><td>120</td><td>10</td></tr>
<tr><td>Category-3</td><td>Product-5</td><td>Big</td><td>120</td><td>Free</td></tr>
<tr><td>Category-4</td><td>Product-6</td><td>Big</td><td>120</td><td>10</td></tr>
<tr><td>Category-4</td><td>Product-6</td><td>Small</td><td>120</td><td>10</td></tr>
</table>

Script:

Before using the following method, Make sure the data is sorted. The logic is to check row by row if data is same in next row’s td, remove next row’s td and increase rowspan of current row’s td.

$(function() {
//Created By: Brij Mohan
//Website: http://techbrij.com
function groupTable($rows, startIndex, total){
if (total === 0){
return;
}
var i , currentIndex = startIndex, count=1, lst=[];
var tds = $rows.find('td:eq('+ currentIndex +')');
var ctrl = $(tds[0]);
lst.push($rows[0]);
for (i=1;i<=tds.length;i++){
if (ctrl.text() ==  $(tds[i]).text()){
count++;
$(tds[i]).addClass('deleted');
lst.push($rows[i]);
}
else{
if (count>1){
ctrl.attr('rowspan',count);
groupTable($(lst),startIndex+1,total-1)
}
count=1;
lst = [];
ctrl=$(tds[i]);
lst.push($rows[i]);
}
}
}
groupTable($('#myTable tr:has(td)'),0,3);
$('#myTable .deleted').remove();
});

groupTable method has 3 arguments:
$rows: jQuery object of table rows to be grouped
startIndex: index of first column to be grouped
total: total number of columns to be grouped

In above code startIndex =0 and total = 3 it means table is grouped by first, second and third column. After grouping, you need to remove deleted class elements like this:
$(‘#myTable .deleted’).remove();

you can use code, but need to keep CREDIT COMMENT. The idea came to implement this just one hour ago. So the code can be optimized. Anyway, let me know if you have any issue.

Related posts:

  1. Grouping Data in ASP.NET Gridview Control
  2. Clone html form elements with selected options using jQuery
  3. FEDe: A Search engine for Front-End (HTML, CSS, Javascript & jQuery) Web developers
  4. Seat Reservation with jQuery
  5. Displaying Total in ASP.NET Gridview Footer Row Without using Template Field

Grouping Data in ASP.NET Gridview Control

$
0
0


In my previous post, I explained how to group HTML table rows with jQuery. This post explains How to do same thing using ASP.NET Gridview control on server side. The logic is same to check row by row. If data is same in next row’s cell, hide next row’s cell and increase rowspan of current row’s cell.

HTML:

 <asp:GridView ID="GridView1" runat="server" CellPadding="4">
 </asp:GridView>

gridview grouping rows aspdotnet Grouping Data in ASP.NET Gridview Control

Server Side:

I have created a generalize method ‘GroupGridView‘ to group data in the gridview.

void GroupGridView(GridViewRowCollection gvrc, int startIndex, int total)
    {
        if (total == 0) return;
        int i, count = 1;
        ArrayList lst = new ArrayList();
        lst.Add(gvrc[0]);
        var ctrl = gvrc[0].Cells[startIndex];
        for (i = 1; i < gvrc.Count; i++)
        {
            TableCell nextCell = gvrc[i].Cells[startIndex];
            if (ctrl.Text == nextCell.Text)
            {
                count++;
                nextCell.Visible = false;
                lst.Add(gvrc[i]);
            }
            else
            {
                if (count > 1)
                {
                    ctrl.RowSpan = count;
                    GroupGridView(new GridViewRowCollection(lst), startIndex + 1, total - 1);
                }
                count = 1;
                lst.Clear();
                ctrl = gvrc[i].Cells[startIndex];
                lst.Add(gvrc[i]);
            }
        }
        if (count > 1)
        {
            ctrl.RowSpan = count;
            GroupGridView(new GridViewRowCollection(lst), startIndex + 1, total - 1);
        }
        count = 1;
        lst.Clear();
    }

You have to pass 3 parameters:
gvrc: GridView Rows
startIndex: index of first column to be grouped(where to start grouping).
total: total number of columns to be grouped.

How to Use:

Before using this method, Make sure data is sorted in same order in which they are to be grouped. Bind the gridview and Pass the gridview rows, start index and total number of columns to be grouped in GroupGridView method and enjoy it.

	GridView1.DataSource = GetDataTable();
        GridView1.DataBind();
        GroupGridView(GridView1.Rows, 0, 3);
 

The above code will group first 3 columns of gridview.

Hope, It’ll save your time.

Related posts:

  1. HTML Table Row Grouping with jQuery
  2. Displaying Total in ASP.NET Gridview Footer Row Without using Template Field
  3. Adding Gridview nested in Repeater in ASP.NET 2.0
  4. Bind array to specific column of asp.net gridview
  5. Create Dynamic DropDownLists in asp.net

The Best Android Applications For Daily Use

$
0
0


Smartphones have entered in different business domains. Recently, Android Market exceeded 10 billion app downloads—with a growth rate of one billion app downloads per month. In my recent post, I explained basic things every Android user must know. Now it’s turn to apps. There are different type of apps, I’ve tested some apps and compiled a list which can be a part of your daily life. My objective is NOT to install so many apps, but app must be high productive.

1. FaceBook for Android:

No need of explanation !!!

2. Twitter for Android:

No need of explanation !!!

3. GTasks:
In the busy life, we can’t remember everything. GTasks is a To Do list app and helps you to getting things done. I don’t want to use separate service(another account) for todo list that’s why I selected this. It syncs with your Google tasks perfectly and have both local and Google account mode.

android apps gTasks The Best Android Applications For Daily Use

4. Merriam Webster Dictionary:

I don’t believe on internet or network connection. That’s why I selected this. It’s great dictionary for reference, education, and vocabulary building with offline support.

android apps dictionary The Best Android Applications For Daily Use

5. Opera Mini Web Browser:

It’s a web browser for mobile devices, It uses Opera’s servers to compress webpages so they load faster. It uses as little as a tenth of the data of normal browsers.

6. imo.im:

No need to install separate apps for GTalk,Skype, MSN, ICQ/AIM, Yahoo..etc. With its new tabbed interface, imo.im is an IM app that’s light, pretty and easy to use.

7. Google Goggles:

You can search by taking a picture. Goggles uses image recognition technology to recognize objects and return relevant search results. You can use it as Bar code or QR code scanner also. It means no need to install separate app to scan barcode/QR code.

8. Diigo’s Power Note:

I use Diigo bookmarks which automatically send bookmark to delicious also. Diigo provides Power Note Android app in which you can add, organize and sync text note, picture and bookmarks to your library. In desktop browser, you can mark webpages as “read later” and read it on the phone easily.

android apps diigo The Best Android Applications For Daily Use

9. Google Reader:

You can follow all your favorite sites, blogs, and more, all in one place and see what your friends are sharing, and easily share any interesting articles you read. It syncs with the web version.

10. DropBox:

Dropbox is a free service that lets you bring all your photos, docs, and videos anywhere. With its Android app, you can view and edit all your Dropbox files in a sweet interface and even stream music and videos you’ve uploaded to Dropbox in its media player (or save for offline viewing).

11. TripAdvisor:

If you’re a traveler, This should be installed in your Android. It has a huge database of hotels, restaurants, flights, forums, things to do and much more just a one-click away from you. A nearby feature that will use your current location to find services next to you. “My saves” is a kind of favorites tab, where you can save the hotels, restaurants and any other service that you liked and you want to recommend.

Games:

12. Prince of Persia:

It’s my favorite game and have been playing since 1996 when I was reading in class sixth. I don’t like One screen One level game like Angry Birds…etc. You can see video preview of this game here.

13. Zombie Dash:

It’s a great game and combines the timeless appeal of classic arcade games with stunning graphics you have to see to believe.

For Indian Users:

14. HinKhoj Hindi Dictionary:

It’s easy to understand in mother tongue. It shows hindi words in devnagri fonts in addition to their phonetic transliteration to english.

15. Indian Rail Info App:

With this app, You can get information about Indian Railways like PNR Status, Find Trains, Seat availability, Arrival & Departure, Train Running Status and much more anytime anywhere, but you cannot book tickets using this app.

16. Mobile Number Tracker:

If you are getting calls from unknown number and want to find from where that person is calling. Use this app to find from which state/telecom operator a mobile number belongs to. It shows caller info during incoming call. You can also view the details of mobile number in the call log.
Note: The MNP ported numbers are not traceable by the app.

android apps MNT The Best Android Applications For Daily Use

17. Free SMS India:

SMS has still a great role if user doesn’t have smart phones. With Free SMS India application, you can send free sms to any mobile number in INDIA using way2sms, fullonsms, site2sms and 160by2 gateway. It has very Simple GUI to avoid confusions.

Hope, It’s interesting for you. Let me know what apps you are using. Share your opinion and experience about apps.

Related posts:

  1. 4 Things Every Android User must Know
  2. Windows 8 & Future of .NET

4 Notepad++ Plugins Make You More Productive

$
0
0


In my previous Notepad++ post, I shared useful tips for fast development. You can extend Notepad++ by installing plugins. The beauty of the Notepad++ extension is that it allows you to add a specific feature or function, fully customizing your working experience. Here are some useful plugins to save time while working.

How to Install:

Default available plugins can be installed from the Plugins manager (via Plugins—> Plugin Manager—> Show Plugin Manager), select plugin and click on Install button. Other than, You can search the plug in with Google, Download it (usually dll file) and put into ‘notepad++/plugins/’ directory. Now, if your notepad++ is active, close it, and activate again. You will see your plugin in Plugins menu bar and automatically installed. If not show, maybe your plugin isn’t compatible.

1. Explorer:

Open your file in Notepad++ quickly using Explorer plugin. It has two sections: Folder tree box(to see directories-sub directories) and File box. Using bottom filter box, You can filter files to find in large listing.

notepad plus explorer plugin 4 Notepad++ Plugins Make You More Productive

Download Explorer Plugin

2. Compare:

No need to install other app to compare files, You can do it easily with Notepad++ itself. Open two files you wish to compare. Click Plugins > Compare > Compare, you’ll get differences highlighted. To off compare screen and back to editor window, Plugins > Compare > Clear Results.

notepad plus compare plugin 4 Notepad++ Plugins Make You More Productive

Download Compare Plugin

3. MultiClipBoard:

It saves multiple copied items, you can paste it easily via either Multi Clip Viewer Box OR Ctrl+Shift+V.
You can enable MultiViewer box(via Plugins > Multiclipboard > Multiclip Viewer) which has list of copied text. Double click on any item in list to paste.

notepad plus multiclip plugin 4 Notepad++ Plugins Make You More Productive

If you don’t want to touch mouse during typing, just press Ctrl+Shift+V, you will see copied text list with index number. Press index number to paste content.
It saves a bunch of time.
Download MultiClipboard plugin

4. Spell Check:

I needed spell check facility in Notepad++ for blogging. Spell check plugin adds this missing feature.
See here to setup spell check plugin. You need to install both Aspell Binaries and dictionary and configure path of bin folder in Notepad++ spell check plugin.

5. Bonus for Web Developers:

If you are a web developer, doing so much in javascript, xml or JSON, You may like following plugins:
JSLint: To run JSLint (The JavaScript Code Quality Tool) against javascript files
JSMin: To minimize code or format the code
JSON Viewer: To see JSON string in Tree View structure
XML Tools: to auto-close tags and provides many useful features.

Enjoy Notepad++ !!!

Related posts:

  1. 10+ Notepad++ Tips For Fast Development
  2. Display File Download Count in WordPress
  3. ‘Tweets By Post’ WordPress Plugin (Part-1 Installation)
  4. Copy/Extract HTML Dropdownlist Options in Plain Text
  5. Mac/iphone Style Dock menu for your website

Responsive Design: Make Your Website Mobile, Tablet, Desktop Compatible

$
0
0


Every client wants their website compatible with all platforms, whether user is accessing the site on a mobile phone, tablet, desktop computer or wide-screen. There are so many devices BlackBerry, iPhone, iPad, netbook, kindle..etc with different sizes and resolutions. It’s impossible to create a website version for each resolution. With Responsive Web Design technique, the website adapts the layout to the environment that it is being viewed in. It makes similar feelings for all platforms. You can see TechBrij as an example by resizing the browser window if you are on a desktop.

techbrij responsive theme Responsive Design: Make Your Website Mobile, Tablet, Desktop Compatible

Steps:

1. In your basic theme for desktop browsers, See each element of web page and think for tablet and mobile view. You can use notebook pen for complex layout.
2. Change element dimension from pixel value to percentage value and make some additional changes to make it similar on same environment.

techbrij responsive theme template Responsive Design: Make Your Website Mobile, Tablet, Desktop Compatible

3. Use Meta tag to disable default mobile scaling to display web page fit on screen.

<meta name="viewport" content="width=device-width, initial-scale=1.0">

4. We’re going to use CSS3 Media queries, but Internet Explorer 8 or older doesn’t support it. So use media-queries.js to add media query support in IE.

<!--[if lt IE 9]>
	<script src="http://css3-mediaqueries-js.googlecode.com/svn/trunk/css3-mediaqueries.js"></script>
<![endif]-->

5. Use CSS Media queries to define special CSS rules for different viewport width ranges/resolutions.

@media screen and (min-width : 750px) {
#content{float:left;width:60%;}
#sidebar{float:right;width:35%}
} 

@media screen and (min-width : 481px) and (max-width : 749px) {
#content{width:95%;}
#sidebar{width:95%;}
}

You can create separate CSS files for different Media queries.

	<link rel="stylesheet" type="text/css" media="only screen and (max-device-width: 480px)" href="small-device.css" />

6. Make images, iframe width flexible.

img {
	max-width: 100%;
}
iframe, object, embed{
width: 100%;
}

7. Test it.

These are the basic steps to implement responsive web design. Alternatively, CSS Frameworks like Less Framework 4, MQFramework, Foundation, Skeleton..etc are used for rapid development.

Resoures:

Media Queries for Standard Devices

Responsive Design with CSS3 Media Queries

Responsive Web Design, most complete guide

Responsive Web design creates a great custom experience for everyone. Share your opinion and about how you’re implementing responsive design.

Related posts:

  1. How to Test Responsive Web Design
  2. 7 Tips to make your website Cross Browser Compatible
  3. Mac/iphone Style Dock menu for your website
  4. 25 Free Online Tools for Web Design and Development
  5. Understand ‘+’, ‘>’ and ‘~’ symbols in CSS Selector

How to Test Responsive Web Design

$
0
0


My previous post explains basic steps for responsive web design to make the site mobile, tablet and desktop compatible. Now, we have to test the website in different resolutions. You can test it simply by resizing browser window, but It’s not convenient resizing to a specific dimension(width and height) each time. Here are tools or utilities to test effectively.

Screenfly:

Screenfly is a web based tool, very handy when you don’t know device resolution. you have to enter URL and select device. I like its neat and clean UI.

Responsivepx:

Responsivepx is a web based tool. You have to enter URL and select height and width to test.

Tool by Matt Kersley:

Matt’s tool is iframe based online tool. Simply enter the URL of your website and test it in different browser resolutions at a time.

Web Developer Extension:

Web Developer extension adds various web developer tools to a browser. The extension is available for Firefox and Chrome. It’s my favourite way to test responsive design. It can be used on local sites without internet connection. You can resize window to a standard dimension on single click and allows you to create your own dimensions by entering width and height.

test responsive theme How to Test Responsive Web Design

I like “Display Window Size in Title” option because it is time saving. It displays the current dimensions(width and height) in title bar. It’s very helpful during resizing.

Hope, It helps. Share your opinion about how you are testing responsive web design.

Related posts:

  1. Responsive Design: Make Your Website Mobile, Tablet, Desktop Compatible
  2. 25 Free Online Tools for Web Design and Development
  3. FEDe: A Search engine for Front-End (HTML, CSS, Javascript & jQuery) Web developers
  4. How to set or test connection string
  5. Testing Web services or REST API Easily with Poster Add-on

Insert, Update, Delete in ASP.NET Gridview With Entity Framework

$
0
0


This article explains how to perform insert, update and delete operations in ASP.NET GridView with Entity Framework. Let us take an example to perform CRUD operations using Entity Framework Database First approach. Suppose we’ve to work on Customer table having CategoryID as foreign key.

Adding Entity Data Model:

DB structure Insert, Update, Delete in ASP.NET Gridview With Entity Framework
In your project in solution explorer, right click > Add New Item > ADO.NET Entity Data Model
Give Name “ModelSample.edmx” > Add
If it asks to add in APP_code folder, click ok
Select “Generate From Database” > Next
Select your database and Set “Save Entity connection string in Web.config as” option true giving name SampleEntities.
Select Both Category and Customer tables
Give Model Namespace and click on Finish.

GridView Structure:

insert update delete gridview Insert, Update, Delete in ASP.NET Gridview With Entity Framework

We’ll use ASP.NET Gridview Footer row for inserting record, inbuilt way to edit and delete records.

<asp:Label ID="lblMessage" runat="server" Text="" ForeColor="Red"></asp:Label>
    <asp:GridView ID="gridSample" runat="server" AutoGenerateColumns="False" ShowFooter="True"
                        CssClass="grid" OnRowCommand="gridSample_RowCommand"
        DataKeyNames="CustomerID" CellPadding="4" ForeColor="#333333"
                        GridLines="None" OnRowCancelingEdit="gridSample_RowCancelingEdit"
                        OnRowEditing="gridSample_RowEditing"
        OnRowUpdating="gridSample_RowUpdating"
        onrowdatabound="gridSample_RowDataBound"
        onrowdeleting="gridSample_RowDeleting">
                        <AlternatingRowStyle BackColor="White" />
                        <Columns>
                            <asp:TemplateField HeaderText="">
                                <ItemTemplate>
                                    <asp:LinkButton ID="lnkEdit" runat="server" Text="" CommandName="Edit" ToolTip="Edit"
                                        CommandArgument=''><img src="../Images/show.png" /></asp:LinkButton>
                                    <asp:LinkButton ID="lnkDelete" runat="server" Text="Delete" CommandName="Delete"
                                        ToolTip="Delete" OnClientClick='return confirm("Are you sure you want to delete this entry?");'
                                        CommandArgument=''><img src="../Images/icon_delete.png" /></asp:LinkButton>
                                </ItemTemplate>
                                <EditItemTemplate>
                                    <asp:LinkButton ID="lnkInsert" runat="server" Text="" ValidationGroup="editGrp" CommandName="Update" ToolTip="Save"
                                        CommandArgument=''><img src="../Images/icon_save.png" /></asp:LinkButton>
                                    <asp:LinkButton ID="lnkCancel" runat="server" Text="" CommandName="Cancel" ToolTip="Cancel"
                                        CommandArgument=''><img src="../Images/refresh.png" /></asp:LinkButton>
                                </EditItemTemplate>
                                <FooterTemplate>
                                    <asp:LinkButton ID="lnkInsert" runat="server" Text=""  ValidationGroup="newGrp" CommandName="InsertNew" ToolTip="Add New Entry"
                                        CommandArgument=''><img src="../Images/icon_new.png" /></asp:LinkButton>
                                    <asp:LinkButton ID="lnkCancel" runat="server" Text="" CommandName="CancelNew" ToolTip="Cancel"
                                        CommandArgument=''><img src="../Images/refresh.png" /></asp:LinkButton>
                                </FooterTemplate>
                            </asp:TemplateField>
                            <asp:TemplateField HeaderText="First Name">
                                <EditItemTemplate>
                                    <asp:TextBox ID="txtFirstName" runat="server" Text='<%# Bind("FirstName") %>' CssClass="" MaxLength="30"></asp:TextBox>
                                    <asp:RequiredFieldValidator ID="valFirstName" runat="server" ControlToValidate="txtFirstName"
                                    Display="Dynamic" ErrorMessage="First Name is required." ForeColor="Red" SetFocusOnError="True"
                                   ValidationGroup="editGrp">*</asp:RequiredFieldValidator>
                                </EditItemTemplate>
                                <ItemTemplate>
                                    <asp:Label ID="lblFirstName" runat="server" Text='<%# Bind("FirstName") %>'></asp:Label>
                                </ItemTemplate>
                                <FooterTemplate>
                                   <asp:TextBox ID="txtFirstNameNew" runat="server" CssClass=""  MaxLength="30"></asp:TextBox>
                                   <asp:RequiredFieldValidator ID="valFirstNameNew" runat="server" ControlToValidate="txtFirstNameNew"
                                    Display="Dynamic" ErrorMessage="First Name is required." ForeColor="Red" SetFocusOnError="True"
                                   ValidationGroup="newGrp">*</asp:RequiredFieldValidator>
                                </FooterTemplate>
                            </asp:TemplateField>
                            <asp:TemplateField HeaderText="Last Name">
                                <EditItemTemplate>
                                    <asp:TextBox ID="txtLastName" runat="server" Text='<%# Bind("LastName") %>' CssClass="" MaxLength="30"></asp:TextBox>
                                    <asp:RequiredFieldValidator ID="valLastName" runat="server" ControlToValidate="txtLastName"
                                    Display="Dynamic" ErrorMessage="Last Name is required." ForeColor="Red" SetFocusOnError="True"
                                   ValidationGroup="editGrp">*</asp:RequiredFieldValidator>
                                </EditItemTemplate>
                                <ItemTemplate>
                                    <asp:Label ID="lblLastName" runat="server" Text='<%# Bind("LastName") %>'></asp:Label>
                                </ItemTemplate>
                                <FooterTemplate>
                                   <asp:TextBox ID="txtLastNameNew" runat="server" CssClass=""   MaxLength="30"></asp:TextBox>
                                   <asp:RequiredFieldValidator ID="valLastNameNew" runat="server" ControlToValidate="txtLastNameNew"
                                    Display="Dynamic" ErrorMessage="Last Name is required." ForeColor="Red" SetFocusOnError="True"
                                   ValidationGroup="newGrp">*</asp:RequiredFieldValidator>
                                </FooterTemplate>
                            </asp:TemplateField>
                            <asp:TemplateField HeaderText="Email">
                                <EditItemTemplate>
                                    <asp:TextBox ID="txtEmail" runat="server" Text='<%# Bind("Email") %>' CssClass="" MaxLength="30"></asp:TextBox>
                                    <asp:RequiredFieldValidator ID="valEmail" runat="server" ControlToValidate="txtEmail"
                                    Display="Dynamic" ErrorMessage="Email is required." ForeColor="Red" SetFocusOnError="True"
                                   ValidationGroup="editGrp">*</asp:RequiredFieldValidator>
                                    <asp:RegularExpressionValidator ID="valRegEmail" runat="server" ErrorMessage="Invalid Email"   ValidationGroup="editGrp"
                                    SetFocusOnError="true" Display="Dynamic" ControlToValidate="txtEmail" ForeColor="Red"
                                    ValidationExpression="\w+([-+.']\w+)*@\w+([-.]\w+)*\.\w+([-.]\w+)*">*</asp:RegularExpressionValidator>
                                </EditItemTemplate>
                                <ItemTemplate>
                                    <asp:Label ID="lblEmail" runat="server" Text='<%# Bind("Email") %>'></asp:Label>
                                </ItemTemplate>
                                <FooterTemplate>
                                   <asp:TextBox ID="txtEmailNew" runat="server" CssClass=""  MaxLength="30"></asp:TextBox>
                                   <asp:RequiredFieldValidator ID="valEmailNew" runat="server" ControlToValidate="txtEmailNew"
                                    Display="Dynamic" ErrorMessage="Email is required." ForeColor="Red" SetFocusOnError="True"
                                   ValidationGroup="newGrp">*</asp:RequiredFieldValidator>
                                   <asp:RegularExpressionValidator ID="valRegEmailNew" runat="server" ErrorMessage="Invalid Email"   ValidationGroup="newGrp"
                                    SetFocusOnError="true" Display="Dynamic" ControlToValidate="txtEmailNew" ForeColor="Red"
                                    ValidationExpression="\w+([-+.']\w+)*@\w+([-.]\w+)*\.\w+([-.]\w+)*">*</asp:RegularExpressionValidator>
                                </FooterTemplate>
                            </asp:TemplateField> 

                             <asp:TemplateField HeaderText="Category">
                                <EditItemTemplate>
                                    <asp:DropDownList ID="ddlCategory" runat="server">
                                    </asp:DropDownList>
                                    <asp:RequiredFieldValidator ID="valCategory" runat="server" ControlToValidate="ddlCategory"
                                    Display="Dynamic" ErrorMessage="Category is required." ForeColor="Red" SetFocusOnError="True"
                                   ValidationGroup="editGrp">*</asp:RequiredFieldValidator>
                                </EditItemTemplate>
                                <ItemTemplate>
                                    <asp:Label ID="lblCategory" runat="server" Text='<%# Bind("Category.Name") %>'></asp:Label>
                                </ItemTemplate>
                                <FooterTemplate>
                                  <asp:DropDownList ID="ddlCategoryNew" runat="server">
                                  </asp:DropDownList>
                                   <asp:RequiredFieldValidator ID="valCategoryNew" runat="server" ControlToValidate="ddlCategoryNew"
                                    Display="Dynamic" ErrorMessage="Category is required." ForeColor="Red" SetFocusOnError="True"
                                   ValidationGroup="newGrp">*</asp:RequiredFieldValidator>
                                </FooterTemplate>
                            </asp:TemplateField>
                        </Columns>
                        <EditRowStyle BackColor="#2461BF" />
                        <FooterStyle BackColor="#507CD1" Font-Bold="True" ForeColor="White" />
                        <HeaderStyle BackColor="#507CD1" Font-Bold="True" ForeColor="White" />
                        <PagerStyle BackColor="#2461BF" ForeColor="White" HorizontalAlign="Center" />
                        <RowStyle BackColor="#EFF3FB" />
                        <SelectedRowStyle BackColor="#D1DDF1" Font-Bold="True" ForeColor="#333333" />
                        <SortedAscendingCellStyle BackColor="#F5F7FB" />
                        <SortedAscendingHeaderStyle BackColor="#6D95E1" />
                        <SortedDescendingCellStyle BackColor="#E9EBEF" />
                        <SortedDescendingHeaderStyle BackColor="#4870BE" />
</asp:GridView>

Bind GridView:

First, import model namespace and bind customer entities to gridview. One thing, Footer template will not be displayed when no data is present. But, we need to display footer for inserting records. we’ll add a dummy row and clear it by coding to display footer row.

	/// <summary>
    /// Bind Customer data to grid
    /// </summary>
    void BindGrid()
    {
        using (SampleEntities context = new SampleEntities())
        {
            if (context.Customers.Count() > 0)
            {
                gridSample.DataSource = context.Customers;
                gridSample.DataBind();
            }
            else
            {
                var obj = new List<Customer>();
                obj.Add(new Customer());
                // Bind the DataTable which contain a blank row to the GridView
                gridSample.DataSource = obj;
                gridSample.DataBind();
                int columnsCount = gridSample.Columns.Count;
                gridSample.Rows[0].Cells.Clear();// clear all the cells in the row
                gridSample.Rows[0].Cells.Add(new TableCell()); //add a new blank cell
                gridSample.Rows[0].Cells[0].ColumnSpan = columnsCount; //set the column span to the new added cell

                //You can set the styles here
                gridSample.Rows[0].Cells[0].HorizontalAlign = HorizontalAlign.Center;
                gridSample.Rows[0].Cells[0].ForeColor = System.Drawing.Color.Red;
                gridSample.Rows[0].Cells[0].Font.Bold = true;
                //set No Results found to the new added cell
                gridSample.Rows[0].Cells[0].Text = "NO RESULT FOUND!";
            }
        }
    }

 protected void gridSample_RowDataBound(object sender, GridViewRowEventArgs e)
    {
        DropDownList ddl = null;
        if (e.Row.RowType == DataControlRowType.Footer)
        {
            ddl = e.Row.FindControl("ddlCategoryNew") as DropDownList;
        }
        if (e.Row.RowType == DataControlRowType.DataRow)
        {
            ddl = e.Row.FindControl("ddlCategory") as DropDownList;
        }
        if (ddl != null)
        {
            using (SampleEntities context = new SampleEntities())
            {
                ddl.DataSource = context.Categories;
                ddl.DataTextField = "Name";
                ddl.DataValueField = "CategoryID";
                ddl.DataBind();
                ddl.Items.Insert(0, new ListItem(""));
            }
            if (e.Row.RowType == DataControlRowType.DataRow)
            {
                ddl.SelectedValue = ((Customer)(e.Row.DataItem)).CategoryID.ToString();
            }
        }
    }

We access category dropdown (in footer row and during editing) and bind to category data in RowDataBound event.
BindGrid method is called in page_load event.

    protected void Page_Load(object sender, EventArgs e)
    {
        if (!IsPostBack)
        {
            BindGrid();
        }
        lblMessage.Text = "";
    }

Inserting Data:

 protected void gridSample_RowCommand(object sender, GridViewCommandEventArgs e)
    {
        if (e.CommandName == "InsertNew")
        {
            GridViewRow row = gridSample.FooterRow;
            TextBox txtFirstName = row.FindControl("txtFirstNameNew") as TextBox;
            TextBox txtLastName = row.FindControl("txtLastNameNew") as TextBox;
            TextBox txtEmail = row.FindControl("txtEmailNew") as TextBox;
            DropDownList ddlCategory = row.FindControl("ddlCategoryNew") as DropDownList;
            if (txtFirstName != null && txtLastName != null && txtEmail != null && ddlCategory != null)
            {
                using (SampleEntities context = new SampleEntities())
                {
                    Customer obj = new Customer();
                    obj.FirstName = txtFirstName.Text;
                    obj.LastName = txtLastName.Text;
                    obj.Email = txtEmail.Text;
                    obj.CategoryID = Convert.ToInt32(ddlCategory.SelectedValue);
                    context.Customers.AddObject(obj);
                    context.SaveChanges();
                    lblMessage.Text = "Added successfully.";
                    BindGrid();
                }
            }
        }
    }

We will get data from footer controls, create new object and use the EntitySet<T>.AddObject method for adding newly created objects. When context.SaveChanges() is called, EF goes ahead and inserts the record into the database.

Updating Data:

	protected void gridSample_RowEditing(object sender, GridViewEditEventArgs e)
    {
        gridSample.EditIndex = e.NewEditIndex;
        BindGrid();
    }
    protected void gridSample_RowCancelingEdit(object sender, GridViewCancelEditEventArgs e)
    {
        gridSample.EditIndex = -1;
        BindGrid();
    }
   protected void gridSample_RowUpdating(object sender, GridViewUpdateEventArgs e)
    {
        GridViewRow row = gridSample.Rows[e.RowIndex];
        TextBox txtFirstName = row.FindControl("txtFirstName") as TextBox;
        TextBox txtLastName = row.FindControl("txtLastName") as TextBox;
        TextBox txtEmail = row.FindControl("txtEmail") as TextBox;
        DropDownList ddlCategory = row.FindControl("ddlCategory") as DropDownList;
        if (txtFirstName != null && txtLastName != null && txtEmail != null && ddlCategory != null)
        {
            using (SampleEntities context = new SampleEntities())
            {
                int customerID = Convert.ToInt32(gridSample.DataKeys[e.RowIndex].Value);
                Customer obj = context.Customers.First(x => x.CustomerID == customerID);
                obj.FirstName = txtFirstName.Text;
                obj.LastName = txtLastName.Text;
                obj.Email = txtEmail.Text;
                obj.CategoryID = Convert.ToInt32(ddlCategory.SelectedValue);
                context.SaveChanges();
                lblMessage.Text = "Saved successfully.";
                gridSample.EditIndex = -1;
                BindGrid();
            }
        }
    }

We get customerID from datakey of gridview, get Customer object using customerID, modify data in customer object and call SaveChanges to apply on database.

Deleting Data:

 protected void gridSample_RowDeleting(object sender, GridViewDeleteEventArgs e)
    {
        int customerID = Convert.ToInt32(gridSample.DataKeys[e.RowIndex].Value);
        using (SampleEntities context = new SampleEntities())
        {
            Customer obj = context.Customers.First(x=>x.CustomerID == customerID);
            context.Customers.DeleteObject(obj);
            context.SaveChanges();
            BindGrid();
            lblMessage.Text = "Deleted successfully.";
        }
    }

We use DeleteObject method to delete object and SaveChanges to reflect it on database.

Hope, It helps !!!

Related posts:

  1. Show ModalPopUp to Edit Asp.net Gridview Row Values Without using AjaxControlToolkit
  2. Client Side Validation using ASP.NET Validator Controls from Javascript
  3. Bind array to specific column of asp.net gridview
  4. Convert ASP.NET Gridview OR HTML Table to Wizard using jQuery
  5. Displaying Total in ASP.NET Gridview Footer Row Without using Template Field

Anonymous Type LINQ Result and GridView Sorting in ASP.NET

$
0
0


It explains how to implement asp.net gridview sorting functionality when gridview datasource is Anonymous Type. Suppose you are using Entity Framework OR LINQ to sql, getting data with a particular structure having different columns from different tables (Anonymous Type) using LINQ and you have defined it as a datasource of gridview. It’s okay to display data. Now, you have to implement sorting feature. One way is to convert Anonymous Type to Datatable and sort it defaultview, but it’s too complex. You might have tasted dynamic sorting with extension method as mentioned here and here but not useful for Anonymous type. Another way is to use switch case for sortexpression and use OrderBy and OrderByDescending for each column. It’s not a generalize solution. then what….???
Here is the solution.

GridView Structure:

Consider following gridview structure:

 <asp:GridView ID="GridView1" runat="server" AutoGenerateColumns="false"
        AllowSorting="true" onsorting="GridView1_Sorting">
        <Columns>
            <asp:BoundField DataField="FirstName" HeaderText="First Name" SortExpression="FirstName"  />
            <asp:BoundField DataField="LastName" HeaderText="Last Name" SortExpression="LastName"  />
            <asp:BoundField DataField="Email" HeaderText="Email" SortExpression="Email"  />
            <asp:BoundField DataField="Total" HeaderText="Total Orders" SortExpression="Total"  />
        </Columns>
</asp:GridView>

gridview sorting Anonymous Type LINQ Result and GridView Sorting in ASP.NET

Sorting Implementation:

1. You’ve to defined two properties for SortExpression and SortDirection.

 /// <summary>
    /// SortExpression of GridView
    /// </summary>
    public string GridViewSortExpression
    {
        get
        {
            return ViewState["GridViewSortExpression"] == null ? "FirstName" : ViewState["GridViewSortExpression"] as string;
        }
        set
        {
            ViewState["GridViewSortExpression"] = value;
        }
    }

    /// <summary>
    /// for Sorting Direction
    /// </summary>
    public SortDirection GridViewSortDirection
    {
        get
        {
            if (ViewState["sortDirection"] == null)
                ViewState["sortDirection"] = SortDirection.Ascending;

            return (SortDirection)ViewState["sortDirection"];
        }
        set { ViewState["sortDirection"] = value; }
    }

2. Set these properties values in gridview sorting event.

 protected void GridView1_Sorting(object sender, GridViewSortEventArgs e)
    {
        GridViewSortExpression = e.SortExpression;
        if (GridViewSortDirection == SortDirection.Ascending)
        {
            GridViewSortDirection = SortDirection.Descending;
        }
        else
        {
            GridViewSortDirection = SortDirection.Ascending;
        };
        BindGrid();
    }

3. Get and Bind the Ordered data to gridview.

The tricky part to get property from GridViewSortExpression dynamically and define it in IEnumerable OrderBy method. See following to do it
———————————————-
data.OrderBy(x =>x.GetType().GetProperty(GridViewSortExpression).GetValue(x, null));
———————————————-
The complete method is :

void BindGrid() {
        using (SampleEntities context = new SampleEntities())
        {
            var data = (from cust in context.Customers
                        join order in context.Orders on cust.CustomerID equals order.CustomerID into OrdersbyCustomer
                        select new { FirstName = cust.FirstName, LastName = cust.LastName, Email = cust.Email, Total = OrdersbyCustomer.Count()}).ToList();
            if (data != null && data.Count > 0)
            {
                if (GridViewSortDirection == SortDirection.Ascending)
                {
                    GridView1.DataSource = data.OrderBy(x => x.GetType().GetProperty(GridViewSortExpression).GetValue(x, null));
                }
                else
                {
                    GridView1.DataSource = data.OrderByDescending(x => x.GetType().GetProperty(GridViewSortExpression).GetValue(x, null));
                };
            }
            else {
                GridView1.DataSource = null;
            }
            GridView1.DataBind();
        }
    }

Hope, It saves your time. Share your opinion or suggestion about it.

No related posts.

3 Practical Uses of Zen Coding

$
0
0


You must know Zen Coding if you are Front End Web developer. Zen coding allows for fast coding and editing in HTML, XML, XSL, and other structured code formats. It uses CSS selectors like syntax and generate full code(write less do more). It expands abbreviations into complete HTML structures. Zen coding plugin is available for almost all top text editors(Notepad++, visual studio, Dreamweaver , TextMate, Sublime Text, Coda, Vim ..etc). In live demo, First write abbreviations and press Ctrl+, to expand abbreviations.

Syntax: Let’s see basic rules

Symbol Description Example Output
tag Element Name div
<div></div>
# element identifier div#myID
<div id="myID"></div>
. Class name div.myClass
<div class="myClass"></div>
> Child Element ul>li
<ul>
	<li></li>
</ul>
+ Sibling element div.Header+div.Content+div.Footer
<div class="Header"></div>
<div class="Content"></div>
<div class="Footer"></div>
* to create multiple elements ul#menu>li*3>a
<ul id="menu">
	<li><a href=""></a></li>
	<li><a href=""></a></li>
	<li><a href=""></a></li>
</ul>
$ item numbers div.item$*3
<div class="item1"></div>
<div class="item2"></div>
<div class="item3"></div>
$$ multi times numbering div#id$.class$$*3
<div id="id1" class="class11"></div>
<div id="id2" class="class22"></div>
<div id="id3" class="class33"></div>

1. As your default template:

For new page, no need to write full common structure like html, head, body tags etc. just type html:xt for xhtml1-transitional or html:5 for HTML5 structure. You can find other short syntax here. You can create your default template of page in zen coding syntax and use it again and again.
Example:

html:xt>div#header>div#logo+ul#nav>li.item-$*5>a

will generate following code:

<!DOCTYPE html PUBLIC "-//W3C//DTD XHTML 1.0 Transitional//EN" "http://www.w3.org/TR/xhtml1/DTD/xhtml1-transitional.dtd">
<html xmlns="http://www.w3.org/1999/xhtml" xml:lang="en">
<head>
	<title></title>
	<meta http-equiv="Content-Type" content="text/html;charset=UTF-8" />
</head>
<body>
	<div id="header">
		<div id="logo"></div>
		<ul id="nav">
			<li class="item-1"><a href=""></a></li>
			<li class="item-2"><a href=""></a></li>
			<li class="item-3"><a href=""></a></li>
			<li class="item-4"><a href=""></a></li>
			<li class="item-5"><a href=""></a></li>
		</ul>
	</div>
</body>
</html>

2. Create list/drop-down list Quickly:

Wrap with Abbreviation” is power of zen coding. It does time consuming data formatting or repeated tasks quickly. Suppose you have to create country drop-down list from excel data. Copy country names from excel and paste in editor.
Now Ctrl + H and use

select#country>option#$*

Similarly, you can create menu/static list as in example of first point quickly.

3. Easy in social Sharing:

It’s easy to share abbreviations instead of whole HTML template in social media, specially in twitter where char length is limited. When HTML template is shared, it gets distorted and very hard to understand. but in abbreviations, there is no role of formatting and easy for users also.

Zen coding has changed the way of writing HTML code and It’s making me more lazy icon wink 3 Practical Uses of Zen Coding Share your opinion and tips about Zen coding.

Related posts:

  1. IxEDIT: No coding for Javascript/jQuery
  2. Naming Conventions & Coding Standards for .NET Web Developers
  3. A Simple Rounded Corner Slide Tabbed Box (Content Slider) using jQuery
  4. Flipper: A Developer Tool to save your coding time

3 Ways to implement CRUD (Select, Insert, Update, Delete) Operations

$
0
0


CRUD (Create, Read, Update, and Delete) are the four basic and essential database operations of an application. There are different ways to design to implement CRUD operations. In this article, You’ll see 3 most widely used approaches in web application.

1. Separate Pages:

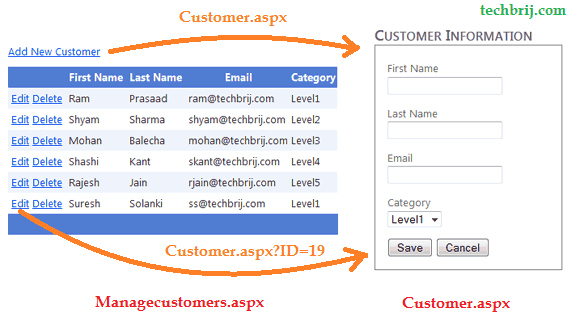
insert update delete new page 3 Ways to implement CRUD (Select, Insert, Update, Delete) Operations

In this approach, Data is displayed in Grid with Edit and Delete options. There is also link to add New record. When user clicks to add new item, the page is redirected to another page having different controls with default values, instructions and validators. After entering data, when user submits form, It is redirected to back on Grid page with new entry.

When user clicks on edit option of any record, It is redirected to page with filled form. Generally same form is used with query-string parameter to retrieve data from database, fill form and to differentiate add /edit operations.

This approach is useful when form has many fields and structure is complex.

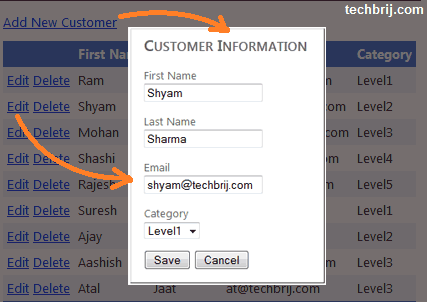
2. Pop-Up Form:

insert update delete pop up 3 Ways to implement CRUD (Select, Insert, Update, Delete) Operations

In this approach, Pop-up dialog instead of separate page is used to Add/Edit data. When user clicks on New option, blank modal pop-up form is displayed and On submission, It’s closed automatically. On editing, filled pop-up form is displayed, user modifies values and save it.

This approach is useful when form has limited fields and Ajax based page(like dashboard) is used. See following post to implement this approach in ASP.NET:

Show ModalPopUp to Edit Asp.net Gridview Row Values

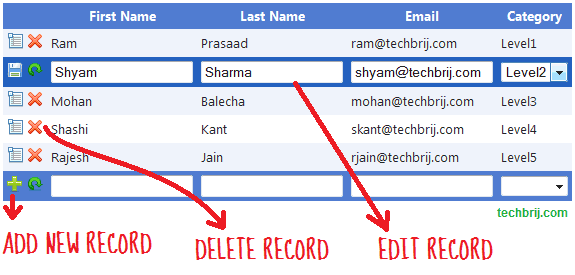
3. Inline Editing:

insert update delete gridview 3 Ways to implement CRUD (Select, Insert, Update, Delete) Operations

In this approach, all operations are done in Grid. When user clicks on edit option, all items become editable and on saving, again become read only.

It’s useful when form has less fields especially on master pages like city, state…etc. See following post to implement this approach in ASP.NET:

Insert, Update, Delete in ASP.NET Gridview With Entity Framework

Share your opinion and let us know which approach you are following the most.

Related posts:

  1. Insert, Update, Delete in ASP.NET Gridview With Entity Framework
  2. Add Dynamic Buttons and Handle click event on server side in ASP.NET
  3. jQuery: Common Operations on DropdownList (Combobox)
  4. An error occurred accessing a data source : Browser enabled infopath Error in MOSS 2007
  5. Retrieve value of Dynamic controls in asp.net

Implement Audit Trail Quickly for Microsoft SQL Server

$
0
0


It explains how to implement an audit trail quickly by creating shadow table for each table in database and triggers to log every time when a record is inserted, updated or deleted in the table.

Steps:

1. First run Scripts By Cedric Baelemans of stored proc which takes table name as argument and create shadow table having some additional fields like AuditId, AuditAction, AuditDate, AuditUser and AuditApp in database.

audit trail table sql server Implement Audit Trail Quickly for Microsoft SQL Server

2. Execute stored proc manually for testing on sample table say Customers.

Exec GenerateAudittrail ‘Customers’,'dbo’

It will create shadow table ‘Customers_shadow‘ with insert, update and delete triggers of Customers. When any record is inserted, updated or deleted, trigger is fired and a record is inserted in shadow table with additional information.

audit trail sql server Implement Audit Trail Quickly for Microsoft SQL Server

3. We can do this quickly by running it with SSMS tools Pack. It is the best free Sql Server Management Studio(SSMS)’s add-in having lots of features. Install SSMS Tools Pack if not installed and see this post for more details.

4. Click on SSMS Tools > “Run Custom Script” > Options
5. Give Shortcut ‘Audit‘ and Select ‘Table‘ in ‘Enabled On‘ options and enter following sql script.
Exec GenerateAudittrail ‘|ObjectName|’,'|SchemaName|’
6. Click on Save and OK button.
7. Now, Right click on any table > Select “SSMS Tools” > Run Custom Scripts > Audit
That’s it !!!

audit trail sql server ssms Implement Audit Trail Quickly for Microsoft SQL Server

It will create Audit Table and Triggers automatically. It is very useful and time saver when hundreds of tables in database and we have to implement audit functionality for some tables.

If you are facing issue, see step by step guide to Run Your Custom Script Quickly with SSMS Tools Pack.

Enjoy Auditing !!!

Related posts:

  1. Run Your Custom Script Quickly with SSMS Tools Pack
  2. Install sql server database with visual studio setup
  3. Setup wordpress on local xampp from production server
  4. Add Dynamic Buttons and Handle click event on server side in ASP.NET
  5. Create Windows Service quickly using .NET

How To Use SQL IN Statement to Select Data Having All Specified Values

$
0
0


Generally, We use SQL Where .. IN Statement to determine whether a specified value matches ANY value in a sub-query or a list. But sometimes we require to get data which have ALL specified values, not ANY value. In this post, we’ll see how to accomplish it. Let’s take an example, Consider following data in Orders table

OrderID ProductID
1 1
1 2
1 3
2 1
2 3
3 2
3 3
4 3
5 2
5 4

——————————–

SQL Query:

Select distinct OrderID
From Orders
Where ProductID in (2,3)
——————————–
The above query selects OrderIDs which has any specified ProductID (2 or 3 or both)

Output:

1
2
3
4
5

Now, we want to select OrderIDs which have ALL specified values (2 and 3 both). See following SQL query:
——————————–
Select OrderID
From Orders
Where ProductID in (2,3)
group by OrderID
having count(*) = 2

——————————–
Output:
1
3

Which is expected. In above query, We are grouping by OrderID, counting and select if count is equal to total number of items in the specified values. If there are 5 items in IN condition then you have to set having count(*) = 5.

Hope, It saves your time. Let me know how you are doing to do this.

Related posts:

  1. Implement Audit Trail Quickly for Microsoft SQL Server
  2. Grouping Data in ASP.NET Gridview Control
  3. Run Your Custom Script Quickly with SSMS Tools Pack
  4. Install sql server database with visual studio setup
  5. Concurrency violation: the UpdateCommand affected 0 of the expected 1 records

Convert ASP.NET Gridview OR HTML Table to Wizard using jQuery

$
0
0


In my post, I explained how we can create a simple wizard using jQuery. In this post, we’ll see how asp.net gridview can be displayed in wizard format. Sometimes, gridview is used to take input from user when multiple fields are required many times. It is not user friendly, We can use wizard but not easy to handle on server side as in gridview. So, It’s better to convert ASP.NET gridview to jQuery wizard. So, no need to change on server side and UI is also more user convenient. We’ll convert gridview structure to wizard structure as explained in this post and use wizard.js.

gridview to wizard jquery Convert ASP.NET Gridview OR HTML Table to Wizard using jQuery

HTML Source:

 <asp:GridView ID="GridView1" runat="server" AutoGenerateColumns="False">
                <Columns>
                    <asp:BoundField DataField="Product" HeaderText="Product" />
                    <asp:BoundField DataField="Price" HeaderText="Price" />
                    <asp:TemplateField HeaderText="Qty">
                        <ItemTemplate>
                            <asp:TextBox ID="txtQty" runat="server" MaxLength="5" Width="75px" ></asp:TextBox>
                        </ItemTemplate>
                    </asp:TemplateField>
                    <asp:TemplateField HeaderText="Size">
                        <ItemTemplate>
                            <asp:DropDownList ID="ddlSize" runat="server">
                             <asp:ListItem Text="S" Value="S"></asp:ListItem>
                            <asp:ListItem Text="M" Value="M"></asp:ListItem>
                            <asp:ListItem Text="L" Value="L"></asp:ListItem>
                            <asp:ListItem Text="XL" Value="XL"></asp:ListItem>
                            <asp:ListItem Text="XXL" Value="XXL"></asp:ListItem>
                           </asp:DropDownList>
                        </ItemTemplate>
                    </asp:TemplateField>
                    <asp:TemplateField HeaderText="Color">
                        <ItemTemplate>
                            <asp:DropDownList ID="ddlColor" runat="server">
                              <asp:ListItem Text="Red" Value="1"></asp:ListItem>
                              <asp:ListItem Text="Green" Value="2"></asp:ListItem>
                              <asp:ListItem Text="Blue" Value="3"></asp:ListItem>
                            </asp:DropDownList>
                        </ItemTemplate>
                    </asp:TemplateField>
                </Columns>
            </asp:GridView>

            <div id="wizHolder" style="margin:70px auto;">
                <div id="title">&nbsp;&nbsp;Wizard Title<a class="closeButton">X</a></div>
                <ul id="wizard"></ul>
            </div>

First, you have to include jQuery and wizard.js file. The logic of conversion is simple, traverse gridview row by row and create a new table having Gridview’s header and current data row as two columns and put in wizHolder > ul > li. So our objective is to create structure something like this:

<table>
<tbody>
	<tr>
		<th>Product</th>
		<td>Product-1</td>
	</tr>
	<tr>
		<th>Price</th>
		<td>$404</td>
	</tr>
	.....
</tbody>
</table>

Script Source:

To convert Gridview:

				var wiz = $('#wizard');
                    $('#<%=GridView1.ClientID %> tr:not(:first)').each(function () {
                        var row = this;
                        var tbl = $('<table/>');
                        $('td', $(this)).each(function (index) {
                            var tr = $('<tr/>');
                            tr.append($('#<%=GridView1.ClientID %> th').eq(index).clone());
                            tr.append($(this).clone());
                            tbl.append(tr);
                        });
                        wiz.append($('<li></li>').append(tbl));
                    });
					  $('#<%=GridView1.ClientID %>').remove();

To convert HTML Table:

If you have to convert HTML Table instead of asp.net gridview, replace <%=GridView1.ClientID %> with your table ID in above code.

To configure wizard:

				var setting = {
                        ctrls: $("#wizard li"), //Structure for Steps
                        nextButtonTitle: 'Go',
                        nextButtonCss: 'btnNext',
                        callBack: btnNextClicked,
                        previousButtonTitle: 'Back',
                        previousButtonCss: 'btnBack',
                        validateWizardStep: validateStep,
                        validateWizardByTitle: validateByTitle,
                        initStep: 0
                    };
                    showWizardScreen(setting);

Same setting is used in which btnNextClicked, validateStep and validateByTitle are functions. See this post for more details about functions.

Hope, It helps. Enjoy playing with jQuery !!!

Related posts:

  1. Bind array to specific column of asp.net gridview
  2. Displaying Total in ASP.NET Gridview Footer Row Without using Template Field
  3. Grouping Data in ASP.NET Gridview Control
  4. Show ModalPopUp to Edit Asp.net Gridview Row Values Without using AjaxControlToolkit
  5. Adding Gridview nested in Repeater in ASP.NET 2.0

Happy Holi

$
0
0


Happy Holi (A festival of Colours) to all TechBrij’s readers.

The world’s Lathmar Holi of Braj has its own identity but also the colors of Bikaner in Rajasthan has fun, frolic with the particular style. The festival of Holi means not only with water balloons, pichhkaris or water guns, gulaal, bhang and mithai but also mutual love and unity in society. Being Bikaneri, I like splash of Rammat, playing Tambourine and listening traditional bhajans. Bikaner’s traditions and customs of the common opinion deeply connects each other and makes a unity. During Holi in Bikaner, a group of persons belonging different casts dancing, singing, playing tambourine in various places out is to create an atmosphere of fun. Bikaneri Holi has their own glorious history, culture and tradition which still followed by people. Bikaneri holi has different colors and all Bikaneri spread all over india come their home town to enjoy the color of Holi.

Holi Happy Holi

In above picture, Both are my nephews and one year olds.

Enjoy and Celebrate a very bright, colourful and joyful Bikaneri Holi.

No related posts.

Moderate Google Docs Forms Data and Share Filtered Data Only to Public

$
0
0


If you are using Google Docs for Forms or Surveys, You might be getting lots of fake (spam) form submissions. The situation becomes more critical when you are sharing data, survey result or summary report to public and It would mislead the objective of forms or surveys. By default, Google forms doesn’t support Captcha to stop spam submission. But you can’t block spammers. In this case, you want to moderate the data and share approved/ filtered data to public.
google docs forms filter share Moderate Google Docs Forms Data and Share Filtered Data Only to Public

Let us take an example to implement this step by step.

Suppose you have a “Comment” form having Name, Email, Website and Comment fields Then In spreadsheet, you have following structure:

google docs spreadsheet Moderate Google Docs Forms Data and Share Filtered Data Only to Public

1. You have to add one more column (say “IsValid“) manually to approve/reject data.

2. Copy the key value from spreadsheet URL (in image it’s “0AuqF9Lo00cllnUFB0Nmc”)

3. Create a New spreadsheet which will have only approved data and will be shared to public.

4. Suppose you have to show Name, Website and Comment columns only. In first row, type column names manually.

5. In A2 cell, type following
—————————————————-
=QUERY(ImportRange(“Key”,”Sheet1!B1:F”);”Select Col1,Col3,Col4 Where Col5 = TRUE”;0)
—————————————————-
Replace Key to copied key value. In our case the formula will be
—————————————————-
=QUERY(ImportRange(“0AuqF9Lo00cllnUFB0Nmc”,”Sheet1!B1:F”);”Select Col1,Col3,Col4 Where Col5 = TRUE”;0)
—————————————————-
It’ll display all approved/valid data.

google docs spreadsheet result Moderate Google Docs Forms Data and Share Filtered Data Only to Public

In our formula, two functions are used:
Query: It’s a built-in function that allows you to perform a query over an array of values using the Google Visualization API Query.

ImportRange: It lets you reference another sheet from the spreadsheet that you’re currently editing. the common syntax is:
=importRange(spreadsheet-key, range).

In our formula, Sheet1′s column B to F data are selected then it is filtered where IsValid = true and selected columns(1,3,4) are displayed in new spreadsheet.

Now, you can share this spreadsheet to public(file >share > private..Change > Public On the web) OR publish as a web page (File > Publish to the web).

When the form is submitted, an entry goes to original spreadsheet. When you set IsValid = true for the entry then It’ll appear in shared spreadsheet. Thus you can filter spam out.

You can see another live example here.

Hope, It helps.

Related posts:

  1. Open ‘View only’ shared google doc form
  2. How to Remove Line Numbers in Excel Column
  3. How To Use SQL IN Statement to Select Data Having All Specified Values
  4. How To See Subdomain Tracking Report In Google Analytics
  5. Configure ‘Google Analytics for WordPress’ plugin for Subdomain tracking

Linux Servers vs. Windows Servers

$
0
0


There has always been a debate between Linux and Windows users about which platform is better. Linux, being an open source platform, promises better support apart from the fact that it is free while Windows users would argue about the user friendliness and the number of applications supported by it. Let’s have a look at both platforms so that we can decide which platform will suit our needs and requirements best.
windows linux hosting server Linux Servers vs. Windows Servers

The Low-Cost Solution:

Linux has always been the main competitor for Windows Servers simply because of the great community support that it has maintained over the years. Popular distros like Ubuntu, OpenSuse, Fedora and Debian are all available for free and are updated regularly by a community of Linux enthusiasts. Any bugs reported is fixed within a few days due to the large number of programmers around the world that contributes to the Linux code base. Commercial Linux distributions like Red Hat Enterprise Linux offer free upgrades for a certain amount of time as well as optional technical support on their purchase; this makes them a good choice for small firms with a limited budget.

If your work environment requires a lot of flexibility in the applications that you are using, then Linux is your ideal choice. Most Linux software source codes are available for free allowing them to be customized to meet the requirements of your business without any legal issues involved. You can create your own patches to fix bugs in your network without relying on third party vendors. Security updates and patches are faster with Linux, as the community works on patches and gets them out as soon as possible. With Windows, you have to rely on Microsoft alone, which can leave the security hole open for months.

When it comes to cost, Linux would definitely overthrow Windows simply because of the comparatively lesser cost in setting up and maintaining a Linux server. Many companies offer huge discounts on Linux based devices because there are no licensing fees involved in the operating system or in majority of the software that run on Linux. A quick Google search can help you find HP coupons that could give you discounts of up to 10% on HP hardware that runs on Linux. The discounts are not only limited to HP though. Other vendors also offer big discounts on Linux based services such as web hosting.

Probably one of the disadvantages of Linux is the fact that it lacks a single platform and customers would often be confused about the different platforms available for them to use. Also, there are a lot of issues with the upgrade cycle on most of the Linux distros since a new one rolls out every few months.

User Friendliness at a Cost:

Microsoft has always been a front runner in the software business and will perhaps remain in that position for the foreseeable future due to a number of reasons. Microsoft has developed a lot of frameworks and applications to suit its customers’ needs and requirements over the years. The classic ASP or ASP.NET, MS Access, Microsoft SQL Server, C# and Silverlight are all available only on the Windows platform. So if your work requires you to use these platforms, then you have no choice but to go for a license. These platforms are more user-friendly and skilled professionals in the aforementioned platforms above are easier to find compared to Linux-based platforms. Thus, this is definitely one area where Windows edges over Linux.

Although you can get similar discounts for Microsoft based servers, due cost of the operating system it may still be more expensive than Linux based servers. Microsoft users will be happy to know that the software that can be used on the Window-based platforms are much easier to use. Many tasks on Linux systems require a very high level of knowledge about the terminal while most of the work on Windows can be done at the touch of a button.

With Windows, you can be sure that the most popular platforms such as PHP, MySQL and Perl will be available on Windows. On the other hand, you can’t be so sure about the opposite. Also the software support offered by many third-party software vendors on Linux is close to nonexistent at times. It thrives on community support so you never know when your favorite platforms or services are shutdown. Also check out:

4 Main Advantages of Dedicated Servers

The Final Verdict:

Both Linux and Windows based-servers have their own positive and negative aspects. The main thing that one should consider while choosing a server should be the budget and the scale of the business along with the software platform. These two platforms will continue to compete with each other in the software market for many years as they both evolve with time. Hence, if you are worried about cost and are very comfortable with a command line interface, then Linux is for you. However, if your main issue is user friendliness and platform-specific software applications, then you can’t do wrong with Windows.
Do Share your opinion, suggestion or experience about windows or Linux hosting?

About the author:
Glee Cunningham has worked with servers and other IT technologies for over 15 years.

If you would like to write for us, please read guidelines here.

Related posts:

  1. 4 Main Advantages of Dedicated Servers
  2. Download & Install Religare RacePro(Trading App) on Windows
  3. Windows 8 & Future of .NET
  4. Create Windows Service quickly using .NET

SQL Query To Check Money Data Type and Convert it to Decimal Dynamically

$
0
0


Sometimes we need to convert one data type to another data type to map columns in sql server. You might not be allowed to change table structure directly. In this case you’ve to convert in your query or stored procedure. Suppose you’ve to convert money data-type to decimal for greater precision in calculation then you can do it easily using Cast or Convert methods.

money to decimal sql server SQL Query To Check Money Data Type and Convert it to Decimal Dynamically

Suppose you don’t know which column is money type and have to convert all money type to decimal for a table then you can do it with dynamic SQL.

Declare @sql varchar(1000)

SELECT @sql = Coalesce(@sql+',','') +
Case DATA_TYPE
when 'money' then 'Cast(' + COLUMN_NAME  + ' as decimal(19,4)) Amt'
else COLUMN_NAME
end
from INFORMATION_SCHEMA.COLUMNS
WHERE TABLE_NAME = N'Orders'

Exec ('select '+ @sql + ' from Orders')

In above SQL, Column name is retrieved from information schema, Cast syntax is used for money data type columns and stored in @sql variable which is a part of dynamic select query.

If you know column name and want to check whether it is money type or not then use SQL_VARIANT_PROPERTY

select OrderID, CustomerID, OrderDate,
(case SQL_VARIANT_PROPERTY(Amount ,'BaseType')
when 'money' then Cast(Amount as decimal(10,2))
else 100.00
end) Amt
from Orders

Enjoy SQLing !!!

Related posts:

  1. How To Use SQL IN Statement to Select Data Having All Specified Values
  2. Anonymous Type LINQ Result and GridView Sorting in ASP.NET
  3. Online tool to convert a long query/xml/content to string and assign to a variable
  4. Moderate Google Docs Forms Data and Share Filtered Data Only to Public
  5. Implement Audit Trail Quickly for Microsoft SQL Server
Viewing all 116 articles
Browse latest View live