Quantcast
Channel: TechBrij
Viewing all 116 articles
Browse latest View live

Received Microsoft Most Valuable Professional (MVP) Award 2012

$
0
0


images Received Microsoft Most Valuable Professional (MVP) Award 2012 I am happy to inform you that Microsoft has awarded me the ‘Most Valuable Professional (MVP)‘ award (in ASP.NET/IIS category) which is a great honor and given to a very limited number of professionals. In the first week of October, I went to Bangalore for official work and got mail from Microsoft during traveling:

Dear Brij Dammani,

Congratulations! We are pleased to present you with the 2012 Microsoft® MVP Award! This award is given to exceptional technical community leaders who actively share their high quality, real world expertise with others. We appreciate your outstanding contributions in ASP.NET/IIS technical communities during the past year.

It was one of the happiest moment in my life and didn’t get a chance to write something about it due to busy schedule. After returning from there, I thought I’d post on receiving award.

Now, I have received the MVP Award gift package which includes the following:

  • Certificate
  • Crystal Award
  • MVP ID Card
  • MVP Badge
  • NDA Agreement

microsoft mvp award Received Microsoft Most Valuable Professional (MVP) Award 2012

I’m living and working in Bikaner (Rajasthan) which is not a big city. So It’s really a big thing for the city and makes me feel great. Getting MVP award is like dreams come true.

On this occasion, I would like special Thanks to Mr.Tanmay Kapoor and the team for this recognition and also thanks a lot to my Friends, Employer, co-workers, Community friends and readers for providing support and I hope to do better.

Thanks Microsoft !!!

Related posts:

  1. Promote your blog with Microsoft Montage
  2. Received Google Adsense Cheque

Real Time Chart With SignalR and ASP.NET MVC

$
0
0


In my recent post, we have implemented Real-Time Chart using HTML5 Push Notification (SSE) and ASP.NET Web API. I got many requests to implement it using SignalR. So In this tutorial, we are going to display real-time updates with SignalR and ASP.NET MVC. SignalR is an async signaling library for ASP.NET to help build real-time, multi-user interactive web applications. It makes easy to push data from the server to the client.

 Real Time Chart With SignalR and ASP.NET MVC

1. Create ASP.NET MVC 4 Project.
2. To install SignalR, run the following command in the Package Manager Console
install-package signalr

3. Download Flot library and Add Flot library scripts (jquery.flot.min.js, excanvas.min.js) in scripts folder

Hub:

4. Add a new folder “Hubs” in the project and add “ChartDataHub.cs” and “ChartData.cs” classes.
in ChartData.cs:

 public class ChartData
    {
        private readonly static Lazy<ChartData> _instance = new Lazy<ChartData>(() => new ChartData());
        private readonly ConcurrentQueue<int> _points = new ConcurrentQueue<int>();
        private readonly int _updateInterval = 250; //ms
        private Timer _timer;
        private readonly object _updatePointsLock = new object();
        private bool _updatingData = false;
        private readonly Random _updateOrNotRandom = new Random();
        private int _startPoint = 50, _minPoint = 25, _maxPoint = 99;

        private ChartData()
        {

        }

        public static ChartData Instance
        {
            get
            {
                return _instance.Value;
            }
        }

        /// <summary>
        /// To initialize timer and data
        /// </summary>
        /// <returns></returns>
        public IEnumerable<int> initData()
        {
            _points.Enqueue(_startPoint);
            _timer = new Timer(TimerCallBack, null, _updateInterval, _updateInterval);
            return _points.ToArray();
        }

       /// <summary>
       /// Timer callback method
       /// </summary>
       /// <param name="state"></param>
        private void TimerCallBack(object state)
        {
            // This function must be re-entrant as it's running as a timer interval handler
            if (_updatingData)
            {
                return;
            }
            lock (_updatePointsLock)
            {
                if (!_updatingData)
                {
                    _updatingData = true;

                    // Randomly choose whether to udpate this point or not
                    if (_updateOrNotRandom.Next(0, 3) == 1)
                    {
                        BroadcastChartData(UpdateData());
                    }
                    _updatingData = false;
                }
            }
        }

        /// <summary>
        /// To update data (Generate random point in our case)
        /// </summary>
        /// <returns></returns>
        private int UpdateData()
        {
            int point = _startPoint;
            if (_points.TryDequeue(out point))
            {
                // Update the point price by a random factor of the range percent
                var random = new Random();
                var pos = random.NextDouble() > .51;
                var change = random.Next((int)point/2);
                change = pos ? change : -change;
                point += change;
                if (point < _minPoint) {
                    point = _minPoint;
                }
                if (point > _maxPoint) {
                    point = _maxPoint;
                }
                _points.Enqueue(point);
            }
            return point;
        }

        private void BroadcastChartData(int point)
        {
            GetClients().updateData(point);
        }

        private static dynamic GetClients()
        {
            return GlobalHost.ConnectionManager.GetHubContext<ChartDataHub>().Clients;
        }
    }

initData: initialize data and timer
UpdateData: to get the latest data(Generate random point in our case)
BroadcastChartData: to broadcast the point

In previous article, we were changing time-interval of timer in timercallback method to get random data at random time interval. Here we are randomly perform the operation to produce same behavior instead of changing time-interval.

 if (_updateOrNotRandom.Next(0, 3) == 1){
 ...do operation...
}

5. in ChartDataHub.cs:

 [HubName("chartData")]
    public class ChartDataHub : Hub
    {
        private readonly ChartData _pointer;

        public ChartDataHub() : this(ChartData.Instance) { }

        public ChartDataHub(ChartData pointer)
        {
            _pointer = pointer;
        }

        public IEnumerable<int> initData()
        {
            return _pointer.initData();
        }
    }

It’s the interface for SignalR. HubName Attribute is the ‘client side’ name of the ‘Hub’.

View:

5. Create new action in Home controller, add view without layout. in the view, add jQuery,SignalR and Flot libraries files:

    @Scripts.Render("~/bundles/jquery")
    <!--[if lte IE 8]><script language="javascript" type="text/javascript" src="~/Scripts/excanvas.min.js"></script><![endif]-->
    <script src="~/Scripts/jquery.flot.min.js" type="text/javascript"></script>
    <script src="~/Scripts/jquery.signalR-0.5.3.min.js" type="text/javascript"></script>
    <script src="/signalr/hubs" type="text/javascript"></script>

Here is the HTML Structure:

<div id="body">
        <div style="text-align: center">
            <h1>
                Trade Price: <span id="priceHolder"></span>
            </h1>
            <div id="placeholder" style="width: 600px; height: 300px; margin: 0 auto">
            </div>
            <a href="http://techbrij.com" style="font-style: italic; font-size: medium">techbrij.com</a>
        </div>
    </div>

To create proxy and start SignalR operations, the following javascript code is used:

         //Create the proxy
        var chartData = $.connection.chartData;

        function init() {
            return chartData.initData();
        }

        chartData.updateData = function (data) {
            update(data);
        }

        // Start the connection
        $.connection.hub.start(
		function () {
			init();
		});

chartData.updateData is called on getting new data. We’ll implement it to update chart.

Chart:

 var ypt = [], totalPoints = 30;

        function initData() {
            for (var i = 0; i < totalPoints; ++i)
                ypt.push(0);
            return getPoints();

        }
        function getData(data) {
            if (ypt.length > 0)
                ypt = ypt.slice(1);
            ypt.push(data);
            return getPoints();
        }
        function getPoints() {
            var ret = [];
            for (var i = 0; i < ypt.length; ++i)
                ret.push([i, ypt[i]]);
            return ret;
        }

        // setup plot
        var options = {
            series: { shadowSize: 0, bars: {
                show: true,
                barWidth: 0.75,
                fill: 1
            }
            }, // drawing is faster without shadows
            yaxis: { min: 0, max: 100,
                tickFormatter: function (val, axis) {
                    return '$' + val;
                }
            },
            xaxis: { show: false }
        };

        var plot = $.plot($("#placeholder"), [initData()], options);
        function update(data) {
            $('#priceHolder').text('$' + data);
            plot.setData([getData(data)]);
            plot.draw();
        }

We are using same code as used in previous article to draw chart.

You can download source code from Github.

Hope, you enjoy it. Share your opinion or suggestion how you are displaying real-time updates.

Related posts:

  1. Real-Time Chart using HTML5 Push Notification (SSE) and ASP.NET Web API
  2. Creating a Chart with jQuery Flot and ASP.NET Web API
  3. Pass Session or Viewbag values to JS Files : ASP.NET MVC 3
  4. Passing Multiple Parameters to ASP.NET Web API With jQuery
  5. Custom RoleProvider, Authorization, EF DB First and ASP.NET MVC

Offline Add, Edit, Delete Data in HTML5 IndexedDB

$
0
0


You can use HTML5 web storage, IndexedDB or File access API in your app to provide offline support. It allows user to work offline when the network isn’t available. An IndexedDB is a persistent data store in the browser means a database on the client side. It allows you to create app with rich query abilities in both offline and online mode. If you are beginner with IndexedDB, you should first read Using IndexedDB.
In this tutorial, we will implement add, edit, delete operations on IndexedDB using Linq2IndexedDB library. Being a .NET guy, I am fan of LINQ, this library provides a way to use LINQ type syntax to perform operations on IndexedDB. It saves bunch of time and code. We are going to implement following thing to save customer data:

html5 indexeddb crud Offline Add, Edit, Delete Data in HTML5 IndexedDB

HTML Structure:

1. Add jQuery, jQuery UI and Modernizer references in the page.
2. Download Linq2IndexedDB library and add indexeddb.shim.js and Linq2IndexedDB.js files.

<link rel="stylesheet" href="http://ajax.googleapis.com/ajax/libs/jqueryui/1.8.9/themes/base/jquery-ui.css" type="text/css" media="all" />
<script src="//ajax.googleapis.com/ajax/libs/jquery/1.7.1/jquery.min.js"></script>
<script src="http://ajax.googleapis.com/ajax/libs/jqueryui/1.8.9/jquery-ui.min.js" type="text/javascript"></script>
<script type="text/javascript" src="Scripts/modernizr-2.6.2.js"> </script>
<script type="text/javascript" src="Scripts/indexeddb.shim.js"> </script>
<script type="text/javascript" src="Scripts/Linq2IndexedDB.js"> </script>

in body tag, we have following structure:

<div style="width:100%;text-align:center;clear:both;padding-top:10px">
    <div id="contentHolder" style="margin:0 auto;width:425px">
    </div>
    <button id="btnAddCustomer">
        Add Customer</button>
    <button id="btnDeleteDB">
        Clear Local DB</button>
    <div id="dialog-form" title="Add new customer">
        <form>
        <fieldset>
            <label for="Id" id="lblId" class="invisible">
                ID</label>
            <input type="number" name="Id" id="txtId" value="" class="text ui-widget-content ui-corner-all invisible" />
            <label for="Name" id="lblName">
                Name</label>
            <input type="text" name="Name" id="txtName" class="text ui-widget-content ui-corner-all" />
            <label for="Email" id="lblEmail">
                Email</label>
            <input type="email" name="Email" id="txtEmail" value="" class="text ui-widget-content ui-corner-all" />
            <label for="Phone" id="lblPhone">
                Phone</label>
            <input type="tel" name="Phone" id="txtPhone" value="" class="text ui-widget-content ui-corner-all" />
        </fieldset>
        </form>
    </div>
</div>

We’ll generate a grid dynamically in contentHolder. btnDeleteDB is used to clear local IndexedDB.

Configure the Database:

The first logical step is to configure database and create instance of the linq2indexeddb object:

var config = {
    dbName: 'CustomerDB',
    version: 1,
    objectStoreName: 'Customers',
    appID: 123
};

var databaseDefinition = [{
    version: config.version,
    objectStores: [{ name: config.objectStoreName, objectStoreOptions: { autoIncrement: false, keyPath: "Email"}}],
    indexes: [{ objectStoreName: config.objectStoreName, propertyName: "Email", indexOptions: { unique: true, multirow: false}}]
}];

var dbConfig = {
    version: config.version,
    definition: databaseDefinition
};

if (!localStorage.customerRevision) {
    localStorage.customerRevision = -1;
}

var db = window.linq2indexedDB(config.dbName, dbConfig, false);

Here we define database name CustomerDB and ObjectStore name Customers.
Check documentation for more about database configuration parameters. Here localStorage is used to save current revision of database.

Load Gridview:

   db.initialize().then(function () {
        InitializeData();
    }, handleError);

	function InitializeData() {
    var content = $('#contentHolder');
    var table = $('<table id="tblCustomer" class="ui-widget ui-widget-content"></table>');
    content.append(table);
    var thead = $('<thead></thead>');
    table.append(thead);
    var tr = $('<tr class="ui-widget-header"></tr>');
    thead.append(tr);
    tr.append('<th>Name</th><th>Email</th><th>Phone</th><th>Actions</th>');
    var tbody = $('<tbody id="customer-data"></tbody>');
    table.append(tbody);

    $('#customer-data').empty();
    db.linq.from(config.objectStoreName).where("IsDeleted").equals("0").orderBy("Email").select().then(function () {
    }, handleError, function (sdata) {
        showCustomer(sdata);
    });

}

	function showCustomer(data) {
    var row = $('tr[value="' + data.Email + '"]');
    if (row.length > 0) {
        row.empty();
    } else {
        row = $('<tr value="' + data.Email + '">');
    }
    row.append('<td>' + data.Name + '</td><td>' + data.Email + '</td><td>' + data.Phone + '</td>');
    var upd = $('<button type="button" value="' + data.Email + '">Update</button>');
    upd.button().click(function () {
        getCustomer(this);
    });

    var del = $('<button type="button" value="' + data.Email + '">Delete</button>');
    del.button().click(function () {
        deleteCustomer(this);
    });

    var col = $('<td></td>');
    col.append(upd);
    col.append(del);
    row.append(col);
    $('#customer-data').append(row);
}

function handleError(error) {
    alert(error);
}

InitializeData: To draw table structure
showCustomer: to add customer details in rows with update and delete buttons.

Add Customer:


	 $('#btnAddCustomer').click(function () {
        $("#txtId").val(0);
        $("#txtName").val('');
        $("#txtEmail").val('');
        $("#txtEmail").removeAttr('disabled').css({ 'color': 'black' }); ;
        $("#txtPhone").val('');
        $("#dialog-form").dialog("open");
    });

    $("#dialog-form").dialog({
        autoOpen: false,
        height: 300,
        width: 350,
        modal: true,
        buttons: {
            "Save": function () {
                var bValid = true;

                if (bValid) {
                    var id = parseInt($("#txtId").val());
                    var customer = {};
                    if (id != 0) {
                        customer.CustomerID = id;
                    }
                    customer.Name = $("#txtName").val();
                    customer.Email = $("#txtEmail").val();
                    customer.Phone = $("#txtPhone").val();
                    customer.Revision = -1;
                    customer.IsDeleted = 0;
                    saveCustomer(customer);
                    $(this).dialog("close");
                }
            },
            Cancel: function () {
                $(this).dialog("close");
            }
        },
        close: function () {
        }
    });

When a new customer is added, It will have CustomerID = 0. the above dialog is used for both add and edit operations. when any change(add/edit) is made, the Revision property gets reset to -1. We’ll use these Revision and other properties in the next post to sync with online server database.

Edit Customer:

We are using Email property as unique criteria, So user can’t modify Email during editing.

function getCustomer(btn) {
    db.linq.from(config.objectStoreName).get($(btn).val()).then(InitializeUpdate, handleError);
}

function InitializeUpdate(customer) {
    $("#txtId").val(customer.CustomerID);
    $("#txtName").val(customer.Name);
    $("#txtEmail").val(customer.Email);
    $("#txtPhone").val(customer.Phone);
    $("#txtEmail").attr('disabled', 'disabled').css({ 'color': 'gray' });
    $("#dialog-form").dialog("open");
}

function saveCustomer(customer) {
    var emails = [];
    //get all localDB emails
    db.linq.from(config.objectStoreName).select(["Email"]).then(function () {
        if ((customer.CustomerID && customer.CustomerID != 0) || $.inArray(customer.Email, emails) > -1) {
            db.linq.from(config.objectStoreName).update(customer).then(function (data) {
                showCustomer(data.object);
            }, handleError);
        } else {
            customer.CustomerID = -1;
            db.linq.from(config.objectStoreName).insert(customer).then(function (data) {
                showCustomer(data.object);
            }, handleError);
        }
    }, handleError, function (data) {
        emails.push(data.Email);
    });
}

When user clicks on update button, getCustomer method is called to get data and InitializeUpdate sets the data in dialog’s controls. On save click in the dialog, saveCustomer method (common in both add/ edit operations) is called. In online database, we are not deleting record, only setting IsDeleted flag. If user creates new customer with same deleted email then we have to reactivate old account and update information, that’s why, first all emails are fetched and if there is valid CustomerID OR Email already exists, update operation is performed in local database else Insert is peformed after setting CustomerID =-1 means all new inserted customers will have CustomerID -1 .

Delete Customer:

/* Delete Customer*/
function deleteCustomer(btn) {

    db.linq.from(config.objectStoreName).get($(btn).val()).then(function (data) {

        if (data.CustomerID == -1) {
            //Delete local record which is not saved on server yet
            db.linq.from(config.objectStoreName).remove(data.Email).then(function () {
                $(btn).parents('tr').remove();
            }, handleError);
        }
        else {
            data.IsDeleted = 1;
            data.Revision = -1;
            db.linq.from(config.objectStoreName).update(data).then(function (data) {
                $(btn).parents('tr').remove();
            }, handleError);
        }
    }, handleError);
}

We are deleting records which are created offline(CustomerID = -1) and never deployed on the server. If any server side data is deleted, we are marking IsDeleted = 1.

Clear Database:

//Reset Local IndexedDB
 $('#btnDeleteDB').click(function () {
        db.deleteDatabase().then(function () {
            db.initialize().then(function () {
                $('#tblCustomer').remove();
                localStorage.customerRevision = -1;
                InitializeData();
            }, handleError);
        });
    });

The above method is used to clear local IndexedDB.

Enjoy HTML5 !!!

Related posts:

  1. Syncing Offline Database(HTML5 IndexedDB) With Online Database using ASP.NET Web API
  2. Add, Edit, Delete In jqGrid With ASP.NET Web API
  3. Add controls (textbox, radio, checkbox..) dynamically in jQuery way
  4. Real-Time Chart using HTML5 Push Notification (SSE) and ASP.NET Web API
  5. Month Range Picker using jQuery UI Datepicker

Syncing Offline Database(HTML5 IndexedDB) With Online Database using ASP.NET Web API

$
0
0


In my previous tutorial, we have implemented CRUD operations on HTML5 IndexedDB database to provide offline support. The next step is to synchronize offline and online databases. In this tutorial, we are going to implement synchronization of IndexedDB and SQL Server databases using ASP.NET Web API.

Server DB Structure:

server db structure Syncing Offline Database(HTML5 IndexedDB) With Online Database using ASP.NET Web API

Here CustomerID is primary key and Email is also unique field.

Web API:

1. Create an Empty ASP.NET MVC Project.

2. Add “ADO.NET Entity Data Model” say CustomerModel.edmx and add Customer table.

3. Right click Controllers folder > Add > Controller > Select Template “Empty API Controller” and give name “ServiceController” > Add

4. To get the updated data from server, we will pass revision parameter and Get action will return all the updated data after the revision.

 public dynamic Get(int revision)
        {
            using (DBCustomerEntities context = new DBCustomerEntities())
            {
                int currentRevision = context.Customers.Max(x => x.Revision) ?? 0;
                if (revision == -1)
                {
                    return new
                    {
                        Revision = currentRevision,
                        Customers = context.Customers.Select(x => new
                        {
                            CustomerID = x.CustomerID,
                            Name = x.Name,
                            Email = x.Email,
                            Phone = x.Phone,
                            Revision = x.Revision ?? 0,
                            IsDeleted = x.IsDeleted ?? false

                        }).ToList()
                    };
                }
                else if (revision == currentRevision)
                {
                    return new { Revision = currentRevision };
                }
                else
                {
                    return new
                    {
                        Revision = currentRevision,
                        Customers = context.Customers.Where(x => x.Revision > revision).Select(x => new
                        {
                            CustomerID = x.CustomerID,
                            Name = x.Name,
                            Email = x.Email,
                            Phone = x.Phone,
                            Revision = x.Revision,
                            IsDeleted = x.IsDeleted ?? false
                        }).ToList()
                    };
                }
            }
        }

If there is no change in data then only revision is returned. On client side, we will check if returned revision is equal to sent revision then display no change message to the user.

5. We are using unique Email criteria for saving data means record is updated if email already exists else it is inserted.

private readonly object _updatePointsLock = new object();
public dynamic Post(JObject data)
        {
            dynamic json = data;
            int revision = json.revision;
            int appID = json.appID;
            IList<Customer> customers = ((JArray)json.customers).Select(t => new Customer
            {
                CustomerID = ((dynamic)t).CustomerID ?? -1,
                Name = ((dynamic)t).Name,
                Email = ((dynamic)t).Email,
                Phone = ((dynamic)t).Phone,
                Revision = ((dynamic)t).Revision,
                IsDeleted = ((dynamic)t).IsDeleted ?? false
            }).ToList(); ;

            lock (_updatePointsLock)
            {
                using (DBCustomerEntities context = new DBCustomerEntities())
                {
                    int currentRevision = context.Customers.Max(x => x.Revision) ?? 0;
                    //check version
                    if (currentRevision == revision)
                    {
                        foreach (Customer cust in customers)
                        {
                            Customer obj = context.Customers.Where(x => x.Email == cust.Email).FirstOrDefault();
                            if (obj == null)
                            {
                                cust.Revision = currentRevision + 1;
                                cust.LastModifiedDate = DateTime.Now;
                                cust.LastModifiedBy = appID;
                                context.Customers.AddObject(cust);
                            }
                            else
                            {
                                obj.Name = cust.Name;
                                obj.Email = cust.Email;
                                obj.Phone = cust.Phone;
                                obj.IsDeleted = cust.IsDeleted;
                                obj.Revision = currentRevision + 1;
                                obj.LastModifiedDate = DateTime.Now;
                                obj.LastModifiedBy = appID;

                            }

                        }
                        context.SaveChanges();
                        return new
                        {
                            Revision = currentRevision + 1,
                            Customers = context.Customers.Where(x => x.Revision > revision).Select(x => new
                            {
                                CustomerID = x.CustomerID,
                                Name = x.Name,
                                Email = x.Email,
                                Phone = x.Phone,
                                Revision = x.Revision,
                                IsDeleted = x.IsDeleted ?? false
                            }).ToList()
                        };
                    }
                    else
                    {
                        return new { Revision = revision };
                    }
                }
            }

        }

View:

sync html5 indexeddb webapi Syncing Offline Database(HTML5 IndexedDB) With Online Database using ASP.NET Web API

For simplicity, we are taking same app to consume web api.
6. Add jQuery, jQuery UI and Modernizr in the project. you can easily install from NuGet.
7. Install Linq2IndexedDB, run the following command in the Package Manager Console:

Install-Package Linq2IndexedDB

8. Controllers > Add > Controller > Select Template “Empty MVC Controller” and give name “HomeController” > ADD.

9. Right Click on Index method > Add View > clear “use a layout or master page” option > Add

10. Copy HTML and JS code from my previous article and put HTML mark-up in view, Create new Customers.js file and add copied JS code. Here we are adding two more buttons for 2 way synchronization.

 <button id="btnAddCustomer">
        Add Customer</button>
    <button id="btnDeleteDB">
        Clear Local DB</button>
    <button id="btnSyncLocal">
        Sync Local DB from Server DB</button>
    <button id="btnSyncServer">
        Sync Server DB from Local DB</button>

11. To sync local DB from Server DB:

 $('#btnSyncLocal').click(function () {
        $.ajax({
            url: 'api/service?revision=' + localStorage.customerRevision,
            type: 'GET',
            dataType: 'json',
            success: function (data) {
                if (data.Revision == localStorage.customerRevision) {
                    alert('You are already working on the latest version.');
                }
                else {
                    syncData(data);
                }
            }
        });
    });

12. To sync server DB from Local DB:

 $('#btnSyncServer').click(function () {
        var customers = [];
        db.linq.from(config.objectStoreName).select().then(function () {
            if (customers.length > 0) {
                var postData = { revision: parseInt(localStorage.customerRevision, 10), appID: config.appID, customers: customers };
                $.ajax({
                    url: 'api/service',
                    type: 'POST',
                    dataType: 'json',
                    contentType: "application/json",
                    data: JSON.stringify(postData),
                    success: function (data) {
                        if (data.Revision == localStorage.customerRevision) {
                            alert('There is newer version on the server. Please Sync from server first.');
                        }
                        else {
                            syncData(data);
                        }
                    }
                });
            }
            else {
                alert('There is no change in data after your last synchronization.');
            }
        }, handleError, function (data) {
            if (data.Revision == -1) {
                customers.push(data);
            }
        });
    });

Here syncData method is used to update local DB data and draw UI.

function syncData(data) {
    var emails = [];
    db.linq.from(config.objectStoreName).select(["Email"]).then(function () {
        $.each(data.Customers, function () {
            if ($.inArray(this.Email, emails) > -1) {
                //update
                db.linq.from(config.objectStoreName).update(this).then(function (data) {
                }, handleError);
            }
            else {
                //insert
                db.linq.from(config.objectStoreName).insert(this).then(function (data) {
                }, handleError);
            }
        });
        //Rebind Grid
        $('#tblCustomer').remove();
        InitializeData();
        localStorage.customerRevision = data.Revision;
        alert('The synchronization has been completed successfully.');
    }, handleError, function (data) {
        emails.push(data.Email);
    });
}

Data Synchronization:

html5 client server architecture diagram Syncing Offline Database(HTML5 IndexedDB) With Online Database using ASP.NET Web API

Consider request flow from left to right in the above diagram.
1. Suppose server DB and Client A are initially in sync with Revision 3 and have P and Q records. On client side, revision is stored using localstorage.
2. Now Client A modifies Q details then for Q record: Revision = -1.
3. Client A adds new record R then for R record: Revision = -1 and CustomerID = -1
4. Client A clicks on “Sync Server DB from LocalDB” button then All Revision = -1 of data are passed to web api with the Revision = 3(DB revision comes from localstorage).
5. On server, it compares revision with its own revision. Both are equal to 3, So, it goes for saving data.
6. On server, email is checked for individual record. The record is inserted for new email and updated for existing emails with incremented revision = 4.
7. The server gives new revision with modified records response to the client.
8. Client checks the new revision if it is higher than existing one then it updates local data and UI, sets new revision(4) in localstorage.

9. Suppose another Client B adds new record S first time so Revision =-1
10. Now Client B clicks on “Sync Server DB from LocalDB” button then All Revision = -1 of data(only S in this case) are passed to web api with the Revision = -1
11. Server compares revision and it is not same (Server Revision = 4, Client Revision = -1) so it gives same revision(-1) as response without modifying data.
12. Client checks the response revision with its own revision, it is same so it alerts user to update data from server first.

13. Now client B clicks on “Sync Client DB from Server DB” button then server checks revision. if it is -1 then gives all data else gives the data after the revision as response. It also gives Revision number in response.

14. Client B checks revision if it is same then gives “no change” message to user. But in our case it is not same so updates local DB data and UI, revision in localstorage also.

15. Now Client B clicks on “Sync Server DB from LocalDB” button then All Revision = -1 of data(only S in this case) are passed to web api with the Revision = 4
16. Server compares revision and adds S record with Revision =5 and gives data and Revision as response.
17. Client B checks the new revision if it is higher than existing one(5 > 4) then it updates local data and UI, sets new revision(5) in localstorage.
18. Now If Client A clicks “Sync Client DB from Server DB“, it is updated with Revision 5.

What about delete?

Suppose Client A deletes record Q since it is already saved in database so it is marked as IsDeleted =1 in Local DB. On “Sync Server DB from LocalDB”, it is updated on server DB also. All IsDeleted=1 are not displayed in the grid, so When Client B syncs, the Q will be updated with IsDeleted = 1 and disappeared from the grid.

Note: If Client A adds Q again then the existing deleted Q will be updated with IsDeleted = 0 means when any exising email is inserted, the record will be updated automatically. You can change it as per your requirement. you can give alert message if any existing email is inserted depends on your requirement.

You can download source code from Github.

Hope you like it. If you enjoy this post, Don’t forget to share it with your friends.

Related posts:

  1. Offline Add, Edit, Delete Data in HTML5 IndexedDB
  2. Real-Time Chart using HTML5 Push Notification (SSE) and ASP.NET Web API
  3. Using jQuery UI Autocomplete With ASP.NET Web API
  4. Creating a Chart with jQuery Flot and ASP.NET Web API
  5. Passing Multiple Parameters to ASP.NET Web API With jQuery

Fast Downloading with Parallel Requests using ASP.NET Web API

$
0
0

In this article, we will implement to download parts of file in parallel to get the complete file faster. It is very useful to download large file and saves a bunch of time. ASP.NET Web API supports byte range requests(available in latest nightly build) with ByteRangeStreamContent class. We will request the ranges of file parts in parallel and merge them back into a single file.

Web API:

First I would recommend to read Henrik F Nielsen’s post to understand HTTP Byte Range Support in ASP.NET Web API. We are going to implement for downloading a CSV file.

 public class DataController : ApiController
    {
        // Sample content used to demonstrate range requests
        private static readonly byte[] _content = File.ReadAllBytes(HttpContext.Current.Server.MapPath("~/Content/airports.csv"));

        // Content type for our body
        private static readonly MediaTypeHeaderValue _mediaType = MediaTypeHeaderValue.Parse("text/csv");

        public HttpResponseMessage Get(bool IsLengthOnly)
        {
            //if only length is requested
            if (IsLengthOnly)
            {
                return Request.CreateResponse(HttpStatusCode.OK, _content.Length);
            }
            else
            {
                MemoryStream memStream = new MemoryStream(_content);

                // Check to see if this is a range request (i.e. contains a Range header field)
                if (Request.Headers.Range != null)
                {
                    try
                    {
                        HttpResponseMessage partialResponse = Request.CreateResponse(HttpStatusCode.PartialContent);
                        partialResponse.Content = new ByteRangeStreamContent(memStream, Request.Headers.Range, _mediaType);
                        return partialResponse;
                    }
                    catch (InvalidByteRangeException invalidByteRangeException)
                    {
                        return Request.CreateErrorResponse(invalidByteRangeException);
                    }
                }
                else
                {
                    // If it is not a range request we just send the whole thing as normal
                    HttpResponseMessage fullResponse = Request.CreateResponse(HttpStatusCode.OK);
                    fullResponse.Content = new StreamContent(memStream);
                    fullResponse.Content.Headers.ContentType = _mediaType;
                    return fullResponse;
                }
            }
        }
    }

First we need to get length of content so bool argument is used for this. if it is true then only content length is returned else content is returned based on whether the incoming request is a range request. If it is then we create a ByteRangeStreamContent and return that. Otherwise we create a StreamContent and return that.

Parallel Requests:

For simplicity, we are taking same app to consume web api. Add new MVC controller and View in the project.

Step 1: In view, First we get the length of the content

  var size;
        $.ajax({
            url: 'api/data?IsLengthOnly=true',
            async: false,
            success: function (data) {
                size = parseInt(data);
            }
        });

Step 2: To split content length in number of threads:

  var totalThreads = 4;
  var maxSize = parseInt(size / totalThreads, 10) + (size % totalThreads > 0 ? 1 : 0);

Step 3: implementing to request a particular range

		var ajaxRequests = [];
        var results = [];
        function reqToServer(reqNo) {
            var range = "bytes=" + (reqNo * maxSize) + "-" + ((reqNo + 1) * maxSize - 1);
            return $.ajax({
                url: 'api/data?IsLengthOnly=false',
                headers: { Range: range },
                success: function (data) {
                    results[reqNo] = data;
                }
            });
        }

        for (var i = 0; i < totalThreads; i++) {
            ajaxRequests.push(reqToServer(i));
        }

Step 4: combine the response of individual parallel requests and put in a hidden field(hdnData).

 var defer = $.when.apply($, ajaxRequests);
        defer.done(function (args) {
            var output = '';
            for (var i = 0; i < totalThreads; i++) {
                output = output + results[i];
            }
            $('#hdnData').val(output);
        });

http parallel range requests Fast Downloading with Parallel Requests using ASP.NET Web API

As in the above example, single download request takes ~6 sec while parallel requests take ~4 sec. It depends on many factors like DNS look up time, Server Bandwidth…etc.

Downlodify:

Now we have the content in the hidden field but user should be able to save as a file so we use Downloadify. It is a javascript and flash based library that allows you to download content in a file without server interaction. Download it, add files in the project and Reference to swfobject.js and downloadify.min.js.

 Downloadify.create('btnDownloadify', {
            filename: function () {
                return 'sample.csv';
            },
            data: function () {
                return document.getElementById('hdnData').value;
            },
            onComplete: function () { },
            onCancel: function () { },
            onError: function () { alert('You must put something in the File Contents or there will be nothing to save!'); },
            swf: '/Content/downloadify.swf',
            downloadImage: '/Content/download.png',
            width: 100,
            height: 30,
            transparent: true,
            append: false
        });

btnDownloadify structure is :

 <p id="btnDownloadify">
        You must have Flash 10 installed to download this file.
 </p>

You can download source code from GitHub.

Hope, you enjoy it.

Related posts:

  1. Real-Time Chart using HTML5 Push Notification (SSE) and ASP.NET Web API
  2. Passing Multiple Parameters to ASP.NET Web API With jQuery
  3. Using jQuery UI Autocomplete With ASP.NET Web API
  4. Creating a Chart with jQuery Flot and ASP.NET Web API
  5. Syncing Offline Database(HTML5 IndexedDB) With Online Database using ASP.NET Web API

HTTP PATCH Requests (Partial Updates) in ASP.NET Web API and EF DB First

$
0
0

To update an entity in ASP.NET Web API, PUT request is used and we have to send all the properties even if only a subset have changed means if only one field is updated on the client side, we have to send the entire model back to the server to make an update. It’s not a cool way. PATCH request allows you to send just the modified properties for partial model updates. It reduces complexity in case of bigger tables. Here is a usage example to implement HTTP Patch request in ASP.NET Web API to update data with EF DB First.

Table Structure:

Let us consider following table structure:
DB Structure HTTP PATCH Requests (Partial Updates) in ASP.NET Web API and EF DB First

In our ASP.NET Web API app, Right Click on Models folder > Add > New Item > Select “ADO.NET Entity Data Model” > Enter Name and click “Add”
Select “Generate From Database” > Next
Select Database Connection (New Connection if doesn’t exist), Make sure “Save entity connection setting in web.config as” option true and Enter Name > Next
Select the table > Enter ModelNamespace > Finish.

Web API:

		[AcceptVerbs("PATCH")]
        public HttpResponseMessage PatchDoc(int id, Delta<DocInfo> newDoc)
        {
            using (DBDocEntities objContext = new DBDocEntities()){
            DocInfo doc = objContext.DocInfoes.SingleOrDefault(p => p.DocID  == id);
            if (doc == null)
            {
                throw new HttpResponseException(HttpStatusCode.NotFound);
            }
            newDoc.Patch(doc);
            objContext.SaveChanges();
            }
            return Request.CreateResponse(HttpStatusCode.NoContent);
        }

In above method, we are using Delta<DocInfo> type argument instead of DocInfo. Delta<DocInfo> allows to set any DocInfo property and also track which properties are set. Delta class provides Patch method which copies the properties that have been set.

Note: oData 0.2.0 alpha is used. It may be subject to change. You can get new nuget package for building OData.

Client Side:

We are going to update only Revision property for a particular document. For simplicity, we are taking same app to consume web API and using following ajax method in the view.

    var obj = { Revision : "2"};

    $.ajax({
        url: 'api/values/1',
        type: 'PATCH',
        data: JSON.stringify(obj),
        dataType: 'json',
        contentType: 'application/json',
        success: function (data) {
        }
    });

It will update Revision to 2 for DocID = 1.

delta patch request HTTP PATCH Requests (Partial Updates) in ASP.NET Web API and EF DB First

Hope, It helps.

Related posts:

  1. Fast Downloading with Parallel Requests using ASP.NET Web API
  2. Using jQuery UI Autocomplete With ASP.NET Web API
  3. Syncing Offline Database(HTML5 IndexedDB) With Online Database using ASP.NET Web API
  4. Create Separate Web API’s Action for Mobile Request: ASP.NET MVC 4
  5. Passing Multiple Parameters to ASP.NET Web API With jQuery

Creating a Pinterest Like Layout in ASP.NET

$
0
0

Pinterest is currently the world’s fastest growing social networking site and famous for the best functioning visual design. Do you love the look and feel of Pinterest? This post explains how to implement the same masonry dynamic layout with infinite scroll in ASP.NET.

pinterest techbrij Creating a Pinterest Like Layout in ASP.NET

Here are the steps to implement it:

1. Download and add jQuery Masonry plugin. It is a dynamic grid layout plugin which arranges elements vertically, positioning each element in the next open spot in the grid and minimizes vertical gaps between elements of varying height.

2. We are going to display product with description in each tile. Here is the structure of Product and ProductRepository class.

public class Product {
    public string Url { get; set; }
    public string Description { get; set; }
}

public static class ProductRepository
{
    static List<Product> objList;
    public static IEnumerable<Product> GetData(int pageIndex, int pageSize)
    {
       int startAt = (pageIndex-1) * pageSize;
        objList =new List<Product>();
        Product obj;
        Random r = new Random();
        int n = r.Next(1, 7);    
        for (int i = startAt; i < startAt + pageSize; i++)
        {
            n = r.Next(1, 7);
            obj = new Product();
            obj.Url = String.Format("http://dummyimage.com/150x{1}/{0}{0}{0}/fff.png&text={2}", n, n * 50,i+1);
            obj.Description = "Description of product " + (i+1).ToString();
            objList.Add(obj);
        }
        return objList;
    }
}

In ProductRepository, GetData method takes pageIndex and pageSize parameters and generates dummy data and images of random heights.

HTML Structure:

3. In the aspx page, the head tag structure is as follows:

<head id="Head1" runat="server">
    <title>Pinterest Like Layout</title>
    <meta http-equiv="X-UA-Compatible" content="IE=edge,chrome=1">
    <!--[if lt IE 9]><script src="http://html5shim.googlecode.com/svn/trunk/html5.js"></script><![endif]-->
    <style type="text/css">
        body
        {
            background-color:#EEEEEE;
        }
        #imgLoad
        {
        	position:fixed;
            bottom:0;	
            left:40%;
            display:none;
        }
        .box
        {
            margin: 5px;
            padding: 10px;
            background-color:#FFFFFF;
            box-shadow: 0 1px 3px rgba(34, 25, 25, 0.4);
        }
    </style>
    <script src="Scripts/jquery-1.7.1.min.js" type="text/javascript"></script>
    <script src="Scripts/jquery.masonry.min.js" type="text/javascript"></script>
</head>

4. To display products, we use Repeater control:

 <div id="container" class="transitions-enabled infinite-scroll clearfix">
        <asp:Repeater ID="Repeater1" runat="server">
            <ItemTemplate>
                <div class="box">
                    <img src="<%# Eval("Url") %>" />
                    <p><%# Eval("Description") %></p>
                </div>
            </ItemTemplate>
        </asp:Repeater>
    </div>
    <div id="imgLoad">
        <img src="http://i.imgur.com/6RMhx.gif" />
    </div>

Dynamic Grid Layout:

5. To bind repeater on Page_Load:

        Repeater1.DataSource = ProductRepository.GetData(1, 25); 
        Repeater1.DataBind(); 

Now, the product is displayed in normal order. If there is variance in each tile height then there is unnecessary blank space between rows. For dynamic grid layout, the following javascript code is used:

			var $container = $('#container');

            $container.imagesLoaded(function () {
                $container.masonry({
                    itemSelector: '.box',
                    columnWidth: 100,
                    isAnimated: true
                });
            });

You can see the products are reordered to minimize vertical spacing.

Infinite Scrolling:

6. To implement infinite scrolling, lets create a webmethod on aspx side:

 [WebMethod]
    public static IEnumerable<Product> GetData(int pageNo, int pageSize)
    {
       
        return ProductRepository.GetData(pageNo, pageSize); 
    }

We call this method using jQuery ajax on scrolling, add products dynamically and reorder products

 var pageNo = 1,pageSize = 25;
  $(window).scroll(function () {
                if ($(window).scrollTop() == $(document).height() - $(window).height() && !($('#imgLoad').is(':visible'))) {
                    loadMore();
                }
            });

            function loadMore() {
                $('#imgLoad').show();
                $.ajax({
                    type: "POST",
                    url: "Default.aspx/GetData",
                    data: JSON.stringify({ pageNo: pageNo + 1, pageSize: pageSize }),
                    dataType: "json",
                    contentType: "application/json",
                    complete: function (response) {                       
                        $('#imgLoad').hide();
                    },
                    success: function (response) {
                        if (response.d.length > 0) {
                            var ctrls = [];
                            for (var i = 0; i < response.d.length; i++) {
                                ctrls.push('<div class="box"> <img src="' + response.d[i].Url + '" /><p>' + response.d[i].Description + '</p></div>');
                            }
                            var $newElems = $(ctrls.join(''));
                            $container.append($newElems);
                            $newElems.css({ opacity: 0 });
                            $newElems.imagesLoaded(function () {
                                // show elems now they're ready
                                $newElems.css({ opacity: 1 });
                                $container.masonry('appended', $newElems, true);
                            }); 
                            pageNo++;
                        }
                    }
                });
 

Output:

Hope, you enjoy it.

Making ASP.NET GridView Responsive With jQuery FooTable

$
0
0

As the current trend is to make website compatible with all platforms like desktop, tablet and mobile..etc, Responsive Design technique comes into the picture. Using it, the website adapts the layout to the environment that it is being viewed in. In this post, we will make ASP.NET gridview responsive using jQuery FooTable plugin. It hides certain columns of data at different resolutions based on data-* attributes and converts hidden data to expandable rows. First, I recommend to read this post to understand how it works.

1. Download and add FooTable js, css and image files in the project and reference in the page.

  <meta name="viewport" content = "width = device-width, initial-scale = 1.0, minimum-scale = 1.0, maximum-scale = 1.0, user-scalable = no" />
  <link href="Styles/footable-0.1.css" rel="stylesheet" type="text/css" />
  <script src="Scripts/1.8.2/jquery.min.js" type="text/javascript"></script>
  <script src="Scripts/footable-0.1.js" type="text/javascript"></script>

Read Also: How to Test Responsive Web Design

GridView:

2. Here is the asp.net gridview structure, we take address as template column for testing:

 <asp:GridView ID="GridView1" CssClass="footable" runat="server" 
            AutoGenerateColumns="False">
        <Columns>
            <asp:BoundField DataField="FirstName" HeaderText="First Name"   />
            <asp:BoundField DataField="LastName" HeaderText="Last Name" />
            <asp:BoundField DataField="Email" HeaderText="Email" />
            <asp:TemplateField HeaderText="Address">                
                <ItemTemplate>
                    <asp:Label ID="Label1" runat="server" Text='<%# Bind("Address") %>'></asp:Label>
                </ItemTemplate>
            </asp:TemplateField>
            <asp:BoundField DataField="Contact" HeaderText="Contact" />
        </Columns>
    </asp:GridView>

Breakpoints:

3. This plugin works with the concepts of “breakpoints”, which are different device widths we care about.

  $(function () {
          $('#<%=GridView1.ClientID %>').footable({
              breakpoints: {
                  phone: 480,
                  tablet: 1024
              }
          });
      });

4. To bind gridview:

   GridView1.DataSource = GetDataTable();
   GridView1.DataBind();      

GetDataTable method returns data for gridview. You can implement it to get data from database and returns datatable or list.
By default asp.net gridview header row is generated in tbody tag, to generate in thead tag:

  GridView1.UseAccessibleHeader = true;
  GridView1.HeaderRow.TableSection = TableRowSection.TableHeader; 

To define data-* attribute in header cells, put following code after binding:

		TableCellCollection cells = GridView1.HeaderRow.Cells; 
        cells[0].Attributes.Add("data-class", "expand");
        cells[2].Attributes.Add("data-hide", "phone,tablet");
        cells[3].Attributes.Add("data-hide", "phone,tablet");
        cells[4].Attributes.Add("data-hide", "phone");    

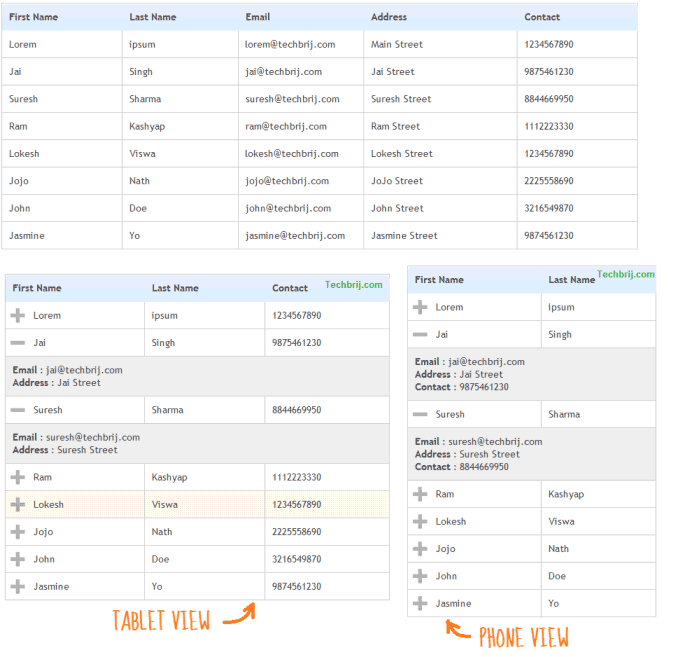
We define data-hide attribute to hide the column for different dimensions. Email and Address will be hidden in tablet view and Email,Address, Contact will be hidden in phone view. On expanding, the hidden data are displayed in row by row.

responsive table Making ASP.NET GridView Responsive With jQuery FooTable

Here is the rendered html of gridview control:

<table cellspacing="0" style="border-collapse:collapse;" id="GridView1" class="footable footable-loaded default">
		<thead>
			<tr>
				<th scope="col" data-class="expand">First Name</th><th scope="col">Last Name</th>
				<th scope="col" data-hide="phone,tablet" style="display: table-cell;">Email</th>
				<th scope="col" data-hide="phone,tablet" style="display: table-cell;">Address</th>
				<th scope="col" data-hide="phone" style="display: table-cell;">Contact</th>
			</tr>
		</thead><tbody>
			<tr class="">
				<td class="expand">Lorem</td>
				<td>ipsum</td>
				<td style="display: table-cell;">lorem@techbrij.com</td>
				<td style="display: table-cell;">
                    <span id="GridView1_Label1_0">Main Street</span>
                </td>
				<td style="display: table-cell;">1234567890</td>
			</tr>
			....
			</tbody>
	</table>

Hope, you enjoy it.


Database Change Notifications in ASP.NET using SignalR and SqlDependency

$
0
0

This article shows how to display real time sql server database change notification in ASP.NET using SignalR and SqlDependency object which represents a query notification dependency between an application and an instance of SQL Server. Consider your database is updated or synchronized by windows service in background, you have to display real time updated data. This article explains how to implement it.

notification Database Change Notifications in ASP.NET using SignalR and SqlDependency

DB Settings:

1. We need to enable the Service Broker on our database(TechBrijDB). To check, run following SQL syntax:

SELECT name, is_broker_enabled FROM sys.databases

To enable service broker on TechBrijDB database:

ALTER DATABASE TechBrijDB SET ENABLE_BROKER
GO

2. To subscribe query notification, we need to give permission to IIS service account

GRANT SUBSCRIBE QUERY NOTIFICATIONS TO “Domain\ASPNET”

In our example, we are going to use JobInfo table:

DB Structure Database Change Notifications in ASP.NET using SignalR and SqlDependency

Setup SqlDependency:

I am using ASP.NET Web API project but same steps can be applied on other ASP.NET projects also.

3. First define connection string in web.config:

<connectionStrings>
    <add name="DefaultConnection" providerName="System.Data.SqlClient" connectionString="Data Source=.\SQLExpress;Initial Catalog=TechBrijDB;Integrated Security=SSPI;" />
</connectionStrings>

4. In Global.asax, To enable listener:

 protected void Application_Start()
 {
		 //...
		 SqlDependency.Start(ConfigurationManager.ConnectionStrings["DefaultConnection"].ConnectionString); 
 }

To stop the listener:

  protected void Application_End()
        {
            SqlDependency.Stop(ConfigurationManager.ConnectionStrings["DefaultConnection"].ConnectionString); 
        }

5. Add following JobInfo and JobInfoRepository classes:

	public class JobInfo {
      public int JobID { get; set; }
      public  string Name { get; set; }
      public  DateTime LastExecutionDate { get; set; }
      public  string Status { get; set; }
    }
	
	 public class JobInfoRepository {

        public IEnumerable<JobInfo> GetData()
        {
          
            using (var connection = new SqlConnection(ConfigurationManager.ConnectionStrings["DefaultConnection"].ConnectionString))
            {
                connection.Open();
                using (SqlCommand command = new SqlCommand(@"SELECT [JobID],[Name],[LastExecutionDate],[Status]
                   FROM [dbo].[JobInfo]", connection))
                {
                    // Make sure the command object does not already have
                    // a notification object associated with it.
                    command.Notification = null;

                    SqlDependency dependency = new SqlDependency(command);
                    dependency.OnChange += new OnChangeEventHandler(dependency_OnChange);

                    if (connection.State == ConnectionState.Closed)
                        connection.Open();

                    using (var reader = command.ExecuteReader())
                        return reader.Cast<IDataRecord>()
                            .Select(x => new JobInfo(){ 
                                JobID = x.GetInt32(0), 
                                Name = x.GetString(1), 
                                LastExecutionDate = x.GetDateTime(2),  
                                Status  = x.GetString(3) }).ToList();                            


                }
            }        
        }
        private void dependency_OnChange(object sender, SqlNotificationEventArgs e)
        {            
            JobHub.Show(); 
        }

    
    }


In above code, On SqlDependency OnChange event, we are calling JobHub’s show method to refresh the grid. We will create Hub in next step.

SignalR:

6. To install Microsoft ASP.NET SignalR, run the following command in the Package Manager Console:

Install-Package Microsoft.AspNet.SignalR -Pre

Now in global.asax > Application_Start method, add following before RouteConfig.RegisterRoutes method

RouteTable.Routes.MapHubs();

You have to include following namespace:

using Microsoft.AspNet.SignalR;

7. Right click on project > Add new item > Select “SignalR Hub Class”, give name JobHub and add following method:

using Microsoft.AspNet.SignalR.Hubs;

 public class JobHub : Hub
    {
        public static void Show()
        {
            IHubContext context = GlobalHost.ConnectionManager.GetHubContext<JobHub>();
            context.Clients.All.displayStatus();
        }
    }

8. In default valuecontroller, we are creating object of JobInfoRepository and on Get action, calling GetData method:

 public class ValuesController : ApiController
    {

        JobInfoRepository objRepo = new JobInfoRepository();


        // GET api/values
        public IEnumerable<JobInfo> Get()
        {
            return objRepo.GetData();
        }
	}

View:

For simplicity, we take same app to consume web api, Create an action say Status in Home controller, add a view without layout page:

@{
    Layout = null;
}

<!DOCTYPE html>

<html>
<head>
    <meta name="viewport" content="width=device-width" />
    <title>JobStatus</title>
    @Styles.Render("~/Content/css")
    @Scripts.Render("~/bundles/modernizr")
    @Scripts.Render("~/bundles/jquery")
    <script src="~/Scripts/jquery.signalR-1.0.0-rc1.min.js"></script>
    <script src="~/signalr/hubs" type="text/javascript"></script>
    <script type="text/javascript">

        $(function () {

            // Proxy created on the fly
            var job = $.connection.jobHub;

            // Declare a function on the job hub so the server can invoke it
            job.client.displayStatus = function () {
                getData();
            };
         
            // Start the connection
            $.connection.hub.start();
            getData();
        });

        function getData() {
            var $tbl = $('#tblJobInfo');
            $.ajax({
                url: '../api/values',
                type: 'GET',
                datatype: 'json',
                success: function (data) {
                    if (data.length > 0) {
                        $tbl.empty();
                        $tbl.append(' <tr><th>ID</th><th>Name</th><th>Last Executed Date</th><th>Status</th></tr>');
                        var rows = [];
                        for (var i = 0; i < data.length; i++) {
                            rows.push(' <tr><td>' + data[i].JobID + '</td><td>' + data[i].Name + '</td><td>' + data[i].LastExecutionDate.toString().substr(0,10) + '</td><td>' + data[i].Status + '</td></tr>');
                        }
                        $tbl.append(rows.join(''));
                    }
                }
            });
        }
    </script>
</head>
<body>
    <div>
        <table id="tblJobInfo" style="text-align:center;margin-left:10px">
        </table>
    </div>
</body>
</html>

Open “http://yourserver/app/home/status” URL and test it.

On database change, dependency_OnChange method is triggered which calls Show method of signalR Hub. It notifies and triggers displayStatus method on client side to reset data.

In following video, I am changing values in table and it is reflected on the web page immediately:

If you are getting “TypeError: $.connection is undefined” javascript error then check your jquery.signalR path in script reference.

If you are getting “The connection to http://localhost … was interrupted while the page was loading” javascript error then check your jquery ajax url in GetData method.

Hope, you enjoy it.

Saving SkyDrive Excel Survey Data To Sql Server Database with ASP.NET MVC

$
0
0

SkyDrive provides the excel survey feature which allows you to create online surveys and analyze results using the free Excel Web App or Excel on your desktop. You can display the survey results by embedding the excel in a web page. ExcelMashup.com allows you show a workbook directly in your website. It also lets you easily sort, filter, and interact with the workbook as in Web Excel with powerful Javascript API. We will create a sample survey and save result data to database using ASP.NET MVC and Entity Framework.

Creating A Survey:

1. Log-in to sky drive. You can create survey using either way:

Create > Excel Survey > Enter name > add questions

OR

Create >Excel Workbook > Enter name > In Home Tab > Survey > New Survey > add questions

After adding questions, click ‘Save and View’ to test.

skydrive excel save Saving SkyDrive Excel Survey Data To Sql Server Database with ASP.NET MVC

2. You can share survey using Survey > Share Survey > Done and send the generated link to audience to submit answers without signing in.

DB Structure:

DB Structure Survey Saving SkyDrive Excel Survey Data To Sql Server Database with ASP.NET MVC

We will use SurveyData table to store survey results and RowNum column to store the index of row in excel. You can imagine row index as primary key of excel data. We are always inserting data through survey so it will be unique. Here our objective is to select and save NEW records only each time and for this, RowNum column is used. when any record is inserted, its row index will be inserted in RowNum column. Next time, Only higher row index records are selected from the excel to save.

Entity Framework:

3. In ASP.NET MVC Project, Right click on Models folder, Add New Item, select “ADO.NET Entity Data Model“, select the database, enter proper name and other information, finish.

4. First, we have to get the existing max RowNum value(will use in view), so in default HomeController, we get and set value to ViewBag variable.

	public ActionResult Index()
        {
            using (SurveyDBEntities objContext = new SurveyDBEntities())
            {
                ViewBag.SavedRowIndex = objContext.SurveyDatas.Select(x => (int?)x.RowNum).Max() ?? 0;       
            }
            return View();
        }     

To save data:

		[HttpPost]
        public JsonResult SaveData(string[][] data) {
            
                if (data != null && data.Length > 0)
                {
                    using (SurveyDBEntities objContext = new SurveyDBEntities())
                    {
                        int rowNumColIndex = data[0].Length - 1;
                        for (int row = 0; row < data.Length; row++)
                        {
                            SurveyData obj = new SurveyData()
                            {
                                Name = data[row][0],
                                Email = data[row][1],
                                CommentType = data[row][2],
                                Comment = data[row][3],
                                RowNum = Convert.ToInt32(data[row][rowNumColIndex])
                            };
                            objContext.SurveyDatas.AddObject(obj);
                        }
                        objContext.SaveChanges();
                    }
                }
                else
                {                   
                    return Json("No data found" );
                }
             
            return Json("Saved Successfully");
        }

Displaying Excel Survey Results:

Open excel file in SkyDrive > File > Share > Embed
click on javascript > Copy

Open View in asp.net project and paste it where you want to display.


<div id="loadingdiv">
			<h3>Please Wait...</h3>
</div>	
<div id="myExcelDiv" style="width: 650px; height:500px;"></div>
<input onclick="JavaScript:saveValues();" type="button" value="Save" />
<script type="text/javascript" src="http://r.office.microsoft.com/r/rlidExcelWLJS?v=1&kip=1"></script>
<script type="text/javascript">
    // Use this file token to reference Sample.xlsx in Excel's APIs
    var fileToken = "xxxxxxxxxxxxxxxxxxxxxxxxxxxxxxxxxxxxxxxxxxxxxxxxxxxxxxxxxxx";
    var ewa = null;
    var ewaCht = null;
    var savedRowNum = @ViewBag.SavedRowIndex;

    // run the Excel load handler on page load
    if (window.attachEvent) {
        window.attachEvent("onload", loadEwaOnPageLoad);
    } else {
        window.addEventListener("DOMContentLoaded", loadEwaOnPageLoad, false);
    }

    function loadEwaOnPageLoad() {
        var props = {

            uiOptions: {
                showDownloadButton: false,
                showGridlines: false,
                showRowColumnHeaders: false,
                showParametersTaskPane: false
            },
            interactivityOptions: {
                allowTypingAndFormulaEntry: true,
                allowParameterModification: true,
                allowSorting: false,
                allowFiltering: false,
                allowPivotTableInteractivity: false
            }
        };
        // Embed workbook using loadEwaAsync
        document.getElementById("loadingdiv").innerHTML = "<h3>Loading...</h3>";
        Ewa.EwaControl.loadEwaAsync(fileToken, "myExcelDiv", props, OnDataLoaded);
    }


    function OnDataLoaded(asyncResult) {
        if (asyncResult.getSucceeded()) {
            ewaCht = asyncResult.getEwaControl();           
            document.getElementById("loadingdiv").style.display = "none";
        }
    } 
</script>

In above code, we added Save button and set savedRowNum variable from viewbag parameter which has the existing max RowNum value.

skydrive excel save 1 Saving SkyDrive Excel Survey Data To Sql Server Database with ASP.NET MVC

To save data:

 function saveValues() {
        ewaCht.getActiveWorkbook().getRangeA1Async('A1:E1000', getRangeForControls, null);
    }

    function getRangeForControls(asyncResult) {
        var range = asyncResult.getReturnValue();
        if (range) {
            range.getValuesAsync(0, saveRangeValues, null);
        }
    }

    function saveRangeValues(asyncResult) {
        var range = asyncResult.getReturnValue();      

        var row, col, str = [], newData = [],lastRowNum = savedRowNum;
        for (row = savedRowNum+1; row < range.length; row++) {
            //check if email field exists
            if (range[row][1]) {
                range[row].push(row);
                newData.push(range[row]);
                lastRowNum =row;
            }
        }

        $.ajax({
            url: '@Url.Action("SaveData", "Home")',
            type: 'POST',
            contentType: 'application/json',
            data: JSON.stringify({ data: newData })
        }).done(function(result){   
            //Set savedRowNum for next processing
            savedRowNum = lastRowNum;            
            alert(result);
        }).fail(function(jqXHR, textStatus) {
            alert( "Request failed: " + textStatus);
        });
    }

In above code, we create a 2d array (newData) which contains the new records only with row index and it is posted to SaveData method which saves the data in database using entity framework.

skydrive excel save 2 Saving SkyDrive Excel Survey Data To Sql Server Database with ASP.NET MVC

Hope, You enjoy it.

Responsive ASP.NET GridView With Twitter Bootstrap

$
0
0

In my recent post, Responsive ASP.NET GridView is implemented using jQuery FooTable plugin. If you are using Twitter Bootstrap framework, you can easily show hide elements based on characteristics of the device the site is being displayed on, most commonly the width of the browser using the inbuilt CSS classes.

1. In your asp.net website, To install Bootstrap, run the following command in the Package Manager Console

Install-Package Twitter.Bootstrap

2. Add bootstrap css and javascript files in the page

    <meta name="viewport" content = "width = device-width, initial-scale = 1.0, minimum-scale = 1.0, maximum-scale = 1.0, user-scalable = no" />
    <link href="Content/bootstrap.min.css" rel="stylesheet" type="text/css" />
    <link href="Content/bootstrap-responsive.min.css" rel="stylesheet" type="text/css" />
    <script src="Scripts/jquery-1.9.0.min.js" type="text/javascript"></script>  
    <script src="Scripts/bootstrap.min.js" type="text/javascript"></script>

3. Twitter Bootstrap has several utility classes for fast responsive development, Here are the default behaviour of the classes:

Class Mobile (<=767px) Tablets (768px-979px) Desktop (>979px)
.visible-phone Visible Hidden Hidden
.visible-tablet Hidden Visible Hidden
.visible-desktop Hidden Hidden Visible
.hidden-phone Hidden Visible Visible
.hidden-tablet Visible Hidden Visible
.hidden-desktop Visible Visible Hidden

Suppose you want to display element for Desktop and tablets, you can use hidden-phone css class OR combination of visible-desktop and visible-tablet classes.

I am using same GridView structure with different CSS classes as follows:

 <asp:GridView ID="GridView1" runat="server" Width="100%" 
            AutoGenerateColumns="False">
        <Columns>
            <asp:BoundField DataField="FirstName" HeaderText="First Name"   />
            <asp:BoundField DataField="LastName" HeaderText="Last Name" ItemStyle-CssClass="hidden-phone" HeaderStyle-CssClass="hidden-phone"   />
            <asp:BoundField DataField="Email" HeaderText="Email" ItemStyle-CssClass="hidden-phone" HeaderStyle-CssClass="hidden-phone" />
            <asp:TemplateField HeaderText="Address" HeaderStyle-CssClass="visible-desktop" ItemStyle-CssClass="visible-desktop">                
                <ItemTemplate>
                    <asp:Label ID="Label1" runat="server" Text='<%# Bind("Address") %>' ></asp:Label>
                </ItemTemplate>
            </asp:TemplateField>
            <asp:BoundField DataField="Contact" HeaderText="Contact" ItemStyle-CssClass="hidden-tablet" HeaderStyle-CssClass="hidden-tablet" />
        </Columns>
    </asp:GridView>

In above code different classes applied to view device specific layout.
Desktop View: All columns
Tablet View: First Name, Last Name, Email
Phone View: First Name, Contact

4. To bind gridview:

  protected void Page_Load(object sender, EventArgs e)
    {
        if (!IsPostBack)
        {
            BindGrid();
        }

    }
    void BindGrid()
    {

        GridView1.DataSource = GetDataTable();
        GridView1.DataBind();
    }

    public List<UserInfo> GetDataTable()
    {
        return new List<UserInfo>() {       
                new UserInfo("Lorem","ipsum","lorem@techbrij.com","Main Street","1234567890"),
                new UserInfo("Jai","Singh","jai@techbrij.com","Jai Street","9875461230"),
                new UserInfo("Suresh","Sharma","suresh@techbrij.com","Suresh Street","8844669950"),
                new UserInfo("Ram","Kashyap","ram@techbrij.com","Ram Street","1112223330"),
                new UserInfo("Lokesh","Viswa","lokesh@techbrij.com","Lokesh Street","1234567890"),
                new UserInfo("Jojo","Nath","jojo@techbrij.com","JoJo Street","2225558690"),
                new UserInfo("John","Doe","john@techbrij.com","John Street","3216549870"),
                new UserInfo("Jasmine","Yo","jasmine@techbrij.com","Jasmine Street","9874561230")
        };
    }

5. UserInfo class:

public class UserInfo
{
    public UserInfo(string firstName, string lastName, string email, string address, string contact)
    {
        FirstName = firstName;
        LastName = lastName;
        Email = email;
        Address = address;
        Contact = contact;
    }

    public string FirstName { get; set; }
    public string LastName { get; set; }
    public string Email { get; set; }
    public string Address { get; set; }
    public string Contact { get; set; }
}

responsive grid Responsive ASP.NET GridView With Twitter Bootstrap

Hope, you enjoy it.

Responsive ASP.NET Menu Control With Twitter Bootstrap

$
0
0

In this tutorial, We will implement collapsing responsive navigation bar using ASP.NET menu control and Twitter Bootstrap. Lets start with the default view of ASP.NET Menu control as follows:

 <asp:Menu ID="NavigationMenu" runat="server" CssClass="menu" EnableViewState="false"                   IncludeStyleBlock="false" Orientation="Horizontal">
                    <Items>
                        <asp:MenuItem Text="Home" ToolTip="Home">  </asp:MenuItem>
                            <asp:MenuItem Text="Music" ToolTip="Music">
                                <asp:MenuItem Text="Classical" ToolTip="Classical" />
                                <asp:MenuItem Text="Rock" ToolTip="Rock" />
                                <asp:MenuItem Text="Jazz" ToolTip="Jazz" />
                            </asp:MenuItem>
                            <asp:MenuItem Text="Movies" ToolTip="Movies">
                                <asp:MenuItem Text="Action" ToolTip="Action" />
                                <asp:MenuItem Text="Drama" ToolTip="Drama" />
                                <asp:MenuItem Text="Musical" ToolTip="Musical" />
                            </asp:MenuItem>
                      
                    </Items>
                </asp:Menu>

responsive menu Responsive ASP.NET Menu Control With Twitter Bootstrap

1. We will update the default UI using bootstrap framework as in above image. To install Bootstrap, run the following command in the Package Manager Console:

Install-Package Twitter.Bootstrap

2. Add bootstrap CSS files in the page

	<link href="Content/bootstrap.min.css" rel="stylesheet" type="text/css" />
    <link href="Content/bootstrap-responsive.min.css" rel="stylesheet" type="text/css" />
    <style type="text/css">
        .nav
        {
            width:100%;
            padding-left:15px;
        }

    </style> 

3. I like fixed top navigation bar, so we assign “navbar navbar-fixed-top” to menu control css class.

CssClass=”navbar navbar-fixed-top”

4. For list, use nav class to list

StaticMenuStyle-CssClass= “nav”

5. For active item, use activeclass

StaticSelectedStyle-CssClass=”active”

6. To display sub-menu as dynamic dropdown, we use dropdown-menu class

DynamicMenuStyle-CssClass=”dropdown-menu”

Now we get the layout as in the top image and the code looks as follows

  <asp:Menu ID="NavigationMenu" runat="server"  EnableViewState="false"  
            IncludeStyleBlock="false" Orientation="Horizontal" 
            CssClass="navbar navbar-fixed-top" 
            StaticMenuStyle-CssClass= "nav" 
            StaticSelectedStyle-CssClass="active"
            DynamicMenuStyle-CssClass="dropdown-menu" 
             >
            <Items>
              <!-- menu items -->    
            </Items>
        </asp:Menu>
 

Responsive Menu:

For background image and proper layout we put the menu in div (navbar > navbar-inner > container).
To implement a collapsing responsive navbar, wrap your navbar content in a containing div, .nav-collapse.collapse, and add the navbar toggle button, .btn-navbar.

        <div class="navbar">
            <div class="navbar-inner">
                <div class="container">
				 <!-- .btn-navbar is used as the toggle for collapsed navbar content -->
                    <a class="btn btn-navbar" data-target=".nav-collapse" data-toggle="collapse">
                        <span class="icon-bar"></span>
                        <span class="icon-bar"></span>
                        <span class="icon-bar"></span>
                    </a>
				<!-- Everything you want hidden at 940px or less, place within here -->
                    <div class="nav-collapse collapse">
                        <asp:Menu ID="NavigationMenu" runat="server" EnableViewState="false"
                            IncludeStyleBlock="false" Orientation="Horizontal"
                            CssClass="navbar navbar-fixed-top"
                            StaticMenuStyle-CssClass="nav"
                            StaticSelectedStyle-CssClass="active"
                            DynamicMenuStyle-CssClass="dropdown-menu">
                            <Items>
                                <asp:MenuItem Text="Home" ToolTip="Home"></asp:MenuItem>
                                <asp:MenuItem Text="Music" ToolTip="Music">
                                    <asp:MenuItem Text="Classical" ToolTip="Classical" />
                                    <asp:MenuItem Text="Rock" ToolTip="Rock" />
                                    <asp:MenuItem Text="Jazz" ToolTip="Jazz" />
                                </asp:MenuItem>
                                <asp:MenuItem Text="Movies" ToolTip="Movies">
                                    <asp:MenuItem Text="Action" ToolTip="Action" />
                                    <asp:MenuItem Text="Drama" ToolTip="Drama" />
                                    <asp:MenuItem Text="Musical" ToolTip="Musical" />
                                </asp:MenuItem>
                            </Items>
                        </asp:Menu>
                    </div>
                </div>
            </div>
        </div>


ASP.NET Menu creates its own styles and classes which creates problem in Bootstrap working. So we remove some styles using jQuery.

 $(".nav li,.nav li a,.nav li ul").removeAttr('style'); 
 

To add down arrow for sub-menu indication:

 $(".dropdown-menu").parent().removeClass().addClass('dropdown');
 $(".dropdown>a").removeClass().addClass('dropdown-toggle').append('<b class="caret"></b>').attr('data-toggle', 'dropdown');

There is no mouseover event for mobile and onclick of ASP.NET menu causes postback. To avoid postback and remove click handler:

            $('.dropdown-toggle').attr('onclick', '').off('click');

Now on clicking parent menu item, sub menu will be displayed.

Here is the overall script structure:

 <script src="Scripts/jquery-1.9.0.min.js" type="text/javascript"></script>

    <script type="text/javascript">
        $(function () {
            //to fix collapse mode width issue
            $(".nav li,.nav li a,.nav li ul").removeAttr('style');

            //for dropdown menu
            $(".dropdown-menu").parent().removeClass().addClass('dropdown');
            $(".dropdown>a").removeClass().addClass('dropdown-toggle').append('<b class="caret"></b>').attr('data-toggle', 'dropdown');

            //remove default click redirect effect           
            $('.dropdown-toggle').attr('onclick', '').off('click');

        });
    </script>
    <script src="Scripts/bootstrap.min.js" type="text/javascript"></script>

responsive menu2 Responsive ASP.NET Menu Control With Twitter Bootstrap

Hope, you enjoy it.

Using Microsoft Translator With ASP.NET MVC 4 Web API

$
0
0

This article explains how to use the Microsoft Translator API to translate text that was input by the user. Microsoft Translation Service is an online service which has support for AJAX, HTTP or SOAP and Basic subscriptions, up to 2 million characters a month, are free. Google’s free Translation API are deprecated So Microsoft Translator is a good alternative. In this sample, we will use AJAX API for English to Hindi translation.

First, You’ll need to sign up in the Windows Azure Marketplace, Subscribe to the Microsoft Translator API, register your app and get your credentials(Client ID and Client Secret) and keep a note of them. Check following step by step guide for this:

Signing up for Microsoft Translator and getting your credentials.

Basic Flow:

Here is the basic flow of the system:

microsoft translator flow Using Microsoft Translator With ASP.NET MVC 4 Web API

1. The client requests to asp.net web api for the access token.
2. Web API has “Client ID” and “Client Secret” for the app in the marketplace. So it posts them to obtain the access token.

Note: We don’t want to disclose “Client ID” and “Client Secret”, that’s why It’s done on server side.

3. The response for the token request contains the access token.
4. the access token is given to the client.
5. Now client can access Microsoft Translator API with access token and request for translation.
6. The response for translation request is the translated text and client can display the output.

Web API:

Create a ASP.NET MVC 4 Web API Project and in Default ValuesController, Get action provides the access token as follows:

 public class ValuesController : ApiController
    {
         // GET api/values
        public async Task<String> Get()
        {

            string clientID = ConfigurationManager.AppSettings["ClientID"].ToString();
            string clientSecret = ConfigurationManager.AppSettings["ClientSecret"].ToString();
            Uri translatorAccessURI = new Uri("https://datamarket.accesscontrol.windows.net/v2/OAuth2-13");

            // Create form parameters that we will send to data market.
            Dictionary<string, string> requestDetails = new Dictionary<string, string>
            {
                { "grant_type", "client_credentials" },
                { "client_id",   clientID},
                { "client_secret",  clientSecret },
                { "scope", "http://api.microsofttranslator.com" }
            };

            FormUrlEncodedContent requestContent = new FormUrlEncodedContent(requestDetails);
            
            // We use a HttpClient instance for Azure Marketplace request
            HttpClient client = new HttpClient();

            //send to data market
            HttpResponseMessage dataMarketResponse = await client.PostAsync(translatorAccessURI, requestContent);
            
            // If client authentication failed then we get a JSON response from Azure Market Place
            if (!dataMarketResponse.IsSuccessStatusCode)
            {
                JToken error = await dataMarketResponse.Content.ReadAsAsync<JToken>();
                string errorType = error.Value<string>("error");
                string errorDescription = error.Value<string>("error_description");
                throw new HttpRequestException(string.Format("Azure market place request failed: {0} {1}", errorType, errorDescription));
            }
            
            // Get the access token to attach to the original request from the response body
            JToken response = await dataMarketResponse.Content.ReadAsAsync<JToken>();
            return HttpUtility.UrlEncode(response.Value<string>("access_token"));
        }
}

ClientID and ClientSecret stored in Web.Config appsettings are passed in HTTP POST request to the token service to obtain the access token. The response is JSON-encoded and includes the access token.

Ajax Client:

For simplicity, we are taking same app to consume web api, In Default view, UI structure is as follows:

<div id="body">
<input type="text" id="txtMsg" value="" />
<input type="button" id="btnTranslate" onclick="translate();" value="Translate" /><br />
<span id="msg"></span>
</div>

UI has Textbox for user input, translate button and span to display output.

        var languageFrom = "en";
        var languageTo = "hi";

        function translate() {
            if ($('#txtMsg').val().trim().length == 0) {
                alert('Please enter text');
                return false;
            }
            
            $("#msg").text('loading...');

            $.ajax({
                type: "GET",
                url: 'api/values',
                contentType: "application/json; charset=utf-8",
                dataType: "json"
            }).done(function (token) {
                   var s = document.createElement("script");
                   s.src = "http://api.microsofttranslator.com/V2/Ajax.svc/Translate?oncomplete=mycallback&appId=Bearer " + token + "&from=" + languageFrom + "&to=" + languageTo + "&text=" + $('#txtMsg').val();
                   document.getElementsByTagName("head")[0].appendChild(s);
            }).fail(function (xhr, ajaxOptions, thrownError) {
                alert(xhr.responseText);
                $("#msg").text('Error');
            });
        }

        window.mycallback = function (response) {
            $("#msg").text('Translated Text: ' + response);
        }

In above code, when user clicks Translate button, Web API method is called to get access token which is added to a string, prefixed with “Bearer ” (don’t forget the space) and send to the translator service. On translation service response, callback method is called to display the output. We are using “en”(English) to “hi”(Hindi) translation. You can find the other language codes here.

english hindi translation Using Microsoft Translator With ASP.NET MVC 4 Web API

Hope, You enjoy it.

Dynamic Partition Problem During Windows 8 Installation

$
0
0

If you try to install windows 8 on dynamic partition, you will get message “Windows cannot be installed to this hard disk space. The Partition contains one or more dynamic volumes that are not supported for installation”. If you have one disk(only one hard drive and all the partitions are dynamic) running Windows 7 and want to install Windows 8 on another partition, you need to convert the disk from DYNAMIC to BASIC. This article explains how to convert it without data loss (format).

Merge Partitions:

If you have more than 4 dynamic partitions, merge them (to make max 4 partitions).

Assuming F drive is just a data partition and doesn’t contain the page file, boot files or a second operating system. If so, Here are the steps to merge the partitions by removing F and extending E, as follows:

1. Back up to an external device any important data on F and, optionally, move the same important data from F to E.
2. Right-click Computer > Manage > Storage > Disk Management, then right-click the graphic of the F partition and select Delete. The partition returns to Unallocated for a Primary Partition or Free Space if it’s a Logical Drive within an Extended Partition. Delete the partition if it is an Extended partition.
3. Now right-click the graphic of the E partition and select Extend.

Converting Dynamic Disk to Basic Disk:

1. Download pw422.zip ISO and extract it.
2. Download Universal USB installer.
3. Run “Universal USB installer”, select Other linux version, select pw422.iso and select pen-drive to burn as bootable pen-drive.
4. Boot from pen-drive
5. Select HDD and change Dynamic drive into Basic.
6. Select Operation and click Apply.

[Warning]: Everything will be restored but extra partition (which is more than 4) will be deleted and data of that partition will be erased that’s why we have already merged additional partitions. (I got my partitions deleted but ..Thank God …”partition recovery wizard” option helped me to recover partition.)

Now you can install Windows 8 easily with normal steps.

Hope, It helps.

Introducing Online ASP.NET MVC 4 Cheat Sheet

$
0
0
Quick reference guide of ASP.NET MVC 4 : online cheat sheet

CRUD Operations using jQuery Dialog with WYSIWYG HTML Editor, Knockout and ASP.NET Web API

$
0
0
Implementing CRUD operations using jQuery dialog with WYSIWYG HTML Editor, Knockout, EF database first and ASP.NET Web API

WYSIWYG Html Editor and XSS Attack Prevention

$
0
0
How to prevent cross site scripting (XSS) attack due to html editors.

Facebook Style Wall Posts and Comments using Knockout.js and ASP.NET Web API

$
0
0
Implementing Facebook Style Wall Posts and Comments system using Knockout.js, jQuery and ASP.NET MVC4 with Web API

Realtime Wall Post and Comment Notifications using SignalR and Knockout

$
0
0
implementing real time notifications similar to twitter, stackoverflow..etc using Knockout JS and SignalR.

C# LINQ: Combine Multiple Sequences In Parallel

$
0
0
Different ways to combine multiple lists in parallel (by order) in C# LINQ.
Viewing all 116 articles
Browse latest View live