Quantcast
Channel: TechBrij
Viewing all 116 articles
Browse latest View live

4 Ways to Design Responsive Navigation Menu

$
0
0


In my recent posts, You’ve seen how to Make the Website Mobile, Tablet, Desktop Compatible and Test Responsive Web Design. In this post, you’ll see different ways to design responsive navigation menu.

1. Simple Menu:

It’s simple CSS menu based on “one design for all”. Menu links goes to next line if browser window is narrow. Generally It’s independent of media queries conditions.

simple responsive menu 4 Ways to Design Responsive Navigation Menu

In this approach, when any link goes to next line, the empty space after the link become useless and it looks not so good.

2. Menu Links with alignment:

In this approach, navigation links are divided into equal parts to cover whole browser width and it reduces with browser width for a limit and after this whole menu divided into two rows with equal width and so on.

responsive menu alignment 4 Ways to Design Responsive Navigation Menu

3. Menu Links With Button:

In this approach, one button is displayed for small devices and on clicking or mouse-over button, navigation menu will be displayed as drop-down.

responsive menu button 4 Ways to Design Responsive Navigation Menu

It’s useful when you want to focus on content.

4. Menu To Dropdown:

In this approach, When the browser window is narrow, the menu converts from a regular row of links into a dropdown control elements. I like this approach the most. Right now, It’s done in SmashingMagazine.

In apporach 3, the menu links are displayed using javascript and you have controls on link means you can display multiple links in single row, but in approach 4, links are displayed as dropdown control items and device browser will have control to display.

Share your opinion and suggestion about responsive navigation menu and let us know how you are implementing it.

Related posts:

  1. Google Adsense: Leaderboard (728 x 90) vs Link Units as Navigation Menu
  2. How to Test Responsive Web Design
  3. Responsive Design: Make Your Website Mobile, Tablet, Desktop Compatible
  4. 5 things I learned from Facebook design
  5. Mac/iphone Style Dock menu for your website

Add Social Slider (Facebook like box, twitter and Google+ Widgets) in Your Website

$
0
0


Today, Social media is a great way to promote websites, blogs, apps and events. For a website, Facebook, Twitter or Google+ widgets become must have parts to get public interaction, generate traffic. If you add Facebook Like box, twitter status and Google+ widget in your web page, it takes too much spaces and it makes webpage too complex. So, alternate is to use icons only and on mouse over display corresponding widget. To attract user, make these icons fixed floated.

social slider widget Add Social Slider (Facebook like box, twitter and Google+ Widgets) in Your Website

How To Add:

1. Open “Social Slider Generator” page from here:

2. Enter Facebook fan page URL, Twitter user name and Google+ Page ID.
It’s not mandatory to enter all fields, If you want to add only Facebook and twitter, enter Facebook and twitter information only and leave Google+ ID blank.

3. Click on ‘Grab the Code‘ button, copy generated code and paste it before </body> tag in your page.

4. If you are getting error: jQuery is undefined or $ is undefined, it means jQuery is not available.

For WordPress blog, Put the following code in your header.php file in the <head> section:

wp_enqueue_script(“jquery”);

before following line:

wp_head();

For a simple website, add following line in HTML head tag:

<script src=”http://ajax.googleapis.com/ajax/libs/jquery/1.4.0/jquery.min.js”></script>

5. It’s compatible with the latest browsers. It might not work with older browsers.

Be Careful:

It’s really a great widget, more attractive with less web page space. you can ask me what it means to be careful. One thing you need to keep in mind before using this widget…what???
If you are using Google Adsense in your website, Widget must not cover any part of adsense unit.
Otherwise It violets adsense policies.

Here’s what it says in the Program Policies…

“Google ads, search boxes or search results may not be… Obscured by elements on a page.”

The thinking is that if you place a navigation element over an ad, an accidental click could be generated.

If you want to use it, use Google leaderboard ad unit in header or footer OR ads in right side bar.

Enjoy Social Digital Life !!!

No related posts.

Create LifeHacker OR Gizmodo Style Sidebar To Scroll Independently

$
0
0


In this article, you will see how to implement Lifehacker.com or Gizmodo.com style sidebar which scrolls independently on mouseover with mouse wheel. It’s really interesting to show important things in top of sidebar. When any user reads articles(might not focus on sidebar instantly), reaches end of article but there is no change in sidebar position. It’s good and a chance to make attention on sidebar, otherwise sidebar is also moving along with article and top section of sidebar is not focused.

Let us start to implement a demo using HTML-CSS without Javascript/jQuery.

1. HTML structure:

<body>
  <div id="wrapper">
	<div id="content">
		....
	</div>
	<div id="sidebarwrapper">
		<div id="sidebar">
		....
			<div id="sidebaritem" class="mousescroll">
			....
			</div>
		</div>
	</div>
  </div>
</body>

2. Layout:

scroll sidebar lifehacker Create LifeHacker OR Gizmodo Style Sidebar To Scroll Independently

3. CSS:

body,html{
  font-family: arial,verdana;
  height:100%;
}	

div#wrapper{
	width:975px;
	margin:0 auto;
	position:relative;
}
div#content{
	float: left;
    width: 650px;
}
div#sidebarwrapper{
		position: absolute;
		right: 0px;
		top: 0;
		width: 300px;
	}
div#sidebar{
	width:300px;
	overflow:hidden;
	position:fixed;
	height:100%;
	top:0;
}
div#sidebaritem {
    width: 330px;
}

div.mousescroll {
    overflow: hidden;
	height:100%;
}
div.mousescroll:hover {
    overflow-y: scroll;
}

On mouse-over, overflow-y : scroll which displays vertical scroll if content is more. To hide scroll bar, the width of parent element (sidebar) is kept smaller than sidebaritem with overflow :hidden.

Why Sidebarwrapper?

Now you might think, what is role of sidebarwrapper? If you use sidebar directly you have to define top and right position. Suppose you set right: 0 then on different resolution, it’s always sticked with right side even content appears in middle. To keep sidebar along with content, sidebarwrapper is used with position: absolute and sidebar is placed in it with fixed position without right declaration.

Enjoy Designing !!!

Related posts:

  1. Fixed Sidebar during Scrolling between Header & Footer using jQuery
  2. Stylish ASP.NET Wizard Control with Horizontal Sidebar on Top
  3. Add widget to page instead of sidebar in wordpress
  4. Responsive Design: Make Your Website Mobile, Tablet, Desktop Compatible
  5. Mac/iphone Style Dock menu for your website

Pass Session or Viewbag values to JS Files : ASP.NET MVC 3

$
0
0


This post explains different ways to get Session, ViewBag or server side variable’s values in your external JS files. In Rich UI web app, there are many JS files having thousands lines of code and It’s common to need of accessing server side variable or session in external js file. Let’s see different ways to get it in ASP.NET MVC 3.
razor javascript file2 Pass Session or Viewbag values to JS Files : ASP.NET MVC 3

1. Using Javascript Variable:

In your view page, you can access session or server side objects easily. So, declare javascript variables, assign Session or ViewBag values and use those variables in JS files.
But your javascript variables must be declared before calling external file. For this, Add section in <head> of layout page(say _layout.cshtml).

<head>
	...
    <link href="@Url.Content("~/Content/Site.css")" rel="stylesheet" type="text/css" />

    @RenderSection("my_script_variables", false)

    <script src="@Url.Content("~/Scripts/external.js")" type="text/javascript"></script>
	...

</head>

and in your view page:

@Section my_script_variables {

    <script type="text/javascript">
            var variable1 = '@myVar1',
            variable2 = '@Session["myVar2"]',
            variable3 = '@ViewBag.myVar3';

        </script>

}

Suppose you have following values:

@{
    String myVar1 = "First";
    Session["myVar2"] = "Second";
    ViewBag.myVar3 = "Third";
 }

and in external js file:

 alert(variable1 + ' ' +variable2 +' '+ variable3);

then you will get ‘First Second Third‘ alert message.

2. Using Control’s Attributes:

You can assign Parameters as value of control

    <input type="hidden" value="@Session["myVar2"]" id="myHiddenVar" />

and get it in js file easily

  alert($('#myHiddenVar').val());

the output in our case is second.

You can use Data Attribute also

 <a id="myLink" data-variable1="@myVar1" data-variable2="@Session["myVar2"]" data-variable3="@ViewBag.myVar3">Test</a>

and in external js file

 $('#myLink').click(function () {
            alert($(this).data('variable1')+' ' +$(this).data('variable2')+' '+$(this).data('variable3'));
            });

On clicking test link, the output is ‘First Second Third‘.

3. RazorJS:

You can add RazorJS by using Nuget. It allows to write Razor-Style C# or VB.NET inside your Javascript Files. Right now, It supports Model and Url Only means you can’t access Session and ViewBag in js (Hope, It’ll be implemented soon).

If the view is NOT strongly typed(means model type is not specified) then you can pass your parameters as model in javascript. Let us see following example:

In view page

@{

    String var1 = "First";
    Session["var2"] = "Second";
    ViewBag.var3 = "Third";

    Dictionary<string, string> test1 = new Dictionary<string, string>();
    test1.Add("var1", var1);
    test1.Add("var2", Session["var2"].ToString());
    test1.Add("var3", ViewBag.var3);    

}
  @Html.RazorJSInline("~/Scripts/external.js", test1);

Here, you notice all required parameters in js file are added in dictionary and pass as a model.

In external.js

@{
var myobj = (Dictionary<string, string>)Model;
}
alert('@myobj["var1"]' +' '+ '@myobj["var2"]'+' ' +'@myobj["var3"]');

The output is ‘First Second Third‘ alert.

Note: RazorJSInline takes second parameter as Model. If model type is not specified in view then you can pass any data type(as you’ve seen above). If model is specified then you have to pass object of same data type(you can modify values of object).

Hope, It helps. Share your opinion and let us know how you are passing parameters in external js files.

Related posts:

  1. Quick View of ASP.NET MVC 3 Razor View Engine
  2. What’s New in ASP.NET MVC 4
  3. Create Separate Web API’s Action for Mobile Request: ASP.NET MVC 4
  4. Show ModalPopUp to Edit Asp.net Gridview Row Values Without using AjaxControlToolkit
  5. Online Ticket Booking System using ASP.NET

Create Separate Web API’s Action for Mobile Request: ASP.NET MVC 4

$
0
0


ASP.NET MVC 4.0 has two great features: One is Display Mode allows you to create mobile-specific and desktop-specific views and Second is Web API platform for building RESTful applications. Sometimes, You might need to return different data or perform different operations for desktop and mobile request. This article explains how to implement separate actions for mobile request keeping same URL format in Web API.

1. In Visual Studio, Select File > New Project > ASP.NET MVC 4 Web Application > Enter name > OK

2. Select ‘Web API‘ > View Engine: ‘Razor‘ > OK

3. You’ll get default ValuesController. When you access <your app url>/api/Values, the array of string value1, value2 is returned.

To create separate action for mobile request, We are going to create separate controller having ‘Mobile‘ suffix.

Right Click on ‘Controllers‘ folder > Add Controller > Give Name ‘ValuesMobileController‘ > Template: ‘API Controller with empty read/write actions‘ > Add

To differentiate both controllers, replace value1, value2 to mobile-value1, mobile-value2 in get method.

4. Now our object is to call action of Mobile controller when request comes from mobile device.

In Global.asax:

default api route:

  routes.MapHttpRoute(
                name: "DefaultApi",
                routeTemplate: "api/{controller}/{id}",
                defaults: new { id = RouteParameter.Optional }
            );

Change it to

 routes.MapHttpRoute(
                name: "DefaultApi",
                routeTemplate: "api/{controller}/{id}",
                defaults: new { id = RouteParameter.Optional }
            ).RouteHandler = new MyRouteHandler();

and add following class:

 public class MyRouteHandler : HttpControllerRouteHandler
    {
        protected override IHttpHandler GetHttpHandler(RequestContext requestContext)
        {
            //Check whether request comes from mobile browser
            if (requestContext.HttpContext.Request.Browser.IsMobileDevice)
            {
                string controller = requestContext.RouteData.Values["controller"].ToString();
                requestContext.RouteData.Values["controller"] = controller + "Mobile";
            }
            return new MyHttpControllerHandler(requestContext.RouteData);
        }
    }

    public class MyHttpControllerHandler : HttpControllerHandler, IRequiresSessionState
    {
        public MyHttpControllerHandler(RouteData routeData)
            : base(routeData)
        {
        }
    }

You have to import following namespaces:

using System.Web.Http.WebHost;
using System.Web.SessionState;

In this RouteHandler, Request.Browser.IsMobileDevice checks whether request comes from mobile browser and change controller name with ‘Mobile‘ suffix.

Now run app on browser, For testing, You can change user-agent to iPhone with user agent switcher Firefox add-on and open same URL. you’ll get mobile-value1 and mobile-value2.

web api Create Separate Web APIs Action for Mobile Request: ASP.NET MVC 4

Hope, It helps.

Related posts:

  1. What’s New in ASP.NET MVC 4
  2. Social media APIs and libraries for .NET developers
  3. Quick View of ASP.NET MVC 3 Razor View Engine
  4. JSON Response of different .NET objects
  5. Pass Session or Viewbag values to JS Files : ASP.NET MVC 3

Useful JavaScript and jQuery Libraries, Plugins [May 2012]

$
0
0


I’ve used different javascript libraries in different projects and realized to prepare a list of commonly used javascript/jQuery plugins every web developer should know. In this post, you’ll find the list which might be valuable for your upcoming projects.
You might want to read following posts:
25 Free Online Tools for Web Design and Development

Top 22 Firefox Add-ons for Web Designers & Developers

javascript jquery plugin Useful JavaScript and jQuery Libraries, Plugins [May 2012]

  1. Autogrow – auto-growing textareas(as the user types it will expand vertically to accommodate the size of the entry).
  2. BlockUI – simulate synchronous behavior when using AJAX, without locking the browser(generally use for pop up, dialog).
  3. ckEditor – rich text and WYSIWYG editor.
  4. ClueTip – show a fancy tooltip when the user’s mouse hovers over (or, optionally, clicks on) any element.
  5. ContextMenu – to create context (right-click) menus.
  6. Downloadify – download of text files without server interaction.
  7. Flot chart – produces graphical plots of arbitrary datasets on-the-fly client-side having interactive features like zooming and mouse tracking.
  8. HoverIntent – To delay or prevent the accidental firing of animations or ajax calls.
  9. Infinite Scroll – pre-fetching content from a subsequent page and adding it directly to the user’s current page similar to Facebook.
  10. jEditable – inplace editor plugin for jQuery.
  11. jHtmlArea – WYSIWYG HTML Editor for jQuery(lightweight and easily customizable).
  12. jqGrid – for representing and manipulating tabular data (client side grid).
  13. jqPlot – plotting and charting plugin.
  14. jQuery Cookie – lightweight jQuery plugin for reading, writing and deleting cookies.
  15. jQuery Form – jQuery Form Plugin allows you to easily and unobtrusively upgrade HTML forms to use AJAX.
  16. jQuery UI – to build highly interactive web applications with rich effects, animations, widgets..etc.
  17. jsTree – cross browser tree component.
  18. Masked Input – allows a user to more easily enter fixed width and format input.
  19. Multiple File Upload – select multiple files for uploading quickly.
  20. MultiSelect – Multi Select Dropdowns.
  21. PrettyPhoto – lightbox clone. Not only supports images, but also for videos, flash, YouTube, iframes and ajax.
  22. ptTimeSelect – To select Time from timepicker.
  23. ScrollTo – Easy element scrolling using jQuery.
  24. Turnjs – Flip book (Page Curl) effect.
  25. uploadify – to upload multiple files.
  26. Validation – simple client-side form validation.
  27. Modernizr – Taking advantage of the new capabilities of HTML5 and CSS3 in older browsers.
  28. excanvas – HTML5 Canvas for Internet Explorer.
  29. html5shiv – to enable use of HTML5 sectioning elements in legacy Internet Explorer.
  30. IE9.js – make Microsoft Internet Explorer behave like a standards-compliant browser.

Share your opinion or suggestion and let us know about other must know plugin(s) you think should be included.

Related posts:

  1. 4 Notepad++ Plugins Make You More Productive
  2. IxEDIT: No coding for Javascript/jQuery
  3. jqGrid: Drag and Drop columns (Reordering) with Javascript Array
  4. jQuery Popup on button click instead of link navigation
  5. FEDe: A Search engine for Front-End (HTML, CSS, Javascript & jQuery) Web developers

Quantity Validation and Total Calculation in ASP.NET Gridview Shopping Cart with jQuery

$
0
0


In this article, You will get how to implement following features in ASP.NET Gridview shopping cart using jQuery:
1. Enter Numeric quantity for product which must not exceed available quantity.
2. Calculate product wise total price based on entered quantity.
3. Calculate grand total of cart if any quantity is updated.

shopping cart Quantity Validation and Total Calculation in ASP.NET Gridview Shopping Cart with jQuery
Consider following gridview structure:

<asp:GridView ID="GridView1" runat="server" AutoGenerateColumns="False" ShowFooter="true" >
        <Columns>
            <asp:BoundField DataField="Code" HeaderText="Code" />
            <asp:BoundField DataField="ProductName" HeaderText="Name" />
            <asp:BoundField DataField="AvlQty" HeaderText="Available Qty" ItemStyle-CssClass="avlQty" />
            <asp:BoundField DataField="Price" DataFormatString="{0:0.00}" ItemStyle-CssClass="price"
                HeaderText="Price" />
            <asp:TemplateField HeaderText="Qty">
                <ItemTemplate>
                    <asp:TextBox ID="TextBoxQty" CssClass="txtQty" runat="server" Text='<%# Eval("SelQty") %>' MaxLength="5" Width="45"></asp:TextBox>
                    <asp:RequiredFieldValidator ID="RequiredFieldValidator1" runat="server" ControlToValidate="TextBoxQty" Display="Dynamic" ForeColor="Red" ErrorMessage="RequiredFieldValidator">*</asp:RequiredFieldValidator>
                </ItemTemplate>
            </asp:TemplateField>
            <asp:TemplateField HeaderText="Net Price">
                <ItemTemplate>
                    <span class="totalPrice"></span>
                </ItemTemplate>
                <FooterTemplate>
                   Total: <span class="grandtotal"></span>
                </FooterTemplate>
            </asp:TemplateField>
        </Columns>
    </asp:GridView>

Here you notice that different CSS are applied on different columns. It’ll be used in jQuery to get or set values.
Let us consider dummy data to bind gridview:

//product class
public class Product
{
    public string Code { get; set; }
    public string ProductName { get; set; }
    public int AvlQty { get; set; }
    public int SelQty { get; set; }
    public double Price { get; set; }
}

//Get product list
public List<Product> GetProducts()
    {

        var products = new List<Product>()
    {
	new Product(){ Code = "ASD123" , ProductName = "Product 1", AvlQty = 10, SelQty=1, Price = 12.5},
	new Product() {Code = "BBB123",	ProductName = "Product 2", AvlQty = 12, SelQty=1, Price = 15},
	new Product() {Code = "CCC123", ProductName = "Product 3", AvlQty = 15, SelQty=1, Price=20},
	new Product() {Code = "DDD123", ProductName = "Product 4", AvlQty = 20, SelQty=1, Price=37.5},
	new Product() {Code = "EEE123", ProductName = "Product 5", AvlQty = 21, SelQty=1, Price=25}
    };
        return products;

    }
//To bind gridview
 protected void Page_Load(object sender, EventArgs e)
    {
        if (!IsPostBack)
        {
            GridView1.DataSource = GetProducts();
            GridView1.DataBind();
        }
    }

To implement quantity validation and total price calculation for valid quantity:


            //Change price and grand total on changing qty
            $('#<%=GridView1.ClientID %> .txtQty').blur(function () {
                var $tr = $(this).parents('tr');
                if ($tr.length > 0) {
                    if (parseInt($tr.find('.avlQty').html()) < $(this).val()) {
                        alert('Qty must not exceed available quantity.');
                        var $ctrl = $(this);
                        window.setTimeout(function () {
                            $ctrl.focus();
                         }, 50);
                        return false;
                    }
                    $tr.find('.totalPrice').html(parseFloat($tr.find('.price').html()) * parseInt($(this).val()));
                }
                CalculateGrandTotal();
            });
            //To get grand Total
            function CalculateGrandTotal() {
                var grandTotal = 0.0;
                $('#<%=GridView1.ClientID %> tr:gt(0)').each(function () {
                    grandTotal = grandTotal + parseFloat($(this).find('.totalPrice').length == 0 || !$(this).find('.totalPrice').html() ? 0 : $(this).find('.totalPrice').html());
                });
                $('#<%=GridView1.ClientID %> .grandtotal').html(grandTotal);
            }

To allow only numeric data in quantity textbox:

 //To allow numeric character only
            $('#<%=GridView1.ClientID %> .txtQty').keydown(function (event) {
                // Allow: backspace, delete, tab, escape, and enter
                if (event.keyCode == 46 || event.keyCode == 8 || event.keyCode == 9 || event.keyCode == 27 || event.keyCode == 13 ||
                // Allow: Ctrl+A
            (event.keyCode == 65 && event.ctrlKey === true) ||
                // Allow: home, end, left, right
            (event.keyCode >= 35 && event.keyCode <= 39)) {
                    // let it happen, don't do anything
                    return;
                }
                else {
                    // Ensure that it is a number and stop the keypress
                    if (event.shiftKey || (event.keyCode < 48 || event.keyCode > 57) && (event.keyCode < 96 || event.keyCode > 105)) {
                        event.preventDefault();
                    }
                }
            });

First time,total price should be auto calculated for all products:

 //First Time to display all total amount and grand total
            function initGrid() {
                $('#<%=GridView1.ClientID %> tr:gt(0)').each(function () {
                    $(this).find('.totalPrice').html(parseFloat($(this).find('.price').html()) * parseInt($(this).find('.txtQty').val()));

                });
                CalculateGrandTotal();
            }
			   initGrid();

Demo:

Here is the HTML rendered demo, In this requiredfield validator js code is not included, So It will not work. In following demo, Change qty in textbox, You will get total amount auto calculated:

Hope, It helps.

Related posts:

  1. Displaying Total in ASP.NET Gridview Footer Row Without using Template Field
  2. Convert ASP.NET Gridview OR HTML Table to Wizard using jQuery
  3. ASP.NET GridView And RepeatColumns(Rows in Multiple Columns) With jQuery
  4. Grouping Data in ASP.NET Gridview Control
  5. Anonymous Type LINQ Result and GridView Sorting in ASP.NET

ASP.NET GridView And RepeatColumns(Rows in Multiple Columns) With jQuery

$
0
0


By Default, There is no RepeatColumns property in ASP.NET Gridview to display rows in multiple columns as in DataList control. When Gridview has few columns, It doesn’t take full space of browser. To make good UI, You might need RepeatColumns property. This post explains how to display asp.net GridView rows in multiple columns using jQuery WITHOUT modifying any existing code.

Code:

function GridViewRepeatColumns(gridviewid, repeatColumns) {
            //Created By: Brij Mohan(http://techbrij.com)
            if (repeatColumns < 2) {
                alert('Invalid repeatColumns value');
                return;
            }
            var $gridview = $('#' + gridviewid);
            var $newTable = $('<table></table>');

            //Append first row in table
            var $firstRow =  $gridview.find('tr:eq(0)'),
            firstRowHTML = $firstRow.html(),
            colLength = $firstRow.children().length;

            $newTable.append($firstRow);

            //Append first row cells n times
            for (var i = 0; i < repeatColumns - 1; i++) {
                $newTable.find('tr:eq(0)').append(firstRowHTML);
            }

            while ($gridview.find('tr').length > 0) {
                var $gridRow = $gridview.find('tr:eq(0)');
               $newTable.append($gridRow);
               for (var i = 0; i < repeatColumns - 1; i++) {
                   if ($gridview.find('tr').length > 0) {
                       $gridRow.append($gridview.find('tr:eq(0)').html());
                       $gridview.find('tr:eq(0)').remove();
                   }
                   else {
                       for (var j = 0; j < colLength; j++) {
                           $gridRow.append('<td></td>');
                       }
                   }
               }
           }
            //update existing GridView
           $gridview.html($newTable.html());
        }

You have to use above method and pass gridviewid and number of repeated columns. suppose your gridview ID is gridSample and have following structure:

gridview 1 ASP.NET GridView And RepeatColumns(Rows in Multiple Columns) With jQuery

To create two columns layout, call following in javascript:

GridViewRepeatColumns("<%=gridSample.ClientID %>",2);
gridview 2 ASP.NET GridView And RepeatColumns(Rows in Multiple Columns) With jQuery

For Three columns layout:
GridViewRepeatColumns("<%=gridSample.ClientID %>",3);

gridview 3 ASP.NET GridView And RepeatColumns(Rows in Multiple Columns) With jQuery

For Four columns layout:
GridViewRepeatColumns("<%=gridSample.ClientID %>",4);

gridview 4 ASP.NET GridView And RepeatColumns(Rows in Multiple Columns) With jQuery

Now You see edit and delete functionality is as it is, No need to modify any other server side code.

Demo:

Here is the HTML rendered demo of 3 columns layout:

Hope, It saves your time.

Related posts:

  1. Convert ASP.NET Gridview OR HTML Table to Wizard using jQuery
  2. Quantity Validation and Total Calculation in ASP.NET Gridview Shopping Cart with jQuery
  3. Displaying Total in ASP.NET Gridview Footer Row Without using Template Field
  4. Adding Gridview nested in Repeater in ASP.NET 2.0
  5. Grouping Data in ASP.NET Gridview Control

Custom RoleProvider, Authorization, EF DB First and ASP.NET MVC

$
0
0


It’s a step by step tutorial to implement custom role provider and authorization in ASP.NET MVC 4.0 with EF 4.x DB First approach.

Step 1: Create new ASP.NET MVC 4 Web Application > Template: Internet Application, View Engine: Razor.

Add Models:

Step 2: Right Click on Models folder > Add > New Item > Select “ADO.NET Entity Data Model” > Enter Name “SampleModel.edmx” > Add
Select “Generate From Database” > Next
Select Database Connection (New Connection if doesn’t exist), Make sure “Save entity connection setting in web.config as” option true and Enter Name “SampleDBEntities” > Next

Select Your tables and stored proc which is related to role functionality, Enter ModelNamespace “SampleDBModel” > Finish.

Let us consider following table structure:

Role DB Structure Custom RoleProvider, Authorization, EF DB First and ASP.NET MVC

Custom RoleProvider:

Step 3: Right Click on Project in Solution Explorer > Add New Item > Class > Enter Name: MyRoleProvider.cs
Step 4: Import following namespace and Inherit this class to RoleProvider.
using System.Web.Security;
using <your project namespace>.Models;

Step 5: Click on RoleProvider > Select “Implement abstract class” option. It’ll generate methods of RoleProvider.

RoleProvider1 Custom RoleProvider, Authorization, EF DB First and ASP.NET MVC

Read Also: Custom role provider based sitemap navigation in asp.net

Step 6: implement GetRolesForUser method, It takes username and returns all roles related to user.

 public override string[] GetRolesForUser(string username)
        {
            using (SampleDBEntities objContext = new SampleDBEntities())
            {
                var objUser = objContext.Users.FirstOrDefault(x => x.AppUserName == username);
                if (objUser == null)
                {
                    return null;
                }
                else
                {
                    string[] ret = objUser.Roles.Select(x => x.RoleName).ToArray();
                    return ret;
                }
            }
        }

You can implement above method as per your database structure. Build the Project.

Step 7: In web.config update RoleManager Tag and define MyRoleProvider class.

    <roleManager defaultProvider="CustomRoleProvider" enabled="true" cacheRolesInCookie="false">
      <providers>
        <clear />
        <add name="CustomRoleProvider" type="MVC4Role.MyRoleProvider"  />
      </providers>
    </roleManager>

Customize Login:

Step 8: Now in AccountController > Login HttpPost action, We’ll validate user as per our database structure.

		[AllowAnonymous]
        [HttpPost]
        public ActionResult Login(LoginModel model, string returnUrl)
        {
            if (ModelState.IsValid)
            {
                using (SampleDBEntities objContext = new SampleDBEntities())
                {
                    var objUser = objContext.Users.FirstOrDefault(x => x.AppUserName == model.UserName  && x.Password == model.Password);
                    if (objUser == null)
                    {
                        ModelState.AddModelError("LogOnError", "The user name or password provided is incorrect.");
                    }
                    else
                    {
                        FormsAuthentication.SetAuthCookie(model.UserName, model.RememberMe);                       

                        if (Url.IsLocalUrl(returnUrl) && returnUrl.Length > 1 && returnUrl.StartsWith("/")
                           && !returnUrl.StartsWith("//") && !returnUrl.StartsWith("/\\"))
                        {
                            return Redirect(returnUrl);
                        }
                        else
                        {
                            //Redirect to default page
                            return RedirectToAction("RedirectToDefault");
                        }
                    }
                }
            }
            // If we got this far, something failed, redisplay form
            return View(model);
        }

In above method, we are validating username and password and redirect on successful login. You can create custom membership provider, implement ValidateUser method and use it here to check validation.

Role Based Redirection:

Step 9: You might want role based redirection on successful login. To implement this, let us create one more action say RedirectToDefault.

 public ActionResult RedirectToDefault()
        {

            String[] roles = Roles.GetRolesForUser();
            if (roles.Contains("Administrator"))
            {
                return RedirectToAction("Index","Admin");
            }
            else if (roles.Contains("Dealer"))
            {
                return RedirectToAction("Index", "Dealer");
            }
            else if (roles.Contains("PublicUser"))
            {
                return RedirectToAction("Index", "PublicUser");
            }
            else
            {
                return RedirectToAction("Index");
            }
        }

Why New Action?

Now one question arises, why to create separate action for this? We can put direct if else in same login action. If we do this then GetRolesForUser or User.IsInRole will not work. FormsAuthentication requires one redirection to set cookies…etc. That’s why we redirects to another action and redirect again to action as per user role.

For testing, Create two new empty controllers say Admin and Dealer and create views of default actions.
Admin View:

@{
    ViewBag.Title = "Index";
}
<h2>Welcome</h2>
This is Admin Area !!!

Dealer View:

@{
    ViewBag.Title = "Index";
}

<h2>Welcome</h2>

This is dealer section !!!

Note: In ASP.NET MVC 4, default template login is based on ajax. So for testing, open <base url>/Account/login. Similarly, you can update JsonLogin action.

login Custom RoleProvider, Authorization, EF DB First and ASP.NET MVC

Authorization:

Step 10: You can use Authorize attribute to restrict access by callers to an action method. You can put Authorize attribute on any action or whole controller. Suppose you want to give Admin controller access to admin role only then use
[Authorize(Roles="Administrator")]
No other user can access this controller actions.

authorize Custom RoleProvider, Authorization, EF DB First and ASP.NET MVC

You can assign multiple roles also. suppose you want to give Dealer controller access to dealer and administrators. then

 [Authorize(Roles = "Dealer,Administrator")]
    public class DealerController : Controller
    {
...
    }

If dealer tries to access admin controller It will be redirected to login page.

Hope, It helps.

Related posts:

  1. Custom role provider based sitemap navigation in asp.net
  2. Pass Session or Viewbag values to JS Files : ASP.NET MVC 3
  3. The search request was unable to connect to the Search Service: MOSS Error
  4. Quick View of ASP.NET MVC 3 Razor View Engine
  5. Create Separate Web API’s Action for Mobile Request: ASP.NET MVC 4

Implementing Role Based Menu in ASP.NET MVC 4

$
0
0


In my previous post, I explained how to implement custom role provider, authorization and role based navigation on successful login in asp.net mvc 4. In this post, We’ll implement role based menu.

In default template of asp.net mvc 4.0, Layout.cshtml has following code for menu:

<nav>
                        <ul id="menu">
                            <li>@Html.ActionLink("Home", "Index", "Home")</li>
                            <li>@Html.ActionLink("About", "About", "Home")</li>
                            <li>@Html.ActionLink("Contact", "Contact", "Home")</li>
                        </ul>
                    </nav>

Which is hard-coded for all users. We’ll create partial view for menu to reduce complexity.

Right click on Shared folder in Views > select Add > click View
Enter Name: _Menu and set “Create as a partial view” option true > click Add
It’ll open blank cshtml page.

Define Menu Items:

In normal asp.net webforms app, Sitemap file is used to define structure. Here we’ll define menu details in partial view.

@{
    var menus = new[]
                {
                   new { LinkText="Home", ActionName="Index",ControllerName="Home",Roles="All"  },
                   new { LinkText="About", ActionName="About",ControllerName="Home",Roles="Anonymous"  },
                   new { LinkText="Contact", ActionName="Contact",ControllerName="Home",Roles="Anonymous"  },
                   new { LinkText="Dashboard", ActionName="Index",ControllerName="Dealer",Roles="Dealer"  },
                   new { LinkText="Dashboard", ActionName="Index",ControllerName="Admin",Roles="Administrator"  },
                   new { LinkText="Administration", ActionName="GetUsers",ControllerName="Admin",Roles="Administrator"  },
                   new { LinkText="My Profile", ActionName="GetDealerInfo",ControllerName="Dealer",Roles="Dealer,PublicUser"  },
                   new { LinkText="Products", ActionName="GetProducts",ControllerName="Product",Roles="Dealer,Administrator"  },
                   new { LinkText="Search", ActionName="SearchProducts",ControllerName="Product",Roles="PublicUser,Dealer,Administrator"  },
                   new { LinkText="Purchase History", ActionName="GetHistory",ControllerName="Product",Roles="PublicUser"  },

                };
}

In above code, An Array of anonymous object having LinkText, ActionName, ControllerName, Roles properties is used.
I’ve given some additional roles which doesn’t belong to user roles like:

All : To display link for both authenticated or anonymous users
Anonymous: To display link for unauthenticated users

Get Role Based Links:

We’ve to get links from above menu structure with following points:
1. If user is not authenticated, Show links having All or Anonymous role.
2. If user is authenticated and has single role, Show links having All or user-role role.
3. If user is authenticated and has multiple roles, show links having All or ANY user-role role.

Note: A user may have multiple roles and in menu structure, a link may have multiple roles.

<ul id="menu">
@if (HttpContext.Current.User.Identity.IsAuthenticated)
{
    String[] roles = Roles.GetRolesForUser();
    var links = from item in menus
                where item.Roles.Split(new String[] { "," }, StringSplitOptions.RemoveEmptyEntries)
                .Any(x => roles.Contains(x) || x == "All")
                select item;
    foreach (var link in links)
    {
        @: <li> @Html.ActionLink(link.LinkText, link.ActionName,link.ControllerName)</li>
    }
}
else{
    var links = from item in menus
                where item.Roles.Split(new String[]{","},StringSplitOptions.RemoveEmptyEntries)
                .Any(x=>new String[]{"All","Anonymous"}.Contains(x))
                select item;
     foreach ( var link in links){
         @: <li> @Html.ActionLink(link.LinkText, link.ActionName, link.ControllerName)</li>
     }
}
</ul>

In above code, Linq is used to get links for both authenticated and unauthenticated user in partial view. It will get links and makes ul li structure.

Add Menu:

Now, we have to use this partial view in layout page. If we directly call this, It will be called in each request and the entire logic is executed again and again. So we’ll use session to store HTML string of menu and use session to display menu for further request.

In _Layout.cshtml page, replace nav tag with following structure:

					<nav>
                         @if (Session["MyMenu"] == null){
                            Session["MyMenu"] = Html.Partial("~/Views/Shared/_Menu.cshtml");
                          }
                         @Session["MyMenu"]
                    </nav>

We’ve to clear session in login and logout actions.

In Login action, clear it just after setting FormsAuthentication cookies:

 FormsAuthentication.SetAuthCookie(model.UserName, model.RememberMe);
 Session["MyMenu"] = null;

and in LogOff action:

public ActionResult LogOff()
        {
            FormsAuthentication.SignOut();
            Session["MyMenu"] = null;
            return RedirectToAction("Index", "Home");
        }

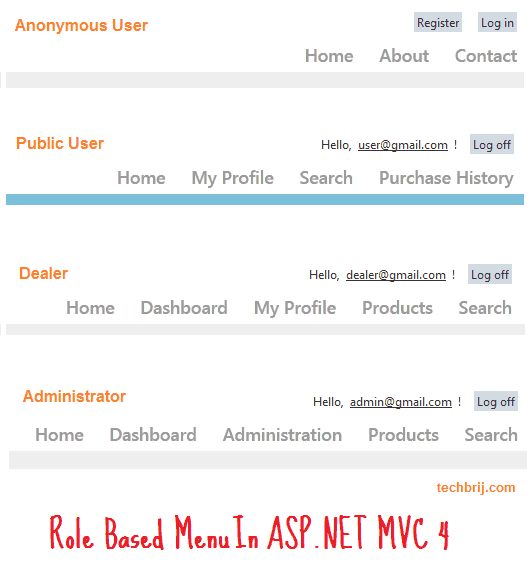
Output

See following output of above menu structure for different roles in asp.net mvc default template.

role based menu mvc Implementing Role Based Menu in ASP.NET MVC 4

Hope, It helps. Share your opinion about how you are implementing role based navigation in ASP.NET MVC.

Related posts:

  1. Custom role provider based sitemap navigation in asp.net
  2. Custom RoleProvider, Authorization, EF DB First and ASP.NET MVC
  3. Pass Session or Viewbag values to JS Files : ASP.NET MVC 3
  4. Quick View of ASP.NET MVC 3 Razor View Engine
  5. Google Adsense: Leaderboard (728 x 90) vs Link Units as Navigation Menu

ASP.NET CheckBoxList Operations with jQuery

$
0
0


This post explains how to perform common operations (like check/uncheck checkboxes by value/text/index, min/max selection limit..etc) on ASP.NET CheckBoxList control using jQuery.

Let’s have following aspx code:

<asp:CheckBoxList ID="CheckBoxList1" runat="server">
</asp:CheckBoxList>
<input type="button" value="OK" id="demo" />

On server side:

       Dictionary<int,string>  dictItems = new Dictionary<int,string>();
        dictItems.Add(1, "Item-1");
        dictItems.Add(2, "Item-2");
        dictItems.Add(3, "Item-3");
        dictItems.Add(4, "Item-4");
        dictItems.Add(5, "Item-5");

        CheckBoxList1.DataSource = dictItems;
        CheckBoxList1.DataTextField = "Value";
        CheckBoxList1.DataValueField = "Key";
        CheckBoxList1.DataBind();

Rendered HTML: The following is the rendered source of above code:

<table id="MainContent_CheckBoxList1">
	<tr>
		<td><input id="MainContent_CheckBoxList1_0" type="checkbox" name="ctl00$MainContent$CheckBoxList1$0" value="1" /><label for="MainContent_CheckBoxList1_0">Item-1</label></td>
	</tr><tr>
		<td><input id="MainContent_CheckBoxList1_1" type="checkbox" name="ctl00$MainContent$CheckBoxList1$1" value="2" /><label for="MainContent_CheckBoxList1_1">Item-2</label></td>
	</tr><tr>
		<td><input id="MainContent_CheckBoxList1_2" type="checkbox" name="ctl00$MainContent$CheckBoxList1$2" value="3" /><label for="MainContent_CheckBoxList1_2">Item-3</label></td>
	</tr><tr>
		<td><input id="MainContent_CheckBoxList1_3" type="checkbox" name="ctl00$MainContent$CheckBoxList1$3" value="4" /><label for="MainContent_CheckBoxList1_3">Item-4</label></td>
	</tr><tr>
		<td><input id="MainContent_CheckBoxList1_4" type="checkbox" name="ctl00$MainContent$CheckBoxList1$4" value="5" /><label for="MainContent_CheckBoxList1_4">Item-5</label></td>
	</tr>
</table>
<input type="button" value="OK" id="demo" />

1. Get Value of Selected Items:

    //Get value of selected items
    $("#demo").click(function () {
        var selectedValues = [];
        $("[id*=CheckBoxList1] input:checked").each(function () {
            selectedValues.push($(this).val());
        });
        if (selectedValues.length>0) {
            alert("Selected Value(s): " + selectedValues);
        } else {
            alert("No item has been selected.");
        }
    });

selected value checkbox ASP.NET CheckBoxList Operations with jQuery

2. Get Index of selected items:

 //Get index of selected items
    $("#demo").click(function () {
        var $ctrls = $("[id*=CheckBoxList1] input:checkbox");
        $("[id*=CheckBoxList1] input:checked").each(function () {
           alert($ctrls.index($(this)));
        });
    });

It will display 0 based index of selected items. Suppose I select Item-1,Item-3,Item-4 then It’ll give output 0,2,3 in alert boxes.

3. Get Text of Selected Items:

   //Get text of selected items
    $("#demo").click(function () {
        $("[id*=CheckBoxList1] input:checked").each(function () {
            alert($(this).next().html());
        });
    });

As you’ve seen, Text is placed in label control(next of checkbox) in rendered HTML. So, $(this).next().html() is used to get text.

4. Check/Uncheck All Checkboxes:

 $("[id*=CheckBoxList1] input:checkbox").prop('checked',true); //To check all
 $("[id*=CheckBoxList1] input:checkbox").prop('checked',false);// To uncheck all

Note: For jQuery 1.6+,use prop and for older version use attr.

Read Also: jQuery .attr() vs .prop()

5. Check Items By Index:

Suppose you have to check items by the given index.

 //Check Items by index
    var selIndex = [0, 2, 3];
    for (var i = 0; i < selIndex.length; i++) {
        $("[id*=CheckBoxList1] input:checkbox").eq(selIndex[i]).prop('checked', true);
    }

Similarly, you can uncheck items by setting false in prop.

6. Check Items By Value:

 //Check Items by value
    var selValue = [1, 2, 4];
    var $ctrls = $("[id*=CheckBoxList1]");
    for (var i = 0; i < selValue.length; i++) {
        $ctrls.find('input:checkbox[value=' + selValue[i] + ']').prop('checked', true);
    }

In above code, checkbox is selected if value exist in selValue array.

7. Check Items By Text:

//Check Items by Text
    var selText = ['Item-1','Item-3'];
    var $ctrls = $("[id*=CheckBoxList1]");
    for (var i = 0; i < selText.length; i++) {
        $ctrls.find('label:contains("' + selText[i] + '")').prev().prop('checked', true);
    }

In this Label text is compared and if text exists then corresponding checkbox is checked. The above code will select Item-1 and Item-3.

8. Max Selection Limit:

The following code limits the number of checkboxes a user can select simultaneously:

  $("[id*=CheckBoxList1] input:checkbox").change(function () {
            var maxSelection = 3;
            if ($("[id*=CheckBoxList1] input:checkbox:checked").length > maxSelection) {
                $(this).prop("checked", false);
                alert("Please select a maximum of " + maxSelection + " items.");
            }
        })

max limit checkbox ASP.NET CheckBoxList Operations with jQuery

Similarly, you can implement Min Selection criteria.

Hope, It helps. Feel free to ask related queries here.

Related posts:

  1. jQuery: Common Operations on Radio Button & Checkbox
  2. jQuery: Common Operations on DropdownList (Combobox)
  3. jQuery .attr() vs .prop()
  4. Clone html form elements with selected options using jQuery
  5. Client Side Validation using ASP.NET Validator Controls from Javascript

Using jQuery UI Autocomplete With ASP.NET Web API

$
0
0


It explains how to implement jQuery UI Autocomplete feature with ASP.NET Web API and Entity Framework DB First approach. Suppose you have to display complete information of user selected item from auto-complete textbox. In this case you might need primary key field of selected item means we’ve to get Id and Name both from Web API.
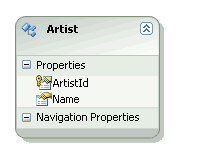
We’ll use Artist table of MVC Music Store database. Assuming all names are unique and we have to include ArtistId also with Name as response of Web API action.
db structure Using jQuery UI Autocomplete With ASP.NET Web API

Create Project:

Here are the basic steps to create Web Api project and add entity data model for Artist table.

1. Open Visual Studio > File > New > Project
2. Select “ASP.NET MVC 4 Web App” > OK
3. Select “Web API template” > OK
4. Right click on Models > Add > New Item
5. Select “ADO.NET Entity Data Model“, Enter Name
6. Generate From Database, Select Database > Next
7. Select Tables and related Stored Proc > Finish

Web API Action:

Open ValueController.cs and add Get method which takes term as string argument and returns dictionary of ArtistID and Name as below:

public IDictionary<int,string> Get(string term)
        {
            using (MVCMUSICSTOREEntities context = new MVCMUSICSTOREEntities()) {
                return context.Artists.Where(x => x.Name.Contains(term)).ToDictionary(x => x.ArtistId, x => x.Name);
            }
        }

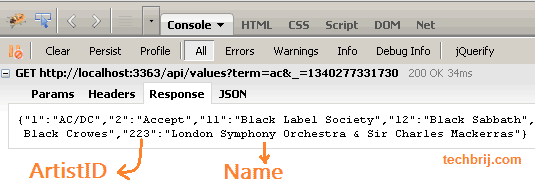
If you check in firebug console, you will get following response:

firebug response Using jQuery UI Autocomplete With ASP.NET Web API

If you want the result must be start with user entered keyword then use StartsWith instead of Contains.

return context.Artists.Where(x => x.Name.StartsWith(term)).ToDictionary(x => x.ArtistId, x => x.Name);

Autocomplete:

For simplicity, We’ll consume above action in same project. Delete existing Views > Home > Index.cshtml file and in HomeController.cs, Right click on Index action > Add View> uncheck all options > Add.

Now first step is to add CSS and script files of jQuery, jQuery UI.

    @Styles.Render("~/Content/themes/base/css", "~/Content/css")
    @Scripts.Render("~/bundles/modernizr", "~/bundles/jquery", "~/bundles/jqueryui")

OR
You can include file like this:

<script src="~/Scripts/jquery-1.6.2.min.js" type="text/javascript"></script>

Here is the auto-complete feature implementation:

 Search : <input type="text" id="txtSearch" />
    <script type="text/javascript">
            $(function () {
                $('#txtSearch').autocomplete({
                    source: function (request, response) {
                        $.ajax({
                            url: '/api/values',
                            type: 'GET',
                            cache: false,
                            data: request,
                            dataType: 'json',
                            success: function (json) {
                                // call autocomplete callback method with results
                                response($.map(json, function (name, val) {
                                    return {
                                        label: name,
                                        value: val
                                    }
                                }));
                            },
                            error: function (XMLHttpRequest, textStatus, errorThrown) {
                                //alert('error - ' + textStatus);
                                console.log('error', textStatus, errorThrown);
                            }
                        });
                    },
                    minLength: 2,
                    select: function (event, ui) {
                        alert('you have selected ' + ui.item.label + ' ID: ' + ui.item.value);
                        $('#txtSearch').val(ui.item.label);
                        return false;
                    }
                })
            });
   </script>

On typing min two characters, Ajax request is made to call web api action, the response is converted in label:’…’,value:’… ‘ format (It’s the main tricky part) and list is displayed. When you select any item, it is displayed with Id in alert box.

autocomplete Using jQuery UI Autocomplete With ASP.NET Web API

Hope, It helps.

Related posts:

  1. Create Separate Web API’s Action for Mobile Request: ASP.NET MVC 4
  2. Testing Web services or REST API Easily with Poster Add-on
  3. ASP.NET CheckBoxList Operations with jQuery
  4. Convert ASP.NET Gridview OR HTML Table to Wizard using jQuery
  5. Custom RoleProvider, Authorization, EF DB First and ASP.NET MVC

Styling Table Or Gridview with CSS3 Bar and Pie Chart

$
0
0


Suppose you’ve to display survey result in grid having different columns with percentage data. It would be more effective and attractive if you use chart to show percentage data. This post explains how to display Bar or Pie chart in HTML table or ASP.NET gridview column with CSS3 and jQuery.
css table pie bar chart Styling Table Or Gridview with CSS3 Bar and Pie Chart

HTML Table Structure:

<table class="mGrid" cellspacing="0" cellpadding="3" rules="all" border="1" id="GridView1" style="border-collapse:collapse;">
		<tr>
			<th scope="col">Name</th><th scope="col">Popularity(%)</th><th scope="col" style="width:100px;">Sale(%)</th>
		</tr><tr>
			<td>Product A</td><td class="barChart">90</td><td class="pieChart">58</td>
		</tr><tr>
			<td>Product B</td><td class="barChart">67</td><td class="pieChart">19</td>
		</tr><tr>
			<td>Product C</td><td class="barChart">75</td><td class="pieChart">11</td>
		</tr><tr>
			<td>Product D</td><td class="barChart">33</td><td class="pieChart">5</td>
		</tr><tr>
			<td>Product E</td><td class="barChart">72</td><td class="pieChart">3</td>
		</tr>
	</table>

Here barChart CSS class is used on second column for bar chart and pieChart CSS class is used on third column for pie chart.

If you are using asp.net GridView, You can apply same classes.

<asp:GridView ID="GridView1" runat="server" ClientIDMode="Static"  AutoGenerateColumns="False" CssClass="mGrid" CellSpacing="0" CellPadding="3">
        <Columns>
            <asp:BoundField DataField="Name" HeaderText="Name" />
            <asp:BoundField DataField="Popularity" HeaderText="Popularity(%)" ItemStyle-CssClass="barChart" />
            <asp:BoundField DataField="Sale" HeaderText="Sale(%)" ItemStyle-CssClass="pieChart" HeaderStyle-Width="100px"  />
        </Columns>
 </asp:GridView>

To bind ASP.NET GridView:


 Product[] products = {
new Product { Name="Product A", Sale=58, Popularity = 90   },
new Product { Name="Product B", Sale=19, Popularity = 67  },
new Product { Name="Product C", Sale=11, Popularity = 75  },
new Product { Name="Product D", Sale=5 , Popularity = 33 },
new Product { Name="Product E", Sale=3 , Popularity = 72 }
};      

        GridView1.DataSource = products;
        GridView1.DataBind();   

Bar Chart:

        .barChart
        {
            width: 300px;
        }
        .barChart div.bar
        {
            background-color: #87CEEB;
            text-align: center;
            height:40px;
           padding-top:10px;
           color:Black;
           border-radius:0px 5px 5px 0px;
        }

The logic is to set width of div according to data.

$('#GridView1 .barChart').each(function (index, value) {
            $(this).html('<div class="bar" style="width:' + $(this).text() + '%">' + $(this).text() +'%</div>');
        });

Pie Chart:

 .pieChart
        {
            position: relative;
            font-size: 80px;
            width: 1em;
            height: 1em;
            display: block;
        }
        .percent
        {
            position: absolute;
            top: 1.05em;
            left: 0;
            width: 3.33em;
            font-size: 0.3em;
            text-align: center;
        }

        .slice
        {
            position: absolute;
            width: 1em;
            height: 1em;
            clip: rect(0px,1em,1em,0.5em);
        }
        .slice.gt50
        {
            clip: rect(auto, auto, auto, auto);
        }
        .slice > .pie
        {
            border: 0.1em solid #66EE66;
            position: absolute;
            width: 0.8em; /* 1 - (2 * border width) */
            height: 0.8em; /* 1 - (2 * border width) */
            clip: rect(0em,0.5em,1em,0em);
            -moz-border-radius: 0.5em;
            -webkit-border-radius: 0.5em;
            border-radius: 0.5em;
        }
        .pieBack
        {
            border: 0.1em solid #EEEEEE;
            position: absolute;
            width: 0.8em;
            height: 0.8em;
            -moz-border-radius: 0.5em;
            -webkit-border-radius: 0.5em;
            border-radius: 0.5em;
        }
        .slice > .pie.fill
        {
            -moz-transform: rotate(180deg) !important;
            -webkit-transform: rotate(180deg) !important;
            -o-transform: rotate(180deg) !important;
            transform: rotate(180deg) !important;
        }

We’ll implement following structure to draw Pie chart with above CSS:

<td class="pieChart">
<div class="percent">58%</div>
<div class="pieBack"></div>
<div class="slice gt50">
<div style="-moz-transform: rotate(208.8deg);" class="pie"></div>
<div style="-moz-transform: rotate(208.8deg);" class="pie fill"></div>
</div>
</td>

Now the logic is to change -prefix-transform property according to data to rotate.

$('#GridView1 .pieChart').each(function (index, value) {
            var percent = $(this).text();
            var deg = 360 / 100 * percent;
            $(this).html('<div class="percent">' + Math.round(percent) + '%' + '</div><div class="pieBack"></div><div ' + (percent > 50 ? ' class="slice gt50"' : 'class="slice"') + '><div class="pie"></div>' + (percent > 50 ? '<div class="pie fill"></div>' : '') + '</div>');
            $(this).find('.slice .pie').css({
                '-moz-transform': 'rotate(' + deg + 'deg)',
                '-webkit-transform': 'rotate(' + deg + 'deg)',
                '-o-transform': 'rotate(' + deg + 'deg)',
                'transform': 'rotate(' + deg + 'deg)'
            });
        });

Hope, It helps.

Related posts:

  1. Convert ASP.NET Gridview OR HTML Table to Wizard using jQuery
  2. HTML Table Row Grouping with jQuery
  3. Simple Slide Tabbed box(Content Slider) using jQuery
  4. Quantity Validation and Total Calculation in ASP.NET Gridview Shopping Cart with jQuery
  5. 4 Ways to Design Responsive Navigation Menu

jqGrid Inline Editing With jQuery Autocomplete FlexBox

$
0
0


This post explains how to use jQuery FlexBox plugin for Google like auto-suggestion box to edit data in jqGrid. Suppose jqGrid has Country column and we want to give auto-suggestion box during editing. When user enters letter, It will auto-populate related country names.

flexbox jqgrid jqGrid Inline Editing With jQuery Autocomplete FlexBox

CSS & JS:

We have to include jquery UI, FlexBox and jqGrid css files.

		<link rel="stylesheet" type="text/css" href="css/main.css" />
		<link rel="stylesheet" type="text/css" href="css/jquery.flexbox.css" />
		<link rel="stylesheet" type="text/css" href="css/jquery-ui-1.8.1.custom.css" />
		<link rel="stylesheet" type="text/css" href="css/ui.jqgrid.css" />
		<style type="text/css">
		body{
		text-align:center;
		}
		#gridMain td.countryHolder{
		overflow:visible;
		margin-bottom:20px;
		}
		#gridMain .ffb{
		margin-top:22px;
		}
		.ui-jqgrid{
		margin:0 auto;
		}
		</style>

Also, need to include jquery, jquery ui, FlexGrid, jqgrid locale and jqgrid js files.

		<script type="text/javascript" src="js/jquery/1.4.2/jquery.min.js"></script>
		<script type="text/javascript" src="js/jquery.flexbox.js"></script>
		<script type="text/javascript" src="js/jquery-ui-1.8.20.min.js"></script>
		<script type="text/javascript" src="js/grid.locale-en.js"></script>
		<script type="text/javascript" src="js/jquery.jqGrid.min.js"></script>
		<script type="text/javascript" src="js/countries.js"></script>

countries.js file has country data in following format:

var countries = {};
countries.results = [
	{id:'AF',name:'Afghanistan'},
	{id:'AL',name:'Albania'},
	{id:'DZ',name:'Algeria'},
	{id:'AS',name:'American Samoa'},
	{id:'AD',name:'Andorra'},
	{id:'AO',name:'Angola'},
	{id:'AI',name:'Anguilla'},
	{id:'AG',name:'Antigua & Barbuda'},
	{id:'AR',name:'Argentina'},
	{id:'AM',name:'Armenia'},
	{id:'AW',name:'Aruba'},
	{id:'AU',name:'Australia'},
	{id:'AT',name:'Austria'},
	{id:'AZ',name:'Azerbaijan'},
	{id:'AP',name:'Azores'},
	{id:'BS',name:'Bahamas'},
	{id:'BH',name:'Bahrain'},
	{id:'BD',name:'Bangladesh'},
	.....

	{id:'YE',name:'Yemen'},
	{id:'ZM',name:'Zambia'},
	{id:'ZW',name:'Zimbabwe'}
];
countries.total = countries.results.length;

See following for jqGrid data:

var mydata=[
{id:"11",Country:"Finland",amount:"200.00",tax:"10.00"},
{id:"12",Country:"Australia",amount:"300.00",tax:"20.00"},
{id:"13",Country:"Bangladesh",amount:"400.00",tax:"30.00"},
{id:"27",Country:"Botswana",amount:"200.00",tax:"10.00"},
{id:"19",Country:"Liberia",amount:"300.00",tax:"20.00"},
{id:"17",Country:"Belgium",amount:"400.00",tax:"30.00"},
{id:"18",Country:"Belarus",amount:"200.00",tax:"10.00"},
{id:"28",Country:"India",amount:"300.00",tax:"20.00"},
{id:"29",Country:"Latvia",amount:"400.00",tax:"30.00"}];

HTML Structure:

<table id="gridMain"></table>
<div id="pagernav"></div>
<div id="testData" style="margin:0 auto"></div>
<input type="button" id="btnGetData" value="Get Updated Info" />

testData div is used to retrieve the latest data from jqGrid.

Read Also:
jqGrid: Drag and Drop columns (Reordering) with Javascript Array

jqGrid:

  var lastsel2;
jQuery("#gridMain").jqGrid({
    datatype: "local",
    data: mydata,
    pager: '#pagernav',
    sortname: 'id',
    sortorder: "desc",
    sortable: true,
    height: 300,
	localReader : {id:'id'},
    editurl: 'clientArray',
	onSelectRow: function(id){
      if(id && id!==lastsel2){
        jQuery('#gridMain').restoreRow(lastsel2);
        jQuery('#gridMain').editRow(id,true);
          lastsel2=id;
      }
    },
    colNames: ['Inv No', 'Country', 'Amount', 'Tax'],
colModel:[ {name:'id',index:'id',key: true, width:40},
 {name:'Country',index:'Country', width:300, classes:"countryHolder", editable: true
 ,edittype:'custom',editoptions:{custom_element:myelem,custom_value:myval}
 },
 {name:'amount',index:'amount', width:80, align:"right", editable: true},
 {name:'tax',index:'tax', width:80, align:"right", editable: true}
 ],
    caption: "FlexBox"
});
jQuery("#gridMain").jqGrid('navGrid', '#pagernav', {add:false,edit:false,del:false});

We defined country colum edittype = custom and defined myelem to get custom control and myval to get value in editoptions. In myelem method, FlexBox is configured.

function myelem(value,options){
   var $ret = $('<div id="country"></div>');
        $ret.flexbox(countries, {
        initialValue: value,
        paging: {
            pageSize: 5
        }
        });
   return $ret;
}

function myval(elem){
    return  $('#country_input').val();
}

You can configure more as per your requirement, check following:
FlexBox documentation

Practical Usage:

For simplicity, I took local data. You can consume web service to get JSON data for grid and auto-complete list, modify grid data and pass to web service to save it. If you want to get the latest data from the grid, see following:

$("#btnGetData").click(function ()
{
var latestData = $('#gridMain').jqGrid('getRowData');
var record,tbl = '<table style="border:2px solid gray;margin:0 auto" cellspacing="0" cellpadding="3" >';
for (row in latestData){
record = latestData[row];
tbl += '<tr>';
for (cell in record)
{
tbl += '<td style="border:1px solid gray"> ' +record[cell] + '</td>';
}
tbl += '</tr>';
}
tbl += '</table>';
$("#testData").html(tbl);
});

Hope, It helps.

Related posts:

  1. jqGrid: Drag and Drop columns (Reordering) with Javascript Array
  2. Using jQuery UI Autocomplete With ASP.NET Web API
  3. Month Range Picker using jQuery UI Datepicker
  4. Useful JavaScript and jQuery Libraries, Plugins [May 2012]
  5. Add controls (textbox, radio, checkbox..) dynamically in jQuery way

Using jQuery Featured Content Slider With ASP.NET Web API

$
0
0


This post explains how you can display your featured posts using content slider to save page space and to attract visitors using jQuery and ASP.NET Web API. I am following this tutorial which explains how to implement with jQuery UI but it is static. We’ll dynamically generate content slider and give sliding effect for image caption.

jquery slider Using jQuery Featured Content Slider With ASP.NET Web API

Web API:

You might want to get Admin selected posts, images or content from database and display them as content slider. So here web API’s responsibility is to provide data.

Consider following Model:

public class Banner {
        public string Title { get; set; }
        public string URL { get; set; }
        public string Summary { get; set; }
        public string SmallImageURL { get; set; }
        public string FullImageURL { get; set; }
    }

In ValuesController, Get Method will return collection of banner objects. For simplicity, the data is hard-coded, but you can get from database and return in same way.

        public IEnumerable<Banner> Get()
        {
            return new Banner[] {
                new Banner(){ Title="15+ Excellent High Speed Photographs",
                    URL ="http://techbrij.com",
                    Summary="Lorem ipsum dolor sit amet, consectetur adipiscing elit. Nulla tincidunt condimentum lacus. Pellentesque ut diam....",
                    SmallImageURL ="images/Banner/image1-small.jpg",
                    FullImageURL="images/Banner/image1.jpg" },
                new Banner(){ Title="20 Beautiful Long Exposure Photographs",
                    URL ="http://techbrij.com",
                    Summary="Vestibulum leo quam, accumsan nec porttitor a, euismod ac tortor. Sed ipsum lorem, sagittis non egestas id, suscipit....",
                    SmallImageURL ="images/Banner/image2-small.jpg",
                    FullImageURL="images/Banner/image2.jpg" },
                new Banner(){ Title="35 Amazing Logo Designs",
                    URL ="http://techbrij.com",
                    Summary="liquam erat volutpat. Proin id volutpat nisi. Nulla facilisi. Curabitur facilisis sollicitudin ornare....",
                    SmallImageURL ="images/Banner/image3-small.jpg",
                    FullImageURL="images/Banner/image3.jpg" },
                new Banner(){ Title="Create a Vintage Photograph in Photoshop",
                    URL ="http://techbrij.com",
                    Summary="Quisque sed orci ut lacus viverra interdum ornare sed est. Donec porta, erat eu pretium luctus, leo augue sodales....",
                    SmallImageURL ="images/Banner/image4-small.jpg",
                    FullImageURL="images/Banner/image4.jpg" }
         };

        }

For testing, Open following URL in browser, you will get the data
http://myservername/api/values
See following data in firebug:

json Using jQuery Featured Content Slider With ASP.NET Web API

View:

For simplicity, we are taking same app, create new action in Home controller, add view without layout and add jQuery and jQuery UI in the view.

  @Styles.Render( "~/Content/css")
  @Scripts.Render("~/bundles/modernizr", "~/bundles/jquery", "~/bundles/jqueryui")

HTML Structure:

We are going to implement same structure as in this tutorial, but dynamically using jQuery. So in the view, we have following structure in body:

 <div id="featured">
        <ul class="ui-tabs-nav">
        </ul>
 </div>

That’s it. To draw internal structure, I created following javascript method:


 function drawLayout(banners) {
            var temp;
            $.each(banners, function (index, val) {
                //Add Tab
                $('#featured ul.ui-tabs-nav').append('<li class="ui-tabs-nav-item" id="nav-fragment-' + index + '"><a href="#fragment-' + index + '"><img src="../../' + val.SmallImageURL + '" alt="" /><span>' + val.Title + '</span></a></li>');
                //Add Content
                temp = [];
                temp.push('<div id="fragment-' + index + '" class="ui-tabs-panel ui-tabs-hide">');
                temp.push('<img src="../../' + val.FullImageURL + '" />');
                temp.push('<div class="info" >');
                temp.push('<h2><a href="' + val.URL + '" >' + val.Title + '</a></h2>');
                temp.push('<p>' + val.Summary + '<a href="' + val.URL + '" >read more</a></p>');
                temp.push('</div>');
                temp.push('</div>');
                $('#featured').append(temp.join(''));
            });
        }

To get data and add content dynamically, jquery ajax is used:

  $.ajax({
                url: '/api/values',
                type: 'GET',
                async: false,
                dataType: 'json',
                success: function (json) {
                    drawLayout(json);
                },
                error: function (XMLHttpRequest, textStatus, errorThrown) {
                    //alert('error - ' + textStatus);
                    console.log('error', textStatus, errorThrown);
                }
            });

To make content slider work:

//Show first slide by default
$('#featured .ui-tabs-panel:first').removeClass('ui-tabs-hide');
$('#featured .ui-tabs-panel:first .info').css({ top: '180px' });
$("#featured").tabs({ fx: { opacity: "toggle"} }).tabs("rotate", 5000, true);

It will create jQuery UI rotating tabs acts as auto rotating content slider. I want to display image caption animated when slide is displayed, so added following code:

 $('#featured').bind('tabsshow', function (event, ui) {
                var $ctrl = $("#featured .ui-tabs-panel:not(.ui-tabs-hide)").find('.info');
                $ctrl.css({ top: '0px' });
                $ctrl.stop().animate({ top: '180px' }, { queue: false, duration: 300 });
            });

Check following HTML demo, instead of calling web api, just used javascript variable having JSON data.

Hope, It helps.

Related posts:

  1. Using jQuery UI Autocomplete With ASP.NET Web API
  2. A Simple Rounded Corner Slide Tabbed Box (Content Slider) using jQuery
  3. Create Separate Web API’s Action for Mobile Request: ASP.NET MVC 4
  4. Simple Slide Tabbed box(Content Slider) using jQuery
  5. Seat Reservation with jQuery

ASP.NET MVC 4 Display Mode For Mobile, Tablet And TV

$
0
0


ASP.NET MVC 4 introduces Display Modes allows you to implement device or browser-specific views means you can target specific devices and provide device friendly interface. In this post, you will see how to implement mobile, tablet and TV specific views.
Lets first understand how to define display mode in the Application_Start method of the Global.asax, like so:

    DisplayModeProvider.Instance.Modes.Insert(0, new DefaultDisplayMode("iPhone")
    {
      ContextCondition = (context => context.GetOverriddenUserAgent().IndexOf
        ("iPhone", StringComparison.OrdinalIgnoreCase) >= 0)
    });

Here we defined iPhone in DefaultDisplayMode argument which defines the suffix of the view and defined condition if user agent has iPhone. When an iPhone browser is making the request(It has iPhone in user agent string), ASP.NET MVC look first for views matching the suffix “iPhone” and renders [view].iPhone.cshtml.

You might want to create different views of your app for desktop, TV(for GoogleTV, Internet.TV…etc), tablets(for ipad, kindle..etc) and mobiles. To implement this, I’ve added four views to home folder:

files ASP.NET MVC 4 Display Mode For Mobile, Tablet And TV

Read also: Responsive Design: Make Your Website Mobile, Tablet, Desktop Compatible

Tablet and TV Views:

Our objective is to create a common view for all tablets. So, we need to detect whether the device is tablet. You would use Request.Browser["IsTablet"] == “True” with 51degrees.mobi premium data. This property is NOT included in the free Lite data set.

So, I converted Categorizr(A device detection script) into C#.

 public string GetDeviceType(string ua)
        {
            string ret = "";
            // Check if user agent is a smart TV - http://goo.gl/FocDk
            if (Regex.IsMatch(ua, @"GoogleTV|SmartTV|Internet.TV|NetCast|NETTV|AppleTV|boxee|Kylo|Roku|DLNADOC|CE\-HTML", RegexOptions.IgnoreCase))
            {
                ret = "tv";
            }
            // Check if user agent is a TV Based Gaming Console
            else if (Regex.IsMatch(ua, "Xbox|PLAYSTATION.3|Wii", RegexOptions.IgnoreCase))
            {
                ret = "tv";
            }
            // Check if user agent is a Tablet
            else if ((Regex.IsMatch(ua, "iP(a|ro)d", RegexOptions.IgnoreCase) || (Regex.IsMatch(ua, "tablet", RegexOptions.IgnoreCase)) && (!Regex.IsMatch(ua, "RX-34", RegexOptions.IgnoreCase)) || (Regex.IsMatch(ua, "FOLIO", RegexOptions.IgnoreCase))))
            {
                ret = "tablet";
            }
            // Check if user agent is an Android Tablet
            else if ((Regex.IsMatch(ua, "Linux", RegexOptions.IgnoreCase)) && (Regex.IsMatch(ua, "Android", RegexOptions.IgnoreCase)) && (!Regex.IsMatch(ua, "Fennec|mobi|HTC.Magic|HTCX06HT|Nexus.One|SC-02B|fone.945", RegexOptions.IgnoreCase)))
            {
                ret = "tablet";
            }
            // Check if user agent is a Kindle or Kindle Fire
            else if ((Regex.IsMatch(ua, "Kindle", RegexOptions.IgnoreCase)) || (Regex.IsMatch(ua, "Mac.OS", RegexOptions.IgnoreCase)) && (Regex.IsMatch(ua, "Silk", RegexOptions.IgnoreCase)))
            {
                ret = "tablet";
            }
            // Check if user agent is a pre Android 3.0 Tablet
            else if ((Regex.IsMatch(ua, @"GT-P10|SC-01C|SHW-M180S|SGH-T849|SCH-I800|SHW-M180L|SPH-P100|SGH-I987|zt180|HTC(.Flyer|\\_Flyer)|Sprint.ATP51|ViewPad7|pandigital(sprnova|nova)|Ideos.S7|Dell.Streak.7|Advent.Vega|A101IT|A70BHT|MID7015|Next2|nook", RegexOptions.IgnoreCase)) || (Regex.IsMatch(ua, "MB511", RegexOptions.IgnoreCase)) && (Regex.IsMatch(ua, "RUTEM", RegexOptions.IgnoreCase)))
            {
                ret = "tablet";
            }
            // Check if user agent is unique Mobile User Agent
            else if ((Regex.IsMatch(ua, "BOLT|Fennec|Iris|Maemo|Minimo|Mobi|mowser|NetFront|Novarra|Prism|RX-34|Skyfire|Tear|XV6875|XV6975|Google.Wireless.Transcoder", RegexOptions.IgnoreCase)))
            {
                ret = "mobile";
            }
            // Check if user agent is an odd Opera User Agent - http://goo.gl/nK90K
            else if ((Regex.IsMatch(ua, "Opera", RegexOptions.IgnoreCase)) && (Regex.IsMatch(ua, "Windows.NT.5", RegexOptions.IgnoreCase)) && (Regex.IsMatch(ua, @"HTC|Xda|Mini|Vario|SAMSUNG\-GT\-i8000|SAMSUNG\-SGH\-i9", RegexOptions.IgnoreCase)))
            {
                ret = "mobile";
            }
            // Check if user agent is Windows Desktop
            else if ((Regex.IsMatch(ua, "Windows.(NT|XP|ME|9)")) && (!Regex.IsMatch(ua, "Phone", RegexOptions.IgnoreCase)) || (Regex.IsMatch(ua, "Win(9|.9|NT)", RegexOptions.IgnoreCase)))
            {
                ret = "desktop";
            }
            // Check if agent is Mac Desktop
            else if ((Regex.IsMatch(ua, "Macintosh|PowerPC", RegexOptions.IgnoreCase)) && (!Regex.IsMatch(ua, "Silk", RegexOptions.IgnoreCase)))
            {
                ret = "desktop";
            }
            // Check if user agent is a Linux Desktop
            else if ((Regex.IsMatch(ua, "Linux", RegexOptions.IgnoreCase)) && (Regex.IsMatch(ua, "X11", RegexOptions.IgnoreCase)))
            {
                ret = "desktop";
            }
            // Check if user agent is a Solaris, SunOS, BSD Desktop
            else if ((Regex.IsMatch(ua, "Solaris|SunOS|BSD", RegexOptions.IgnoreCase)))
            {
                ret = "desktop";
            }
            // Check if user agent is a Desktop BOT/Crawler/Spider
            else if ((Regex.IsMatch(ua, "Bot|Crawler|Spider|Yahoo|ia_archiver|Covario-IDS|findlinks|DataparkSearch|larbin|Mediapartners-Google|NG-Search|Snappy|Teoma|Jeeves|TinEye", RegexOptions.IgnoreCase)) && (!Regex.IsMatch(ua, "Mobile", RegexOptions.IgnoreCase)))
            {
                ret = "desktop";
            }
            // Otherwise assume it is a Mobile Device
            else
            {
                ret = "mobile";
            }
            return ret;
        }

To add display mode for tablet and TV:

  DisplayModeProvider.Instance.Modes.Insert(0, new DefaultDisplayMode("tablet")
            {
                ContextCondition = (context => GetDeviceType(context.GetOverriddenUserAgent()) == "tablet")
            });

            DisplayModeProvider.Instance.Modes.Insert(1, new DefaultDisplayMode("tv")
            {
                ContextCondition = (context => GetDeviceType(context.GetOverriddenUserAgent()) == "tv")
            });

Note: If multiple context conditions are satisfied then app will render which appears in Display Mode order first means 0 index will have the highest priority.

Mobile View:

For mobile, If you are thinking to do something like this:

 DisplayModeProvider.Instance.Modes.Insert(2, new DefaultDisplayMode("mobile")
            {
                ContextCondition = (context => GetDeviceType(context.GetOverriddenUserAgent()) == "mobile")
            });

OR

DisplayModeProvider.Instance.Modes.Insert(2, new DefaultDisplayMode("Mobile")
            {
                ContextCondition = (context => context.Request.Browser.IsMobileDevice)
            });

NO NEED to do it, mobile suffix is already inbuilt for mobile devices. By default, if you add a .mobile.cshtml view to a folder, that view will be rendered by mobile devices.

if no condition matches for any defined display mode, default desktop view is displayed.

You can test it using Mozilla User Agent Switcher Add-on.

desktop ASP.NET MVC 4 Display Mode For Mobile, Tablet And TV

mobile ASP.NET MVC 4 Display Mode For Mobile, Tablet And TV

tablet ASP.NET MVC 4 Display Mode For Mobile, Tablet And TV

tv ASP.NET MVC 4 Display Mode For Mobile, Tablet And TV

Hope, It helps. Share your opinion or suggestion how you are implementing cross device web app.

Related posts:

  1. Create Separate Web API’s Action for Mobile Request: ASP.NET MVC 4
  2. What’s New in ASP.NET MVC 4
  3. Responsive Design: Make Your Website Mobile, Tablet, Desktop Compatible
  4. Custom RoleProvider, Authorization, EF DB First and ASP.NET MVC
  5. Implementing Role Based Menu in ASP.NET MVC 4

Add, Edit, Delete In jqGrid With ASP.NET Web API

$
0
0


This post explains how to implement a simple CRUD (Create, Read, Update, and Delete) in jqGrid with ASP.NET MVC 4 Web API. If you are beginner to Web API, read this post to create a web API that supports CRUD operations. We will use GET, POST, PUT and DELETE HTTP methods for Select, Insert, Update and Delete operations respectively.

Model:

I am using same model and repository structure as in this post:

 public class Product
    {
        public int Id { get; set; }
        public string Name { get; set; }
        public string Category { get; set; }
        public decimal Price { get; set; }
    }

Repository Interface:

 interface IProductRepository
    {
        IEnumerable<Product> GetAll();
        Product Get(int id);
        Product Add(Product item);
        void Remove(int id);
        bool Update(Product item);
    }

Repository:

 public class ProductRepository : IProductRepository
    {
        private List<Product> products = new List<Product>();
        private int _nextId = 1;

        public ProductRepository()
        {
            Add(new Product { Name = "Tomato soup", Category = "Groceries", Price = 1.39M });
            Add(new Product { Name = "Yo-yo", Category = "Toys", Price = 3.75M });
            Add(new Product { Name = "Hammer", Category = "Hardware", Price = 16.99M });
            Add(new Product { Name = "Network Cards", Category = "Electronics", Price = 6.59M });
            Add(new Product { Name = "Spotting Scopes", Category = "Optics", Price = 25.99M });
            Add(new Product { Name = "Biometric Monitors", Category = "Health Care", Price = 100.0M });
            Add(new Product { Name = "Perfume", Category = "Cosmetics", Price = 10.99M });
            Add(new Product { Name = "Hair Coloring", Category = "Personal Care", Price = 16.99M });
        }

        public IEnumerable<Product> GetAll()
        {
            return products;
        }

        public Product Get(int id)
        {
            return products.Find(p => p.Id == id);
        }

        public Product Add(Product item)
        {
            item.Id = _nextId++;
            products.Add(item);
            return item;
        }

        public void Remove(int id)
        {
            products.RemoveAll(p => p.Id == id);
        }

        public bool Update(Product item)
        {
            int index = products.FindIndex(p => p.Id == item.Id);
            if (index == -1)
            {
                return false;
            }
            products.RemoveAt(index);
            products.Add(item);
            return true;
        }
    }

Web API Controller:

Add an empty API controller in your project and add a field that holds an IProductRepository instance:

public class ProductsController : ApiController
{
    static readonly IProductRepository repository = new ProductRepository();
}

let’s take a look at the JSON format expected by the grid:

{
  total: "xxx",
  page: "yyy",
  records: "zzz",
  rows : [
    {id:"1", cell:["cell11", "cell12", "cell13"]},
    {id:"2", cell:["cell21", "cell22", "cell23"]},
      ...
  ]
}

To display product list in jqGrid, we implement the above format. See following method:

  public dynamic GetProducts(string sidx, string sord, int page, int rows)
        {
            var products = repository.GetAll() as IEnumerable<Product>;
            var pageIndex = Convert.ToInt32(page) - 1;
            var pageSize = rows;
            var totalRecords = products.Count();
            var totalPages = (int)Math.Ceiling((float)totalRecords / (float)pageSize);
            products = products.Skip(pageIndex * pageSize).Take(pageSize);
            return new
            {
                total = totalPages,
                page = page,
                records = totalRecords,
                rows = (
                    from product in products
                    select new
                    {
                        i = product.Id.ToString(),
                        cell = new string[] {
                           product.Id.ToString(),
                           product.Name,
                           product.Category,
                           product.Price.ToString()
                        }
                    }).ToArray()
            };
        }

To add new product, HTTP POST request is used:

 public HttpResponseMessage PostProduct(Product item)
        {
            item = repository.Add(item);
            var response = Request.CreateResponse<Product>(HttpStatusCode.Created, item);
            string uri = Url.Link("DefaultApi", new { id = item.Id });
            response.Headers.Location = new Uri(uri);
            return response;
        }

To update existing product, HTTP PUT is used:

 public void PutProduct(int id, Product item)
        {
            item.Id = id;
            if (!repository.Update(item))
            {
                throw new HttpResponseException(new HttpResponseMessage(HttpStatusCode.NotFound));
            }
        }

To delete a product:

		public HttpResponseMessage DeleteProduct(int id)
        {
            repository.Remove(id);
            return new HttpResponseMessage(HttpStatusCode.NoContent);
        }

View:

For simplicity, We are going to use same app to consume Web API.
1. First we include jqGrid library in our project. To install jQuery.jqGrid from NuGet, run the following command in the Package Manager Console

Install-Package jQuery.jqGrid

2. include jQuery UI and jqGrid css files

 @Styles.Render("~/Content/themes/base/css", "~/Content/css")
 <link href="~/Content/jquery.jqGrid/ui.jqgrid.css" rel="stylesheet" type="text/css" />

OR include ui.jqgrid.css in existing bundle.

3. include javascript files:

    <script src="~/Scripts/jquery-1.6.2.js" type="text/javascript"></script>
    <script src="~/Scripts/jquery-ui-1.8.23.js" type="text/javascript"></script>
    <script src="~/Scripts/i18n/grid.locale-en.js" type="text/javascript"></script>
    <script src="~/Scripts/jquery.jqGrid.min.js" type="text/javascript"></script>

OR
you can add grid.locale-en.js and jquery.jqGrid.min.js in the bundle and use it. Make sure, the sequence must be same.

HTML Structure:

4. You have to add HTML table for jqGrid and a div for pager in body.

	<table id="gridMain">
        </table>
        <div id="pagernav">
        </div>

That’s it.

5. To create basic jqGrid structure:


 var API_URL = "api/products/";
 jQuery("#gridMain").jqGrid({
            url: API_URL,
            datatype: 'json',
            mtype: 'GET',
            pager: '#pagernav',
            sortable: true,
            height: 200,
            viewrecords: true,
            colNames: ['Id', 'Name', 'Category', 'Price'],
            colModel: [{ name: 'Id', index: 'Id', width: 40, sorttype: "int" },
             { name: 'Name', index: 'Name', editable: true, edittype: 'text', width: 70 },
             { name: 'Category', index: 'Category', editable: true, edittype: 'text', width: 70 },
             { name: 'Price', index: 'Price', editable: true, edittype: 'text', width: 50, align: "right", sorttype: "float", formatter: "number" }
            ],
            caption: "CRUD With ASP.NET Web API",
            autowidth: true

        });

6. By default, jqGrid uses POST HTTP method for adding and editing record. But we have to use different HTTP methods for different operations. It’s the most tricky part of this post. I created a method takes HTTP Method type and return parameter for editing.

 function updateDialog(action) {
            return {
                url: API_URL
                , closeAfterAdd: true
                , closeAfterEdit: true
                , afterShowForm: function (formId) { }
                , modal: true
                , onclickSubmit: function (params) {
                    var list = $("#gridMain");
                    var selectedRow = list.getGridParam("selrow");
                    rowData = list.getRowData(selectedRow);
                    params.url += rowData.Id;
                    params.mtype = action;
                }
                , width: "300"
            };
        }

  jQuery("#gridMain").jqGrid('navGrid', '#pagernav',
        { add: true, edit: true, del: true },
        updateDialog('PUT'),
        updateDialog('POST'),
        updateDialog('DELETE')
);		

jqgrid crud Add, Edit, Delete In jqGrid With ASP.NET Web API

Now, In navigation bar, click on add, edit or delete icon to insert, update or delete product respectively.

Hope, It helps. Share your opinion, suggestion or queries in comment box.

Related posts:

  1. Using jQuery Featured Content Slider With ASP.NET Web API
  2. Using jQuery UI Autocomplete With ASP.NET Web API
  3. Quantity Validation and Total Calculation in ASP.NET Gridview Shopping Cart with jQuery
  4. Create Separate Web API’s Action for Mobile Request: ASP.NET MVC 4
  5. jqGrid Inline Editing With jQuery Autocomplete FlexBox

Creating a Chart with jQuery Flot and ASP.NET Web API

$
0
0


This article explains how to display interactive charts with Flot jQuery plugin and ASP.NET Web API. Flot is an open source Javascript plotting library produces graphical plots of arbitrary datasets on-the-fly client-side. We’ll get data from database using ASP.NET Web API and use it to display chart.

In SQL Server database, ‘Analytics’ table has date wise visits, page-views information for the site. We’ll display monthly summary report using following steps:

Web API:

1. Create ASP.NET MVC 4 Web API project, add new “ADO.NET Entity Data Model” in Model folder and select ‘Analytics’ and related tables from database.

sql database analytics Creating a Chart with jQuery Flot and ASP.NET Web API

2. Create a new Empty API Controller say ChartController and Create an action as follows:

 public dynamic Get(int year)
 {
   using (AnalyticsEntities context = new AnalyticsEntities())
            {

                var alldata = (from item in context.SiteAnalyticsDatas
                               where item.Date.Value.Year == year && item.SiteID == 1
                               group item by item.Date.Value.Month into grp
                               select new
                               {
                                   Month = grp.Key,
                                   Visitors = grp.Sum(x => x.Visitors).Value,
                                   Visits = grp.Sum(x => x.Visits).Value,
                                   PageViews = grp.Sum(x => x.PageViews).Value
                               }).ToList();

It takes year and returns month wise total visits,visitors and page-views data. But we’ll format the data according to required format of Flot library.

				var ret = new[]
                {
                    new { label="PageViews", data = alldata.Select(x=>new int[]{ x.Month, x.PageViews })},
                    new { label="Visits", data = alldata.Select(x=>new int[]{ x.Month, x.Visits })},
                    new { label="Visitors", data = alldata.Select(x=>new int[]{ x.Month, x.Visitors })}

                };

                return ret;
            }
        }

It will generate JSON as follows:

[
{
"label":"PageViews",
"data":[[1,1605084],
        [2,1810388],
		[3,1774972],
		[4,1800778],
		[5,1917004]
		....
	   ]
},
{
"label":"Visits",
"data":[[1,1074408],
        [2,1317860],
		[3,1299752],
		....
		]
},
....
]

View:

3. For simplicity, we are taking same app to consume web api, create new action in Home controller, add view without layout.
4. Download Flot, Add new flot folder in Scripts and Add flashcanvas folder and jquery.flot.min.js, excanvas.min.js files from the downloaded folder,
include Flot’s Javascript files in the page, Make sure jquery is already included before float js file.

    <!--[if lte IE 8]><script language="javascript" type="text/javascript" src="~/Scripts/flot/excanvas.min.js"></script><![endif]-->
    <script language="javascript" type="text/javascript" src="~/Scripts/flot/jquery.flot.min.js"></script>

HTML Structure:

We have a div as placeholder of chart as follows:

 <section style="width: 500px; margin: 10px; text-align:center;">
        <div id="placeholder" style="width: 500px; height: 300px;">
        </div>
        <h3 style="font-size:1.4em">Traffic Overview - 2012 </h3>
  </section>

5. Now, we are going to call Web-API action to get data and plot chart as follows:

       var dataurl = 'api/Chart/';
            // setup plot
            var options = {
                legend: {
                    show: true,
                    margin: 10,
                    backgroundOpacity: 0.9
                },
                points: {
                    show: true,
                    radius: 3
                },
                lines: {
                    show: true
                },
                grid: { hoverable: true, clickable: true },
                yaxis: { min: 0,tickFormatter:formatter },
                xaxis: { ticks: [[1,"Jan"],[2,"Feb"],[3,"Mar"],[4,"Apr"],[5,"May"],[6,"Jun"],[7,"Jul"],[8,"Aug"],[9,"Sep"],[10,"Oct"],[11,"Nov"],[12,"Dec"]]}

            };
            function formatter(val, axis) {
                return val.toString().replace(/\B(?=(\d{3})+(?!\d))/g, ",");
            }
            $.ajax({
                url: dataurl,
                method: 'GET',
                data: { year: 2012 },
                dataType: 'json',
                success: function (data) {
                    $.plot($("#placeholder"), data, options);
                }
            });

As we are getting month in int, so to convert it to name, ticks: [[1,"Jan"],[2,"Feb"],….is defined. Alternatively, Use flot time plugin and define mode:”time” in xaxis settings(example).

Tooltip:

To implement tooltip, bind the plothover event and show a div as tooltip dynamically as following:

     var previousPoint = null;
           $("#placeholder").bind("plothover", function (event, pos, item) {
              if (item) {
                if (previousPoint != item.dataIndex) {
                    previousPoint = item.dataIndex;

                    $("#tooltip").remove();
                    var x = item.datapoint[0],
                        y = item.datapoint[1].toString().replace(/\B(?=(\d{3})+(?!\d))/g, ",");
                    showTooltip(item.pageX, item.pageY, item.series.label + ": " + y);

                }
                }
            else {
                $("#tooltip").remove();
                previousPoint = null;
           }
            });

           function showTooltip(x, y, contents) {
        $('<div id="tooltip">' + contents + '</div>').css( {
            position: 'absolute',
            display: 'none',
            top: y + 5,
            left: x + 5,
            border: '1px solid #fdd',
            padding: '2px',
            'background-color': '#fee',
            opacity: 0.80
        }).appendTo("body").fadeIn(200);
    }

Output:

chart Creating a Chart with jQuery Flot and ASP.NET Web API

Now, You might want to provide functionality to allow user to select month, quarter or year range and display the chart accordingly, check following post to implement date range picker:

jQuery Date Range Picker To Select Year, Month Or Quarter Only

Hope, It helps.

Related posts:

  1. Using jQuery UI Autocomplete With ASP.NET Web API
  2. Passing Multiple Parameters to ASP.NET Web API With jQuery
  3. Using jQuery Featured Content Slider With ASP.NET Web API
  4. Add, Edit, Delete In jqGrid With ASP.NET Web API
  5. Month Range Picker using jQuery UI Datepicker

Passing Multiple Parameters to ASP.NET Web API With jQuery

$
0
0


ASP.NET MVC 4 Web API has limited support to map POST form variables to simple parameters of a Web API method. Web API does not deal with multiple posted content values, you can only post a single content value to a Web API Action method. This post explains the different ways to pass multiple parameters to Web API method.

Suppose You have following Web API method:

public HttpResponseMessage PostProduct(int Id,String Name,String Category, decimal Price)
{
		//...
}

and you are trying to call using jQuery:

  $.ajax({

  url: 'api/products',
  type: 'POST',
  data: { Id: 2012, Name: 'test', Category: 'My Category', Price: 99.5 },
  dataType: 'json',
  success: function (data) {
 alert(data);
 }

 });

Unfortunately, Web API can’t handle this request and you’ll get error. But if you pass parameters using query string, It’ll work:

 $.ajax({

  url: 'api/products?Id=2012&Name=test&Category=My%20Category&Price=99.5',
  type: 'POST',
  dataType: 'json',
  success: function (data) {
  alert(data);
   }

  });

But it’s not good solution and not applicable for complex objects. So here are the different ways to do it.

Using Model Binding:

Model: Create a model having all parameters to be passed

 public class Product
    {
        public int Id { get; set; }
        public string Name { get; set; }
        public string Category { get; set; }
        public decimal Price { get; set; }
    }

Controller: Use the model as argument type in the method

public HttpResponseMessage PostProduct(Product item)
 {
     item = repository.Add(item);
     var response = Request.CreateResponse<Product>(HttpStatusCode.Created, item);
     string uri = Url.Link("DefaultApi", new { id = item.Id });
     response.Headers.Location = new Uri(uri);
     return response;
 }

jQuery:

 $.ajax({
  url: 'api/products',
  type: 'POST',
  data: { Id: 2012, Name: 'test', Category: 'My Category', Price: 99.5 },
  dataType: 'json',
  success: function (data) {
                    ...
   }
 });

OR

  var product = {
             Id: 2012, Name: 'test', Category: 'My Category', Price: 99.5
 }

 $.ajax({
  url: 'api/products',
  type: 'POST',
  data: JSON.stringify(product),
  dataType: 'json',
  contentType: "application/json",
  success: function (data) {

  }
 });

Using Custom Parameter Binding:

ASP.NET Web API provides to create a custom Parameter Binding to extend the functionality and allows you to intercept processing of individual parameters. Check Rick’s Post to implement it.

JObject:

Web API now uses JSON.NET for it’s JSON serializer, So you can use the JObject class to receive a dynamic JSON result, cast it properly or parse it into strongly typed objects.

 public HttpResponseMessage PostProduct(JObject data)
        {
            dynamic json = data;
            Product item = new Product() {
                Id = json.Id,
                Name = json.Name,
                Category = json.Category,
                Price =json.Price
            };
            item = repository.Add(item);
            var response = Request.CreateResponse<Product>(HttpStatusCode.Created, item);
            string uri = Url.Link("DefaultApi", new { id = item.Id });
            response.Headers.Location = new Uri(uri);
            return response;
        }

OR

You can directly parse it into strongly typed class:

 public HttpResponseMessage PostProduct(JObject data)
        {

            Product item = data.ToObject<Product>();
            item = repository.Add(item);
            var response = Request.CreateResponse<Product>(HttpStatusCode.Created, item);
            string uri = Url.Link("DefaultApi", new { id = item.Id });
            response.Headers.Location = new Uri(uri);
            return response;
        }

FormDataCollection:

You can define FormDataCollection type argument and read parameter one by one manually using .Get() or .GetValues() methods (for multi-select values).

data: { Id: 2012, Name: ‘test’, Category: ‘My Category’, Price: 99.5 },

For above data:

 public HttpResponseMessage PostProduct(FormDataCollection data)
        {
            Product item = new Product() {
                Id = Convert.ToInt32(data.Get("Id")),
                Name = data.Get("Name"),
                Category = data.Get("Category"),
                Price = Convert.ToDecimal(data.Get("Price"))
            };
            item = repository.Add(item);
            var response = Request.CreateResponse<Product>(HttpStatusCode.Created, item);
            string uri = Url.Link("DefaultApi", new { id = item.Id });
            response.Headers.Location = new Uri(uri);
            return response;
        }

Query String:

We have seen to access multiple parameters from query string easily. It’s very helpful when you have to pass Model with additional parameters. So the additional parameters can be passed using query string.

Controller:

   public HttpResponseMessage PostProduct(Product item, string criteria)
        {
		//...
		}

jQuery:

 $.ajax({
   url: 'api/products?criteria=full',
   type: 'POST',
   data: JSON.stringify(product),
   dataType: 'json',
   contentType: "application/json",
   success: function (data) {
                }
            });

You can parse your query string explicitly in method If you have too many query string values to push into parameters.

  public HttpResponseMessage PostProduct(Product item)
        {
            var queryItems = Request.RequestUri.ParseQueryString();
            string criteria = queryItems["criteria"];
			//...
	}

Return Multiple Parameters:

Now, the next question is how to return multiple parameters. First thing is to use Model having all parameters and return its instance, but each time we can’t create model for each return type. If all parameters have same data-type then we can create and return a collection. But it might be different data-types. The simplest solution is use dynamic return type.

 public dynamic GetProducts()
        {
            var products = repository.GetAll() as IEnumerable<Product>;
            return new
            {
               Products = products,
               Criteria = "full"
            };
        }

Here is the response:

multiple return type Passing Multiple Parameters to ASP.NET Web API With jQuery

Share your opinion how you are passing multiple parameters to Web API. Hopefully, this behavior can be enabled in future release without being a breaking change.

Related posts:

  1. Using jQuery UI Autocomplete With ASP.NET Web API
  2. Add, Edit, Delete In jqGrid With ASP.NET Web API
  3. Creating a Chart with jQuery Flot and ASP.NET Web API
  4. Using jQuery Featured Content Slider With ASP.NET Web API
  5. Create Separate Web API’s Action for Mobile Request: ASP.NET MVC 4

Real-Time Chart using HTML5 Push Notification (SSE) and ASP.NET Web API

$
0
0


In my recent post, we have seen how to create basic chart using jQuery Flot and ASP.NET Web API. In this article, we’ll create a chart to display real-time updates using native HTML5 push notification. The HTML5 Server-Sent event (SSE) model allows you to push real-time data updates from the server to the browser.
 Real Time Chart using HTML5 Push Notification (SSE) and ASP.NET Web API

Generally, we are using Ajax methods to get new data at specified intervals. So, each time client has to call the server even there is no new data. It’s not efficient. With HTML5 Server-Sent requests, we can stream data from the server, with updates pushed from there without the code at client side having to keep requesting it and we can process new data in javascript code when it receives from the server.

Web API:

Here, our objective is to get random number at random time interval from server and plot the chart. We are going to start with Henrik F Nielsen’s post to develop an application utilizing a real HTTP push messaging infrastructure. We are defining content-type : text/event-stream and data in following format for SSE:

data: Hello World!\n
\n

There is no length limit for the text and empty line fires the event. We will generate random number instead of “Hello World” text to draw chart.

 public class ChartController : ApiController
    {
        private static readonly Lazy<Timer> _timer = new Lazy<Timer>(() => new Timer(TimerCallback, null, 0, 1000));
        private static readonly ConcurrentQueue<StreamWriter> _streammessage = new ConcurrentQueue<StreamWriter>();

        public HttpResponseMessage Get(HttpRequestMessage request)
        {
            Timer t = _timer.Value;
            HttpResponseMessage response = request.CreateResponse();
            response.Content = new PushStreamContent(OnStreamAvailable, "text/event-stream");
            return response;
        }
        private static void TimerCallback(object state)
        {
            Random randNum = new Random();
            foreach (var data in _streammessage)
            {

                data.WriteLine("data:" + randNum.Next(30, 100) + "\n");
                data.Flush();

            }
            //To set timer with random interval
            _timer.Value.Change(TimeSpan.FromMilliseconds(randNum.Next(1,3)*500), TimeSpan.FromMilliseconds(-1));

        }
        public static void OnStreamAvailable(Stream stream, HttpContentHeaders headers, TransportContext context)
        {
            StreamWriter streamwriter = new StreamWriter(stream);
            _streammessage.Enqueue(streamwriter);
        }
    }

Here we are changing timer interval randomly to create more real environment.

View:

For simplicity, we are taking same app to consume web api, create new action in Home controller, add view without layout.
Download Flot and add jquery.flot.min.js, excanvas.min.js files from the downloaded folder, Make sure jquery is already included before float js file.

<!--[if lte IE 8]><script language="javascript" type="text/javascript" src="~/Scripts/excanvas.min.js"></script><![endif]-->
<script language="javascript" type="text/javascript" src="~/Scripts/jquery.flot.min.js"></script>

HTML:

	<div style="text-align: center">
        <h1>
            Trade Price: <span id="priceHolder"></span>
        </h1>
        <div id="placeholder" style="width: 600px; height: 300px; margin: 0 auto">
        </div>
    </div>

placeholder is used for chart and priceHolder is to display current price.

EventSource API:

To start receiving server notifications, we simply open a connection to an SSE URI and setup our callbacks in javascript:

 if (!!window.EventSource) {
                var source = new EventSource('http://localhost:49999/api/chart/');
                source.addEventListener('message', function (e) {
                    console.log(e.data);
                    update(parseInt(e.data, 10));
                }, false);

                source.addEventListener('open', function (e) {
                    console.log("open!");
                }, false);

                source.addEventListener('error', function (e) {
                    if (e.readyState == EventSource.CLOSED) {
                        console.log("error!");
                    }
                }, false);

            } else {
                // not supported!
            }
 

Chart:

When we get new number from server side, the first number is removed, new number is pushed, the points are re-indexed and assigned to Flot chart.


            var ypt = [], totalPoints = 30;

            function initData() {
                for (var i = 0; i < totalPoints; ++i)
                    ypt.push(0);
                return getPoints();

            }
            function getData(data) {
                if (ypt.length > 0)
                    ypt = ypt.slice(1);
                ypt.push(data);
                return getPoints();
            }
            function getPoints() {
                var ret = [];
                for (var i = 0; i < ypt.length; ++i)
                    ret.push([i, ypt[i]]);
                return ret;
            }

            // setup plot
            var options = {
                series: { shadowSize: 0, bars: {
                    show: true,
                    barWidth: 0.75,
                    fill: 1
                }
                }, // drawing is faster without shadows
                yaxis: { min: 0, max: 100,
                    tickFormatter: function (val, axis) {
                        return '$' + val;
                    }
                },
                xaxis: { show: false }
            };

            var plot = $.plot($("#placeholder"), [initData()], options);
            function update(data) {
                $('#priceHolder').text('$' + data);
                plot.setData([getData(data)]);
                plot.draw();
            }

You can download source code from Github.
Hope, you enjoy it. Share your opinion or suggestion how you are displaying real-time updates.
Reference:
Recent ASP.NET Web API Updates – April 24
Native HTML5 push notifications with ASP.NET Web API and Knockout.js

No related posts.

Viewing all 116 articles
Browse latest View live